Les organisations modernes doivent sécuriser les accès sans freiner le métier.
Les modèles classiques, comme le Role-Based Access Control (RBAC), ont montré leurs limites : multiplication des rôles, exceptions à répétition, gouvernance complexe.
Le Policy-Based Access Control (PBAC) répond à ces enjeux.
Ce modèle de nouvelle génération prend des décisions d’accès dynamiques, basées sur le contexte plutôt que sur des rôles statiques.
Résultat : une sécurité plus flexible, précise et traçable, trois piliers essentiels de tout projet IAM moderne.
Du rôle à la politique : une révolution naturelle
Le RBAC a longtemps dominé la gestion des accès.
Solide dans des environnements stables, il devient rigide dès que les utilisateurs, les applications ou les données évoluent rapidement.
L’attribute-Based Acces Control (ABAC) a introduit plus de contexte grâce ayx attributs (département, localisation, fonction).
Le PBAC va plus loin : il traduit la logique métier en politique combinant attributs, conditions et contexte pour des décisions d’accès en temps réel.
Exemple :
RBAC : « Alice a le rôle RH »
PBAC : » Autoriser Alice à consulter les données RH si elle appartient au service RH et si la demande est effectuée pendant des heures de travail. »
Comment fonctionne le PBAC
Les composants essentiels du PBAC
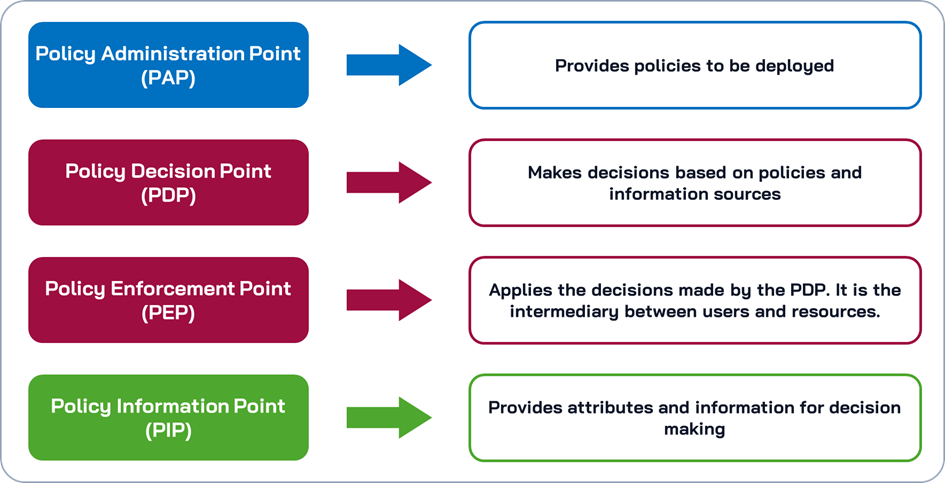
Le modèle PBAC repose sur quatre points clés, qui structurent la chaîne de décisions d’accès :
PAP – Policy Administration Point : point central où les politiques sont crées, gérées et distribuées.
PDP – Policy Decision Point : moteur de décision, il évalue les politiques et détermine si l’accès est autorisé.
PEP – Policy Enforcement Point : il applique la décision du PDP sur la ressource concernée.
PIP – Policy Information Point : il fournit les attributs et les informations contextuelles nécessaires à la décision
Ensemble, ces composants forment un système cohérent où chaque requête d’accès est évaluée, validée et tracée en temps réel.
PBAC en pratique : l’exemple d’Alice
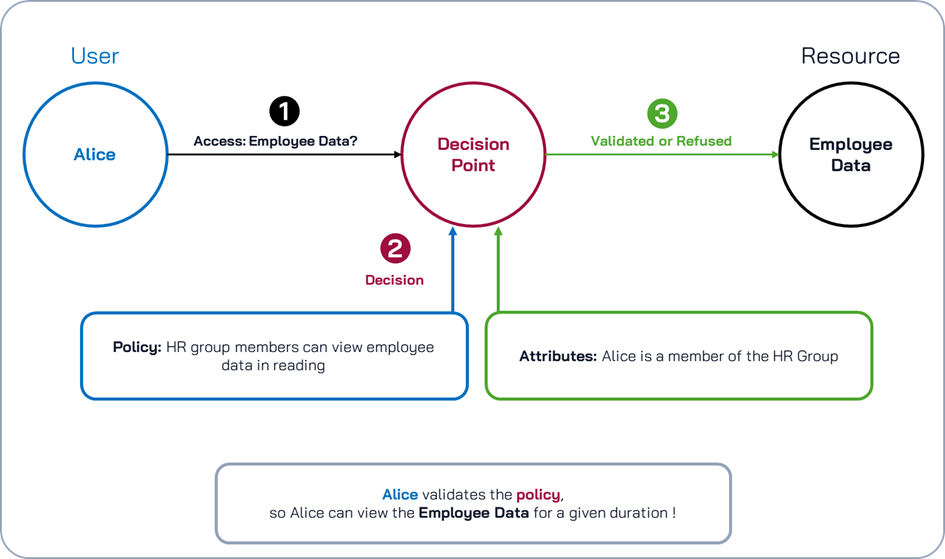
Prenons un cas concret :
Demande : Alice veut accéder aux données des employés
Décision : Le PDP regarde les politiques actives et les attributs d’Alice :
Politique : « Le groupe RH peut accéder aux données des employés en lecture seule »
Attribut : « Alice est membre du groupe RH »
Résultat : Le PDP autorise l’accès en lecture d’Alice et le PEP applique cette décision
Si Alice quitte le groupe RH, sa prochaine demande sera refusée automatiquement, sans intervention manuelle.
Le PBAC assure ainsi un contrôle dynamique et contextuel des autorisations.
Les prérequis d’un projet PBAC réussi
Le PBAC est un modèle puissant, mais il exige une maturité IAM avancée et une gouvernance solide.
Sa mise en oeuvre repose sur plusieurs clés :
Une architecture IAM intégrée : Interconnexion entre IAG, AM et sources de données.
Une modélisation des besoins métier claire : savoir QUI accède à QUOI, et dans QUELLES conditions.
Une gouvernance rigoureuse : politique conçue, testée et documentée comme du code.
La réussite passe par une approche progressive : commencer petit, tester, ajuster, puis étendre.
Quand adopter le PBAC ?
Le PBAC s’adresse particulièrement aux organisations qui :
évoluent sous fortes contraintes réglementaires (finances, santé, secteur public) ;
gèrent plusieurs applications, partenaires ou environnements ;
disposent déjà d’une base IAM mature (IAG, AM, PAM).
C’est aussi un levier stratégique pour le Zéro Trust, où chaque accès est continuellement vérifié selon le contexte et le niveau de risque.
PBAC VS autres modèles
Modèle
Base
Force
Limitation
Maturité IAM
RBAC
Rôles
Simple à comprendre
Rigide, difficile à évoluer
Intermédiaire
ABAC
Attributs
Contextuelle
Difficile à gouverner
Avancé
PBAC
Politiques
Dynamique, évolutif, auditable
Complexe à implémenter
Expert
De nombreuses entreprises adoptent une approche hybride : RBAC pour les accès standards, PBAC pour les autorisations sensibles et à forte granularité.
Vers une gouvernance des accès modernes
Le PBAC marque une évolution majeure dans la gestion des identités et des accès.
Plutôt que de maintenir des milliers de rôles, il permet de centraliser les politiques, d’en améliorer la traçabilité et d’aligner la sécurité sur les besoins métiers.
Bien implémenté, le PBAC devient le moteur décisionnel de la gouvernance des accès, garantissant que chaque autorisation est explicable et contextualisée.
En résumé, le PBAC illustre parfaitement la philosophie Ariovis : « Security meets Business ».
Ariovis poursuit l’amélioration de son extranet pour offrir une expérience toujours plus fluide et utile à chacun de ses utilisateurs.
Ce mois d’octobre, Ariovis met l’accent sur la clarté et la transmission : un parcours candidat repensé pour plus de lisibilité, une base de connaissance réorganisée pour un accès simplifié aux articles, et une refonte complète de la formation ACIA, pensée pour accompagner les premiers pas dans l’IAM.
Amélioration
Recrutement : Le process de recrutement a été retravaillé pour rendre la candidature plus fluide et la communication plus claire à chaque étape avec le candidat
Académie : Refonte de la formation ACIA
La formation débutante IAM fait peau neuve : contenus repensés, progression simplifiée, et une meilleure introduction aux fondamentaux de l’IAM.
Base de connaissance : La base de connaissance Ariovis évolue ! L’accès aux articles a été repensé pour plus de clarté et d’efficacité. Une organisation par thématiques, des interfaces allégées et une meilleure lisibilité vous permettent désormais de trouver la bonne information en un coup d’œil.
Phishing is one of the most widespread cyberattacks. And also one of the most effective: every day, thousands of people click on a fake link, share their login credentials, or download malware… without even realizing it.
The good news is that it’s entirely possible to protect yourself effectively from phishing, without spending a penny. You just need to be aware of the best practices and apply them daily.
1. Learn to recognize phishing attempts
The first line of defense against phishing is you. And it starts with being a little observation.
Here are some typical signs of a fraudulent message:
A strange or misspelled email address
An urgent tone: « Your account will be suspended », « Immediate action required »
● A link to click that leads to a suspicious site
An unexpected attachment
● Spelling or formatting errors
Tip: hover your mouse over the link without clicking. You’ll see the real URL. If it doesn’t match the official site, run away.
2. Always verify the sender… and the context
Receiving an email from a service you don’t use? An invoice from a company you don’t know? A message from a « friend » with a strange tone?
In 90% of cases, it’s phishing.
Ask yourself these simple questions:
Was I expecting this message?
Is the sender’s address legitimate?
Is the message’s tone consistent with the company or the person?
When in doubt, don’t click on anything. Go directly to the official website concerned, or contact the sender through another channel.
3. Enable two-factor authentication (MFA)
Even if you fall into the trap of a fake site, it’s not too late. The best defense to prevent your accounts from being compromised is two-factor authentication.
For free, you can enable it on:
Gmail, Outlook, Yahoo
Social networks (Facebook, Instagram, TikTok, etc.)
E-commerce or online service sites
It adds an additional verification: a code by SMS or via an app like Google Authenticator.
. A hacker who only has your password won’t be able to go further.
4. Update your devices
An updated system = fewer exploitable vulnerabilities.
Whether it’s your computer, phone, or even your browser, remember to:
● Install updates as soon as they’re available
● Use antivirus software (even free)
● Delete applications you no longer use
Updates often include invisible but essential security patches.
5. Use filtering DNS against malicious sites
A lesser-known but very effective trick: change your internet box’s DNS to use a service that automatically blocks phishing sites.
For example, DNS4EU is a free European solution that you can easily configure at home.
Ariovis has written clear guides, adapted to each operator:
After years of watching the power struggle between American and Asian tech giants, the EU is now trying to regain control over its data, infrastructure, and cybersecurity. This awakening, still fragile, is taking shape through new regulations, sovereign tech initiatives… and a clear ambition: no longer be subject to the rules of Silicon Valley.
But is this “resistance” credible? Where is it being deployed? And can it truly reverse decades of technological dependence?
Let’s take a closer look at this ongoing reconquest.
A deeply rooted American dominance
Since the early days of the web, the United States has shaped the global internet.
Google, Apple, Meta, Amazon, Microsoft, the main platforms, everyday tools, cloud services, and even submarine cables are mostly controlled by American firms, often closely tied to intelligence and surveillance interests.
The consequences?
Massive dependency for European businesses and public services
Systematic exposure to U.S. extraterritorial laws (like the Cloud Act)
A continuous flow of our personal data to servers often located outside the EU
This imbalance is no longer just economic it’s strategic.
Europe fights back: a multi-pronged approach
Faced with this reality, the European Union has chosen not to stand by. In recent years, it has launched a series of concrete initiatives to reclaim digital sovereignty:
Strong regulations: GDPR, DSA, DMA
The GDPR (General Data Protection Regulation), adopted in 2016, laid the foundation for the right to digital privacy.
The DSA (Digital Services Act) and DMA (Digital Markets Act) aim to regulate large platforms and rebalance the digital playing field.
Sovereign technology initiatives
GAIA-X: a European cloud designed to host strategic data
Chips Act: to bring some semiconductor manufacturing back to Europe
EU Digital Identity Wallet: a secure European digital ID
European-built alternatives: like DNS4EU
Less publicized but just as strategic, DNS4EU (DNS for Europe) is an initiative to build a sovereign DNS service that aligns with European standards — and remains independent from major U.S. players.
DNS4EU: A quiet yet powerful symbol
DNS is the internet’s invisible directory. It’s what enables your device to turn a domain name (like ariovis.fr) into an IP address your browser can understand.
Today, this process mostly runs through DNS servers owned by Google or Cloudflare.
DNS4EU offers a European alternative:
Hosted within the EU
Compliant with GDPR
Not commercially exploited
Equipped with security filters to block digital threats
It’s a small technical change but a big political statement: Europe still has the capacity to build its own infrastructure.
And this change can start right at home, by reconfiguring your router’s DNS settings.
Taking back control starts at home
Digital sovereignty isn’t just an institutional issue, it’s also about individual choices.
Changing your DNS, protecting your data, understanding who collects what and where it’s sent these simple actions are modern-day digital citizenship.
At Ariovis, we help you make informed choices with step-by-step guides to install DNS4EU based on your internet provider:
Europe doesn’t (yet) have its own Google, Amazon, or mass-market operating systems. But it’s laying the groundwork for an alternative digital model — one that’s more ethical, more controlled, and more transparent.
DNS4EU, GAIA-X, GDPR… these are building blocks of a new digital sovereignty.
And for this resistance to become a viable alternative, it must translate into everyday practice. Individuals, businesses, institutions, everyone has a role to play in restoring meaning to the word “independence” in the digital world.
DNS4EU is a free European DNS service supported by the EU, designed to ensure greater safety, privacy, and performance.
Changing your DNS is like setting up a global parental control filter for your Wi-Fi — without installing anything.
4. Really talk with your kids
Let’s be honest: no tool can replace communication.
You don’t need to be a cybersecurity expert to pass on the right habits, just start the conversation.
Simple rules to repeat often:
Never share your real name, school, or home address
Don’t reply to strangers online
Tell your parents right away if something shocking appears on screen
You can also watch a short video together, or ask an open-ended question like:
“So… do you know what an online scam looks like?”
5. Teach good habits… in a fun, simple way
Cybersecurity doesn’t have to be scary or complicated.
With the right words and tools, you can start teaching kids how to stay safe online, and make it a shared moment.
Instead of scolding or silently watching over their shoulder, try:
asking questions about real-life situations (“What would you do if someone messaged you in a game?”)
discussing safe behaviors together
or watching a short illustrated video with them to spark the conversation
At Ariovis, we believe that awareness comes through education and repetition, not fear.
That’s why we regularly share practical, age-appropriate tips on Instagram, designed for both kids and parents!
A smart move: follow @ariovis_officielto get weekly insights on how to make the internet safer for the whole family.
In summary
Protecting your children online doesn’t require a big budget or technical skills.
With a bit of common sense, a few simple settings, and open conversation at home, you can already provide a much safer digital environment.
Are you an SFR customer looking to enhance the security and privacy of your internet connection? Configuring your SFR box to use DNS4EU servers is an effective solution. At Ariovis, experts in cybersecurity and access management, we’re here to guide you through a simple tutorial to install DNS4EU on your SFR box.
Why Use DNS4EU on Your SFR Box ?
DNS servers play a crucial role by translating domain names into IP addresses. By default, your SFR box uses the operator’s DNS servers, which do not always offer optimal personal data protection.
DNS4EU, supported by the European Commission, provides a secure and privacy-focused DNS infrastructure across Europe. Switching to DNS4EU allows you to :
Protect your personal data
Enjoy safer browsing
Benefit from a reliable and high-performance DNS service
Steps to Configure DNS4EU on Your SFR Box
Follow this step-by-step Ariovis guide to change your DNS settings on an SFR box in just a few minutes.
1. Log in to Your SFR Box Interface
Make sure you’re connected to the SFR network (Wi-Fi or Ethernet).
Open your browser and go to:
http://192.168.1.1
Log in using your credentials. By default, the username is usually admin, and the password is written on your box’s label.
2. Access the DNS Settings
In the interface, go to Local Network or Advanced Settings.
Look for DNS Servers or DNS Configuration.
3. Configure DNS4EU servers on your box SFR
Here are the 5 official DNS4EU addresses you can set on your SFR box for enhanced privacy and network security:
In your SFR box interface, go to Advanced Settings > Network.
Find the DNS Servers section, and replace the existing values with the five DNS4EU addresses above.
Save your changes and restart your box SFR and connected devices to apply the new DNS settings.
These five servers (two IPv4 and three IPv6) offer a more secure, reliable, and privacy-respecting browsing experience, fully aligned with European standards.
Need more help? Check out our full tutorial to guide you through the setup based on your SFR box model (4, 5, or 6).
4. Save and Restart the Box
Save your changes.
To apply the new configuration, restart your SFR box as well as all connected devices.
How to Verify DNS4EU is Active ?
To confirm your SFR box is using DNS4EU, perform a simple test:
If the DNS server shown is one of the DNS4EU addresses (51.81.216.60 or 51.81.216.70), the configuration is successful.
Ariovis: Your Cybersecurity Partner for a Safer Network
Changing your DNS is an important first step toward protecting your home network. At Ariovis, we help individuals and businesses with cybersecurity projects, access management (IAM), and network infrastructure security.
Need personalized guidance? Reach out to us or visit our website at ariovis.fr
Conclusion
Installing DNS4EU on an SFR box is a simple and effective way to improve the privacy and security of your internet connection. Follow this Ariovis guide for a quick and reliable setup, and browse with peace of mind using a European DNS service designed to protect your data.
Important information This article is currently being updated. Some steps may no longer match your device’s current interface. We invite you to consult Free’s official support page.
Additional articles on configuring DNS4EU on Windows, Android, macOS and iPhone will be published soon.
Are you a Freebox user looking to enhance your online privacy and security? Installing DNS4EU on your Freebox is a smart choice. At Ariovis, experts in cybersecurity and identity access management (IAM), we’ll walk you through how to configure your Freebox to use DNS4EU—a secure, privacy-respecting European DNS alternative.
Why Choose DNS4EU for Your Freebox?
DNS servers play a critical role in your browsing experience: they translate domain names (e.g., ariovis.fr) into IP addresses your devices can understand. By default, your Freebox uses Free’s DNS servers, but these don’t always offer optimal privacy.
DNS4EU is a European DNS service backed by the European Commission, designed to :
Protect your personal data,
Secure your online browsing,
Deliver reliable performance through a robust European infrastructure.
Switching your Freebox’s DNS to DNS4EU is a simple yet powerful way to boost your everyday cybersecurity.
How to Set Up DNS4EU on Your Freebox: Step-by-Step
Here’s the method recommended by Ariovis experts to configure DNS4EU on your Freebox in just a few minutes.
1. Log In to the Freebox Management Interface
First, ensure you’re connected to your Freebox network. Open a web browser and go to:
http://mafreebox.freebox.fr
Log in using your Freebox password. If you’ve never changed it, it’s displayed on your Freebox Révolution (touchscreen) or written in your contract.
2. Go to Network and DNS Settings
Once logged in :
Click on Freebox Settings,
Then open Port Management and Local Network, or directly DHCP, depending on your Freebox version,
Locate the DNS server configuration fields.
3. Configure DNS4EU servers on your Freebox
Here are the 5 official DNS4EU addresses you can set on your Freebox for enhanced privacy and network security:
In your Freebox interface, go to Advanced Settings > Network.
Find the DNS Servers section, and replace the existing values with the five DNS4EU addresses above.
Save your changes and restart your Freebox and connected devices to apply the new DNS settings.
These five servers (two IPv4 and three IPv6) offer a more secure, reliable, and privacy-respecting browsing experience, fully aligned with European standards.
Need more help? Check out our full tutorial to guide you through the setup based on your Freebox model (4, 5, or 6).
4. Save and Restart
Save your changes. To apply the new settings, restart your Freebox and all connected devices (computers, smartphones, etc.).
Verify Your DNS4EU Configuration
To check whether your Freebox is using DNS4EU, you can run a quick test:
If the DNS server shown matches 51.81.216.60 or 51.81.216.70, you’re all set.
Ariovis: Your Cybersecurity Partner for Safer Browsing
Switching your DNS servers is a crucial first step toward improving your home network’s security. At Ariovis, we support individuals and businesses in their cybersecurity efforts, from access management (IAM) to securing IT infrastructure.
To further protect your digital environment, feel free to contact us or visit ariovis.fr to discover our services and expert advice.
Conclusion
Installing DNS4EU on your Freebox is a simple and effective way to boost your online privacy and security. Follow Ariovis’ guide for a smooth setup and enjoy a safer internet experience thanks to a trusted European DNS provider.
Want to learn more about cybersecurity or get personalized guidance ? Ariovis is here to help.
OpenID Connect is an identity layer built on top of the OAuth 2.0 protocol. It allows applications to verify the identity of users based on the authentication performed by an external provider. This is especially useful when you want to secure applications without managing your own user credentials. Keycloak is an open-source Identity and Access Management (IAM) solution that makes it easy to set up a robust OpenID Connect provider.
In this article, we’ll discuss how to connect your own python flask application to any OpenID Connect provider and how to configure your own with Keycloak. You’ll configure a Keycloak server, register an OIDC client, and build a simple Flask application that authenticates users through Keycloak using industry-standard protocols.
By the end of this guide, you will have:
A working Keycloak instance running in Docker
A Flask application secured with OpenID Connect
A complete login and logout flow
A structured and scalable Flask project architecture
This setup is ideal for developers looking to add authentication to their Python web apps using modern identity standards.
Prerequisites
Before you begin, here are the basic prerequisites to use this guide:
With both tools in hand, we can safely start our project.
Understanding what is Open ID Connect ?
If you are already familiar with OpenID Connect, you can pass this section. If you aren’t or want a refresher on the concept, this section will give you a quick overview of how OpenID Connect works, why it’s useful, and what role it plays in securing your application.
So OpenID Connect is built on the open Oauth2 protocol. It is a globally adopted web standard used by major tech players like Google, Microsoft, and Apple. It enables user identity verification by relying on the identity and authentication services of an external provider.
This approach eliminates the need for a dedicated user database, simplifying the way you implement authentication and authorization in your apps.
Fully interoperable, OpenID Connect operates through a RESTful HTTP interface with JSON formatting. Chances are, you already use this standard daily—any time you click a “Sign in with Google” button instead of entering separate credentials, you’re leveraging OpenID Connect.
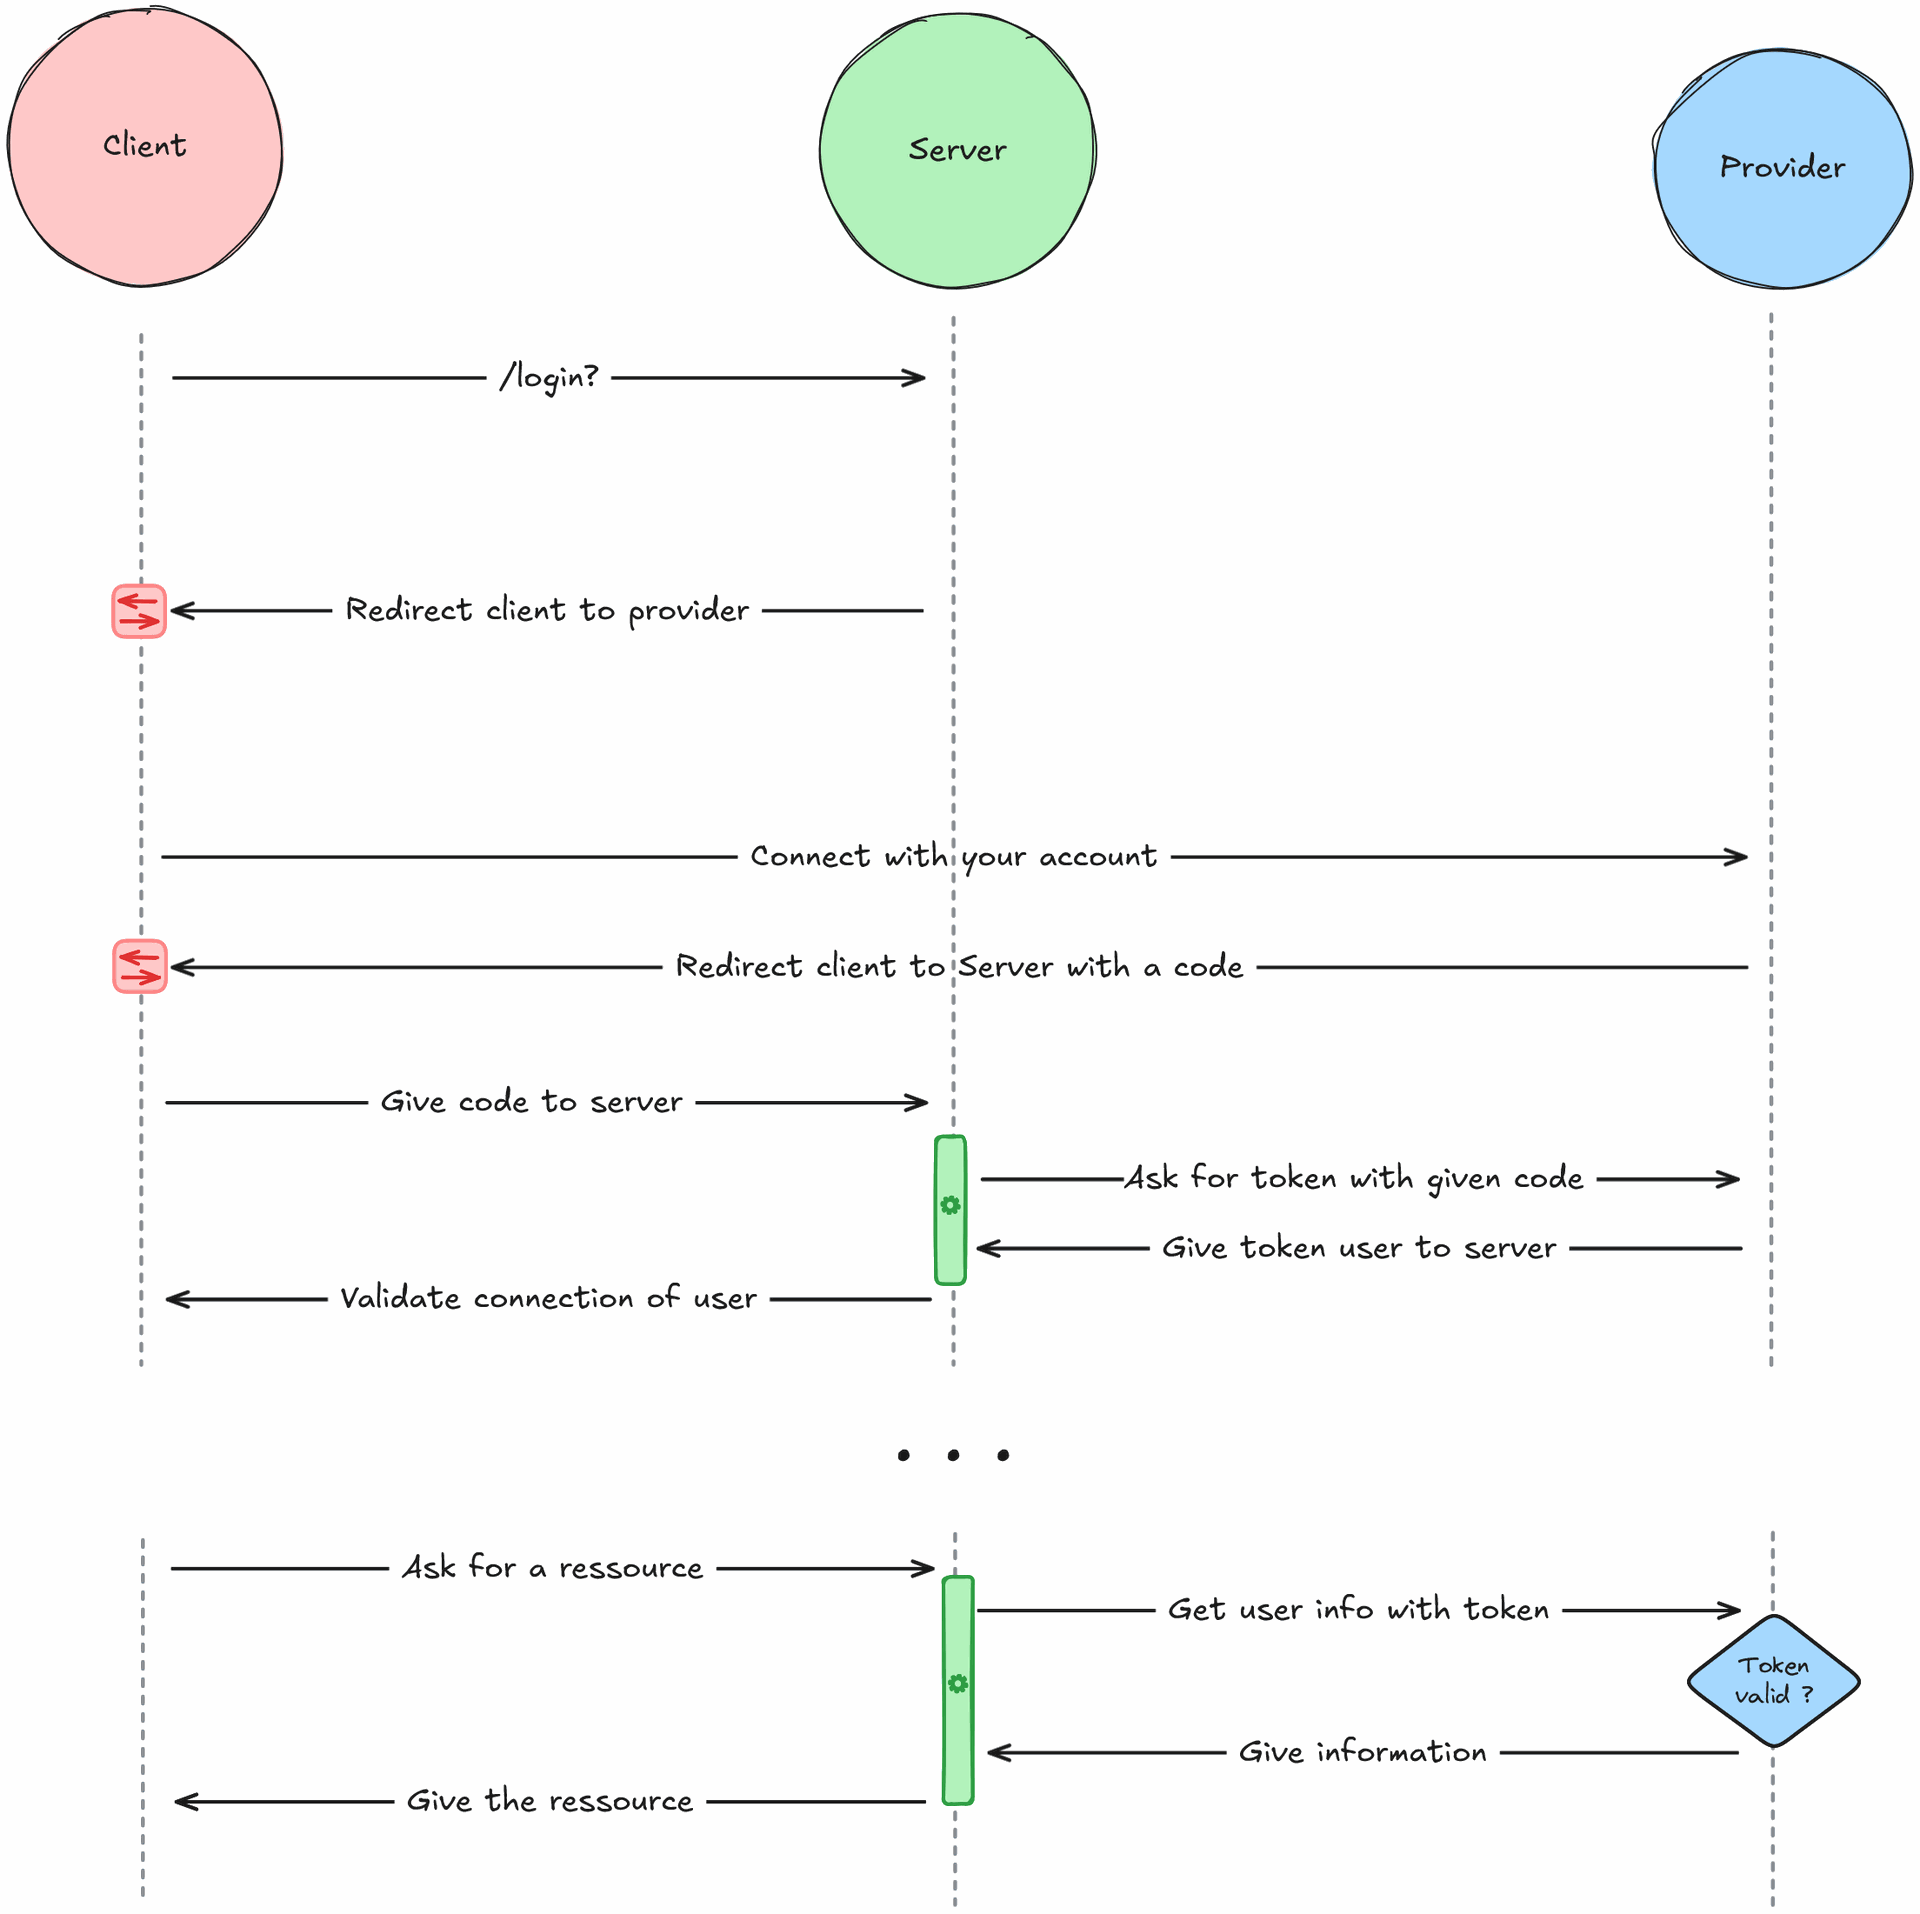
Now, if you aren’t familiar with Oauth2 protocol either, here is the detailed flow of information that happens when you use OpenID Connect.
When you log into the service, you are first redirected to the provider to authenticate with your account. A code or proof of authentication will be given to you in exchange, which you will give to your service. This service can then exchange the code for a token with the provider, which will represent your identity.
Each time the service will need to get information about your profile, it will ask the provider for the information and give you access to resources accordingly to your identity.
This is called the authorization code flow of OpenID Connect. By this design, the token is never exposed to the frontend, reducing the possible angle of attacks and identity thefts.
What is Keycloak ?
Keycloak is a fully open-source identity and access management solution that provides all-in-one support for authentication and authorization. Designed for flexibility, it enables developers to secure applications with minimal effort, offering features like single sign-on (SSO), social login, and user management out of the box.
We will use Keycloak to play the role of the Identity Provider in our project. With it, you will be able to create and manage your users, fully customize the authentication flow and link your users to all your projects faster. This solution is also lightweight and scalable thanks to its clustering ability if you plan to implement it on bigger projects.
All configurations will be done through this admin console, so no specialized skills are required to use it.
Configure Keycloak
The first step of this guide is the configuration of Keycloak. For this we will use Docker as this facilitate the installation step.
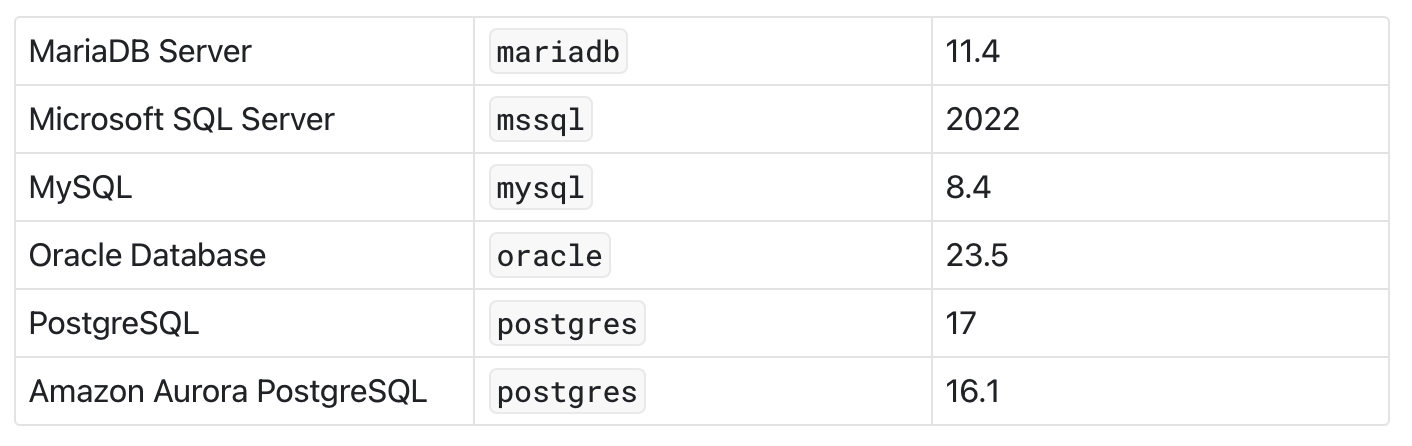
To work, Keycloak need to store its data in a database. For this article, we will use Postgres, but you can use any database in the following list:
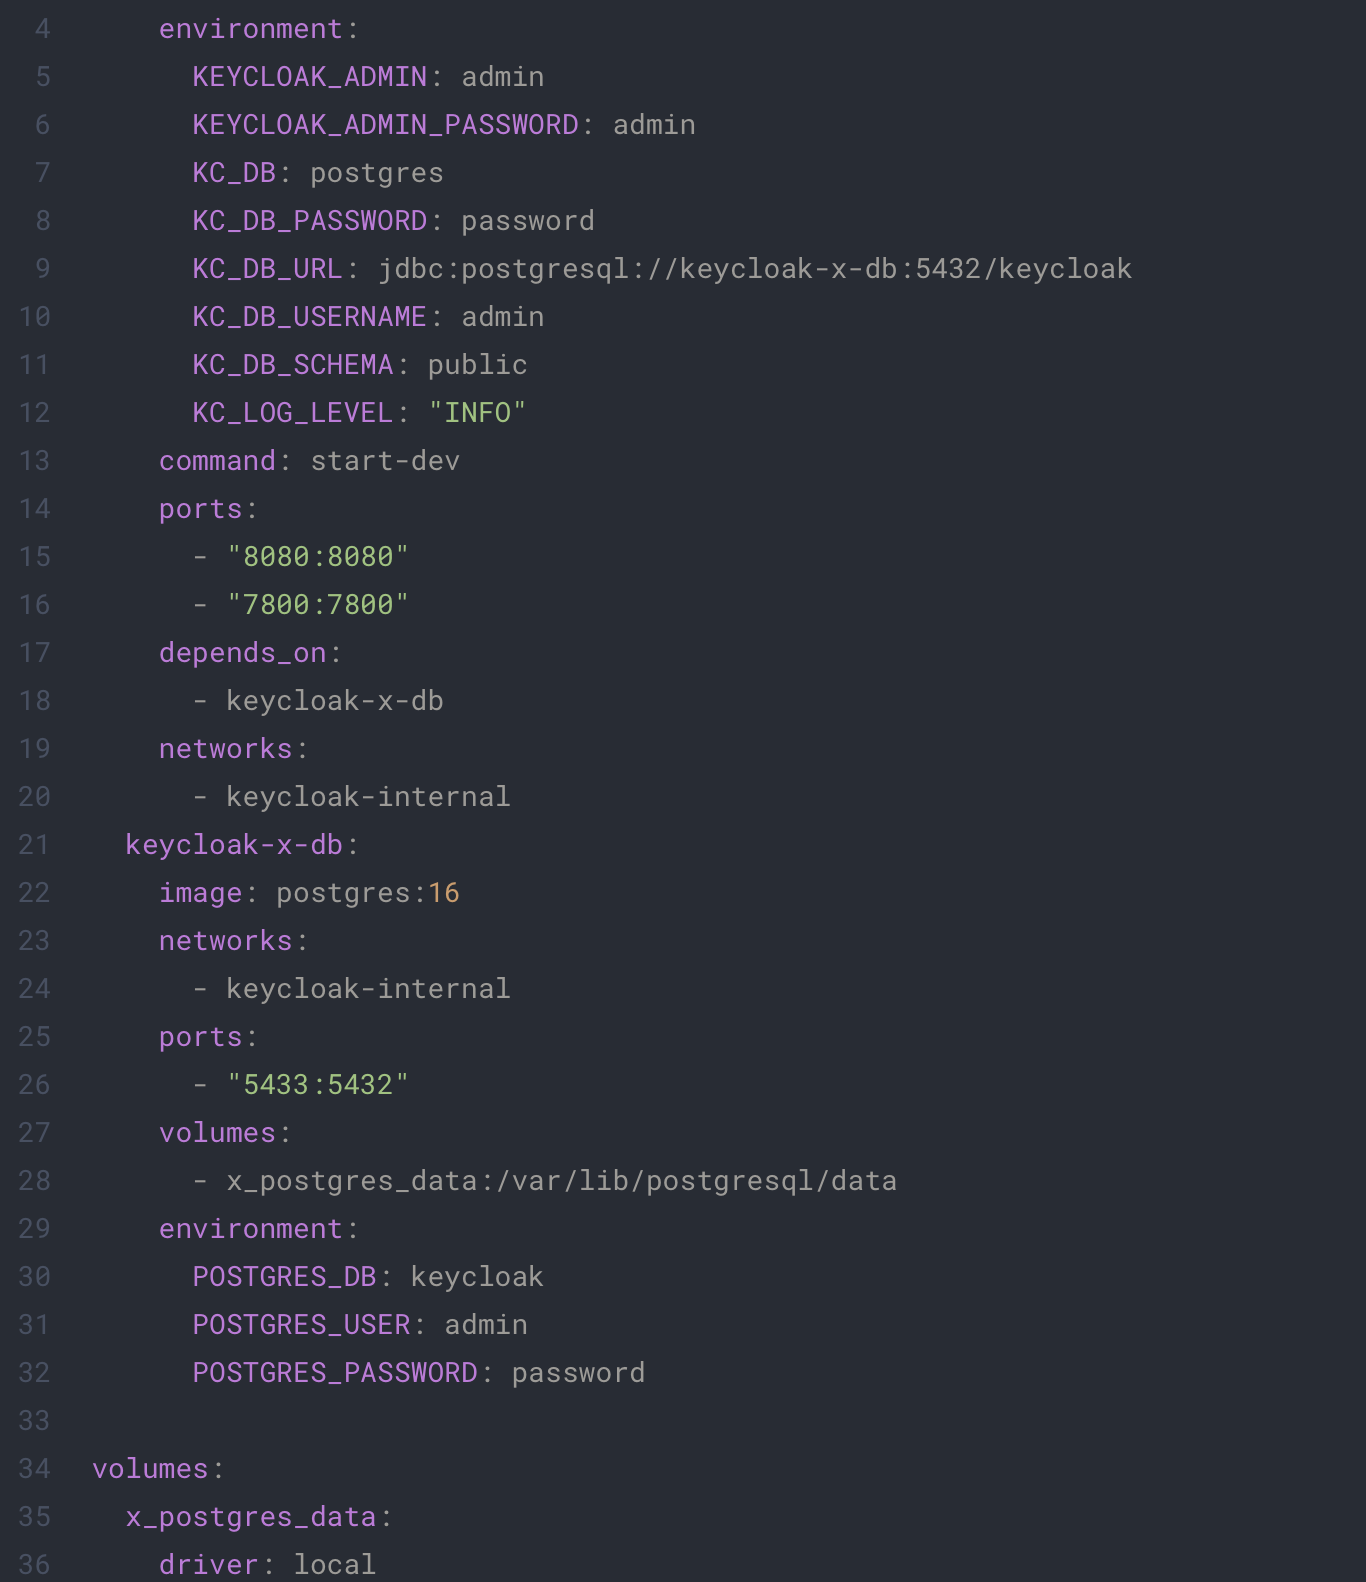
To orchestrate all configuration, we will use the following docker-compose.yaml:
This file is the configuration of your Keycloak and Postgres environment, be sure to change the user and password parameters accordingly to your preferences.
Run the following command to launch a basic instance of Keycloak on your machine.
docker-compose up
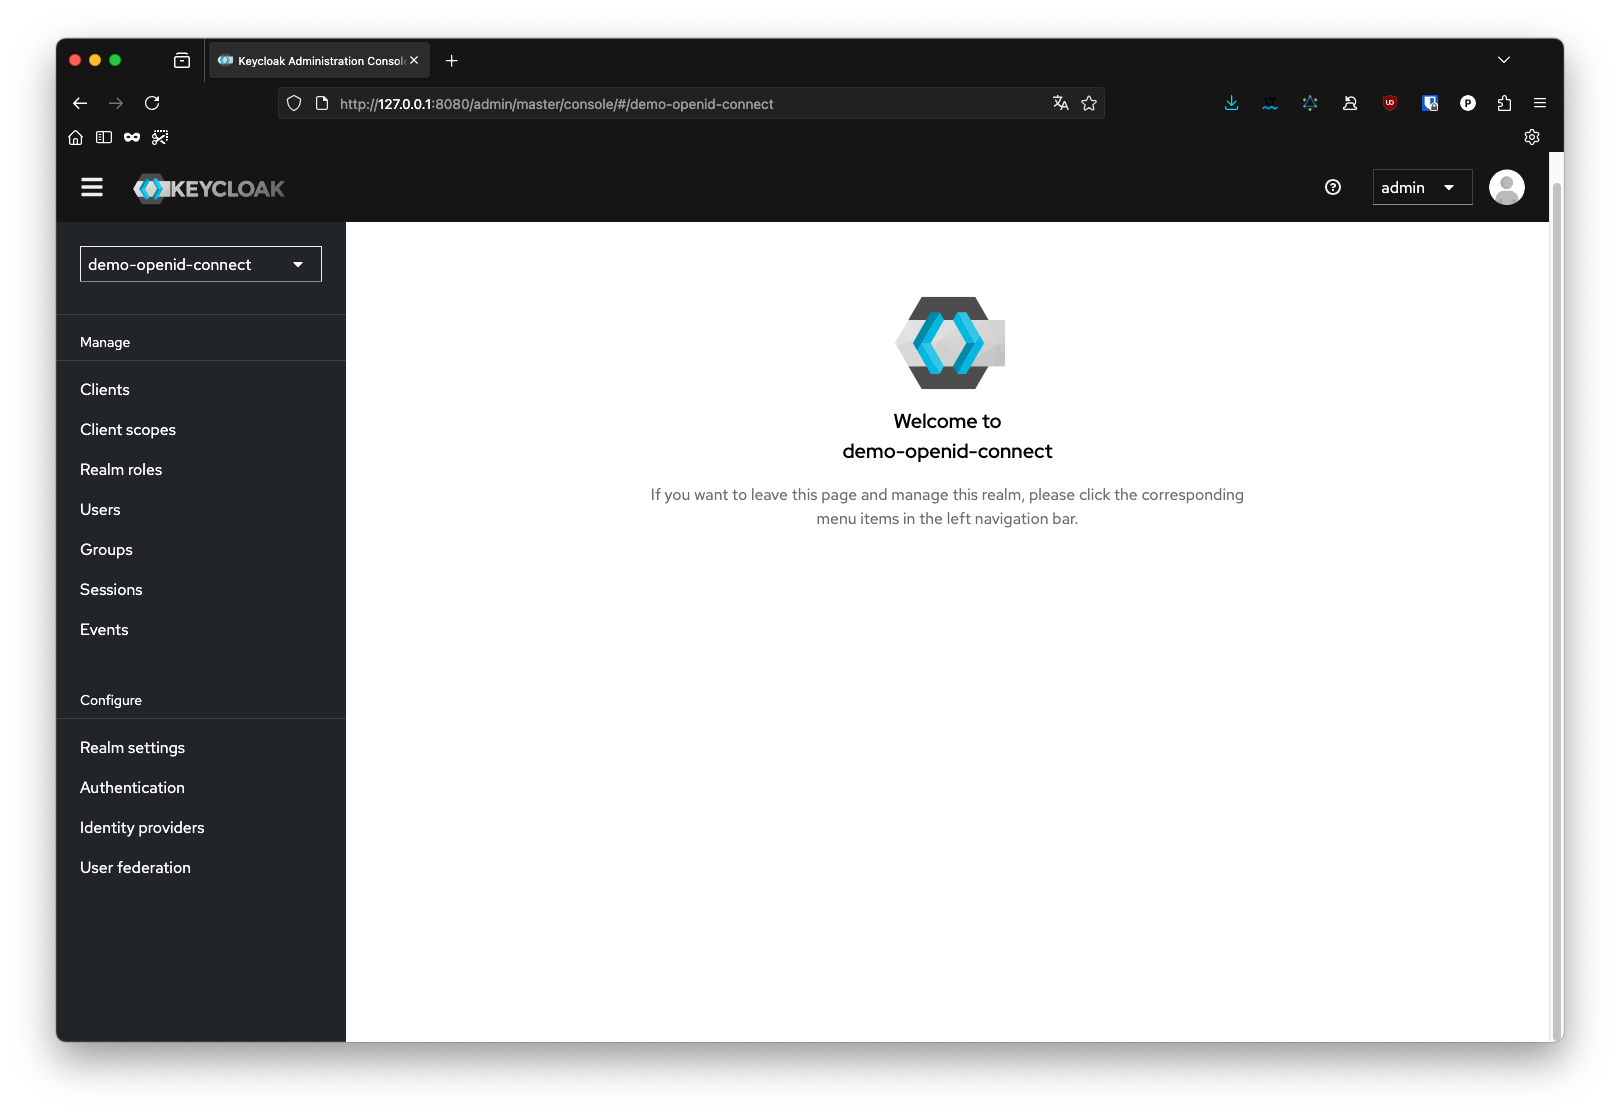
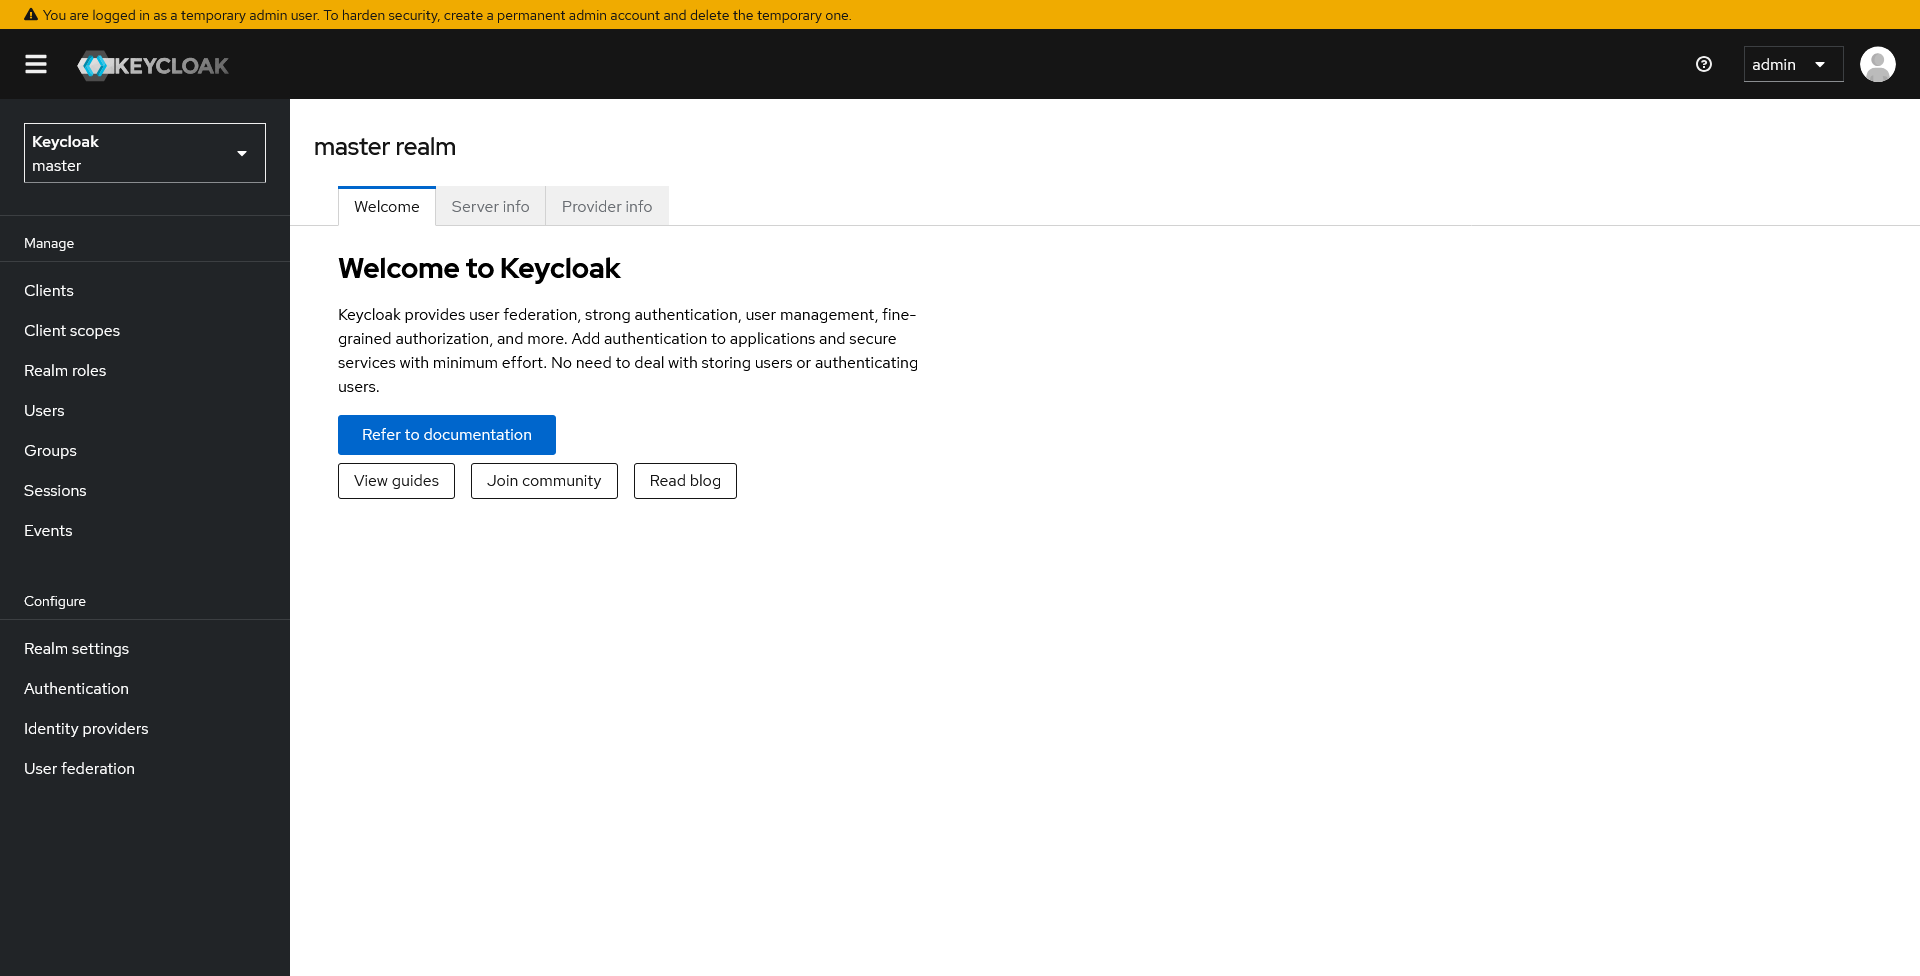
Once the container is fully started, you can access the admin console at the following address: http://localhost:8080. You can connect to the administration console and should get to this page:
From this console, you can administrate all your connexion, users, clients, and more…
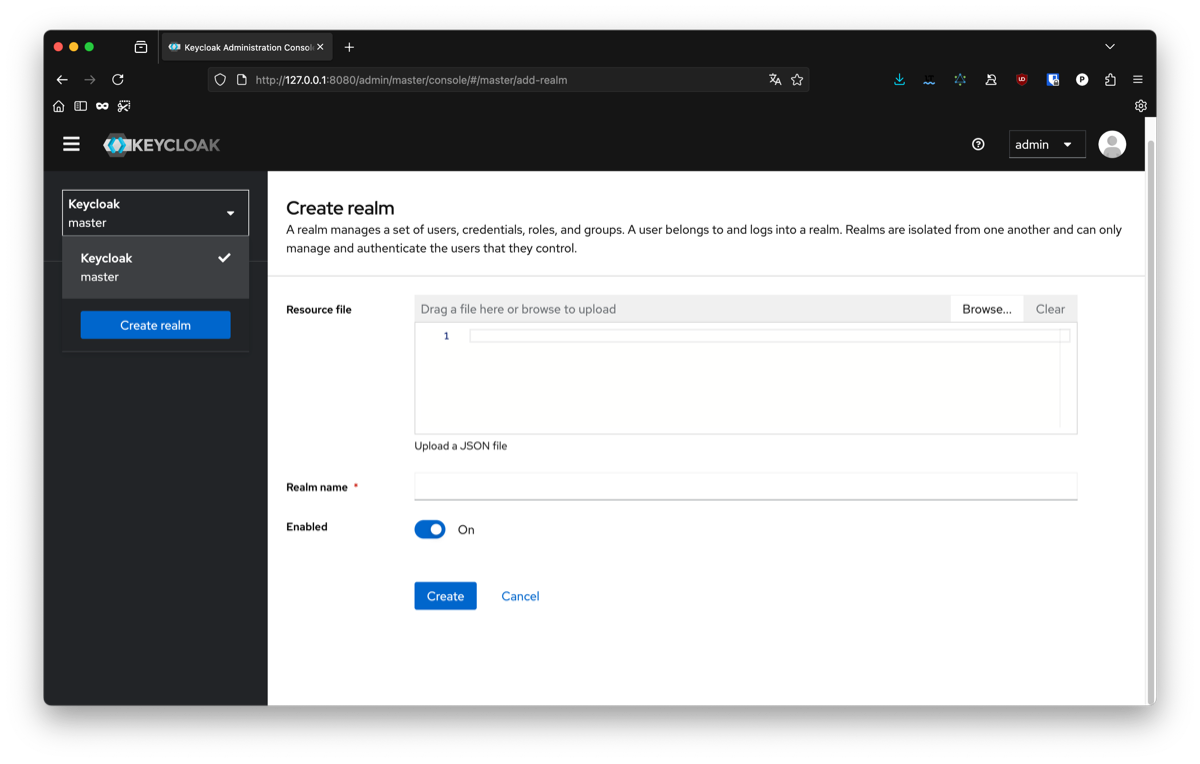
First we will create a realm for our app, for this you can click on the list of realms on the top left. We don’t have a current configuration so we will just create an empty one. For this article I will name it demo-openid-connect.
In Keycloak, a realm is like a container that holds all the users, applications, and settings for a specific project or environment.
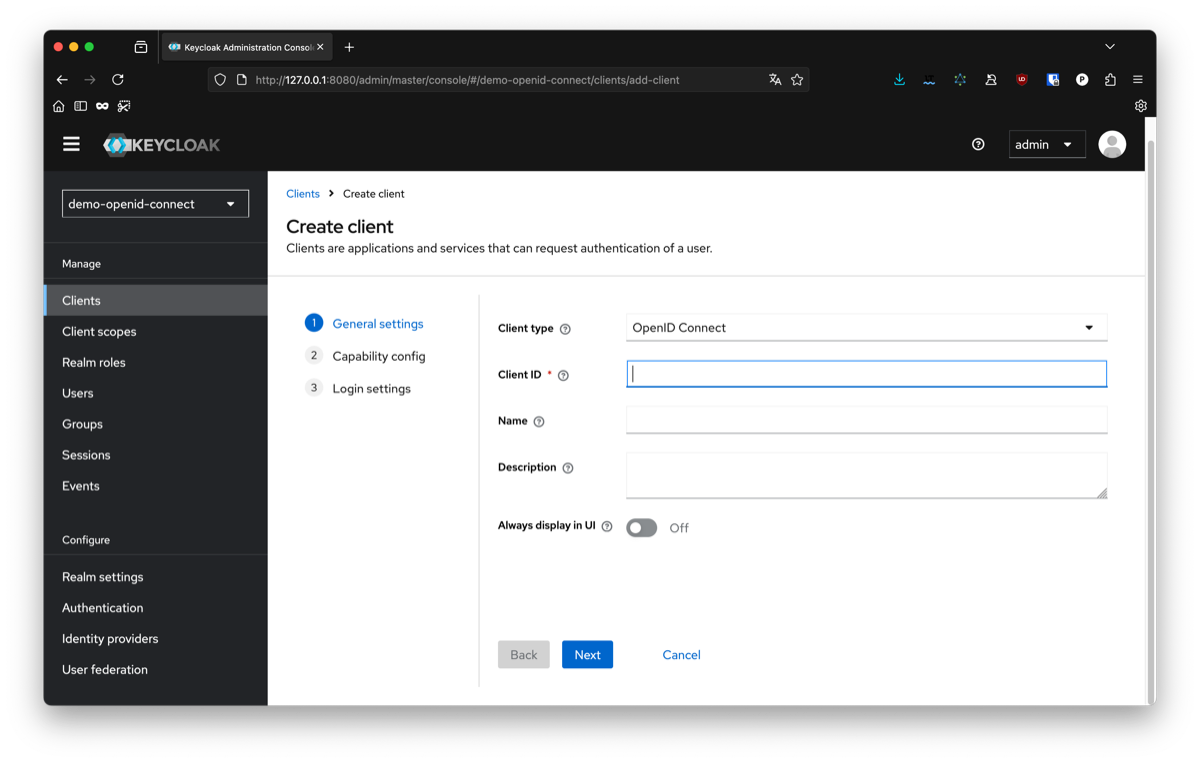
The next step is to configure an OpenID client that Python will use to connect with Keycloak. In you newly created realm, go to client and create a new one.
You will need to configure the following parameters:
client type : OpenID Connect
You can choose between SAML or OpenID Connect, in this article we will focus on OpenID Connect.
client id : 7f3c2e10-8c1a-4c71-89f2-f0bb72e536f4.
The id of your client, it will be needed later to connect to it. You can choose anything, for this example I chose a random uuid.
ame : open-id-client
The name of your client. This is only use to identify your client on keycloak, you can choose anything.
client authentication : toggle to true
Enable to authorize opined flow on this client.
root url : http://localhost:8081
The root url of you application. For this example we will use a local instance on port 8081.
home url : /
The home of the application, since our application will be at the root url, we will just put ‘/’. If you want to run it under a specific path, you can update this
alid redirect urls : *
For this example, we will allow any url from our domain to act as a redirection from our client. In production, you should change this to a more specific url to restrict your client to your own application only.
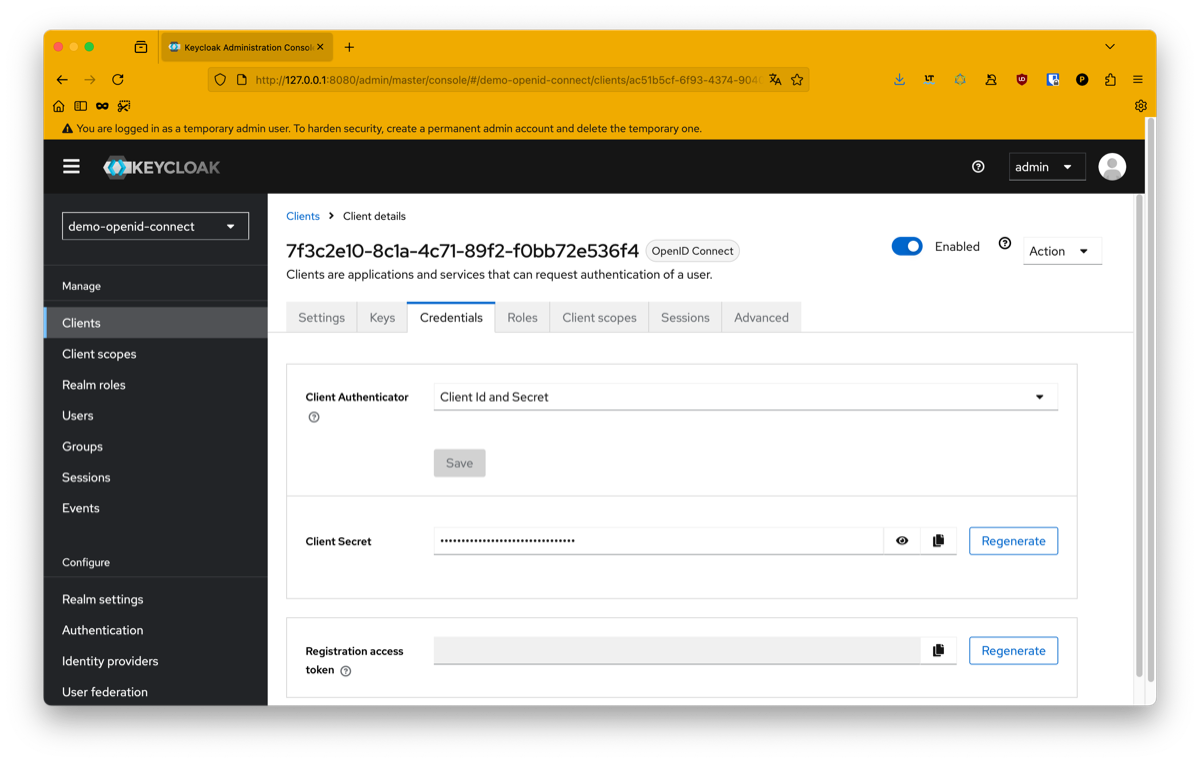
Finally you will need to configure a secret for your client. For this you can go in the credential tab and copy it. It should look like something like this: 961jZtg26dDrLcUacShPyYRvUEAhQEA4.
This secret is the proof your app will use to authenticate to keycloak. You have to be careful not to share it and save it in an unaccessible place like a secret manager or an environment file.
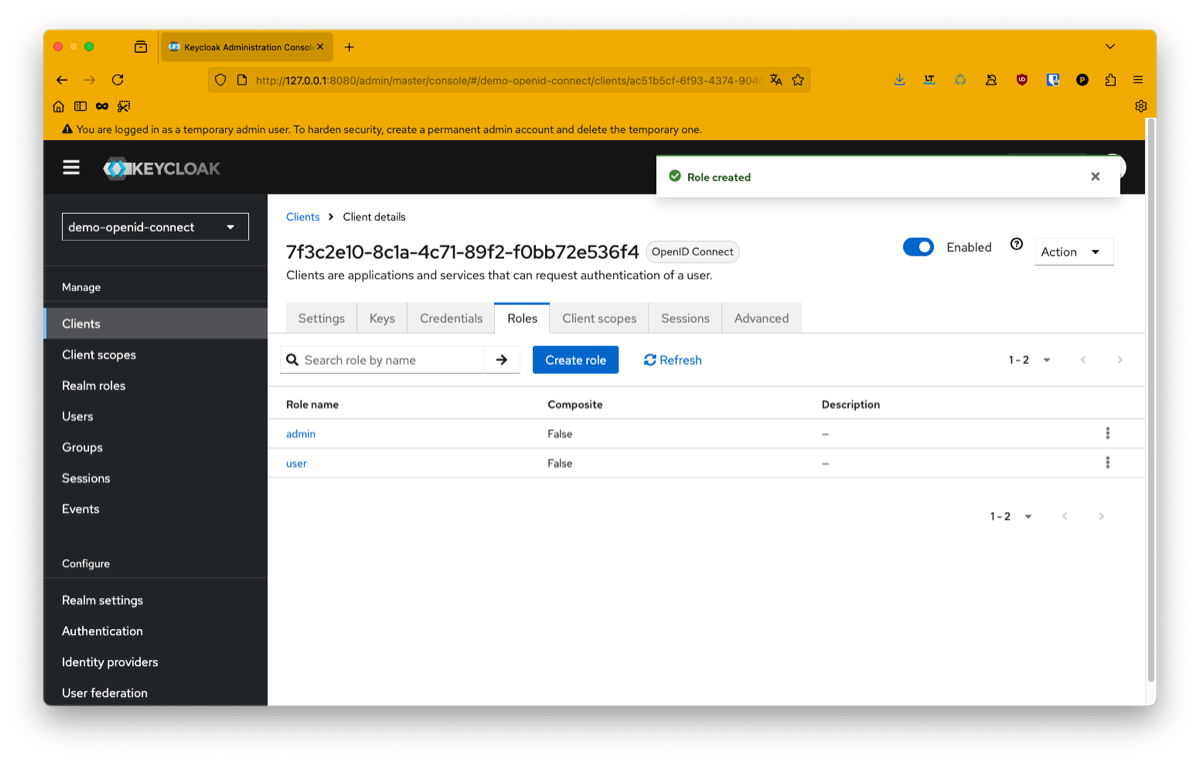
You can also configure custom roles for your application if you need to:
Switch to python
Our keycloak is now ready for our Python application to use. We will now build our python application. For this we will use Flask, be aware you can use any other http server for this.
What is Flask ?
Flask is a minimalist web framework written in Python. It allows you to quickly spin up a web server and expose endpoints for your application. It’s lightweight, simple to use, and well-suited for building REST APIs or small web services.
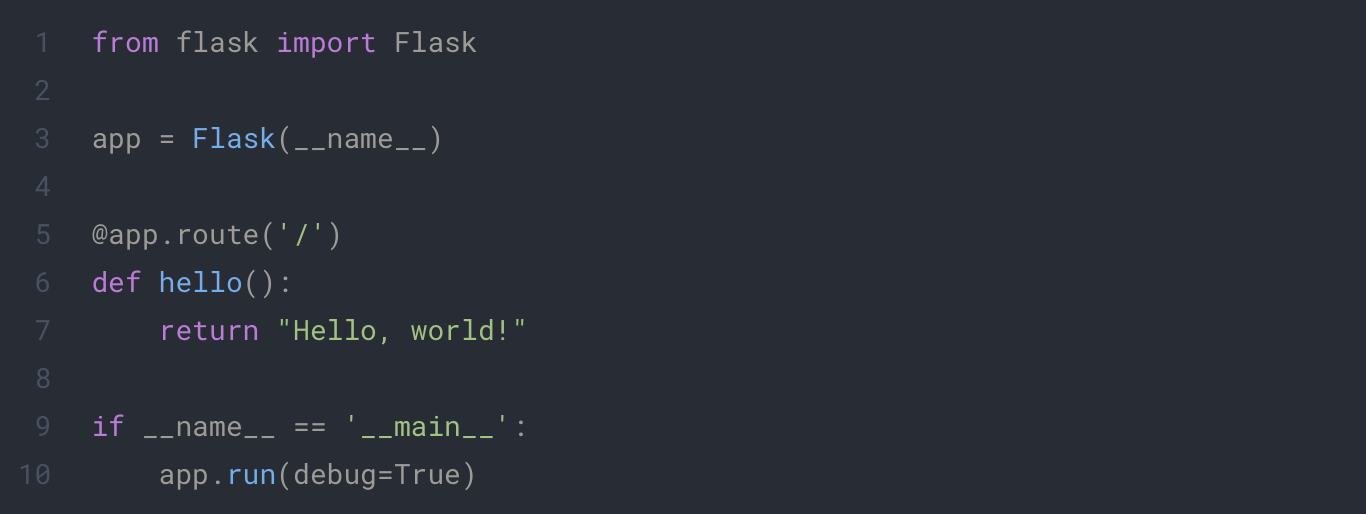
Here’s a basic example of a Flask application:
In this example we launch a web server and create an endpoint at the path /. To run this application, simply save it in a file (for example app.py) and execute it with Python:
python -m pip install Flask
python app.py
You can now go on your chosen web navigator to http://localhost/. You should see the text Hello, world!.
You can now go on your chosen web navigator to http://localhost/. You should see the text Hello, world!.
The power of Flask is to render html template and inject your own data. We will update our script a little bit to make a basic example, but first we will need to organize our project a little bit.
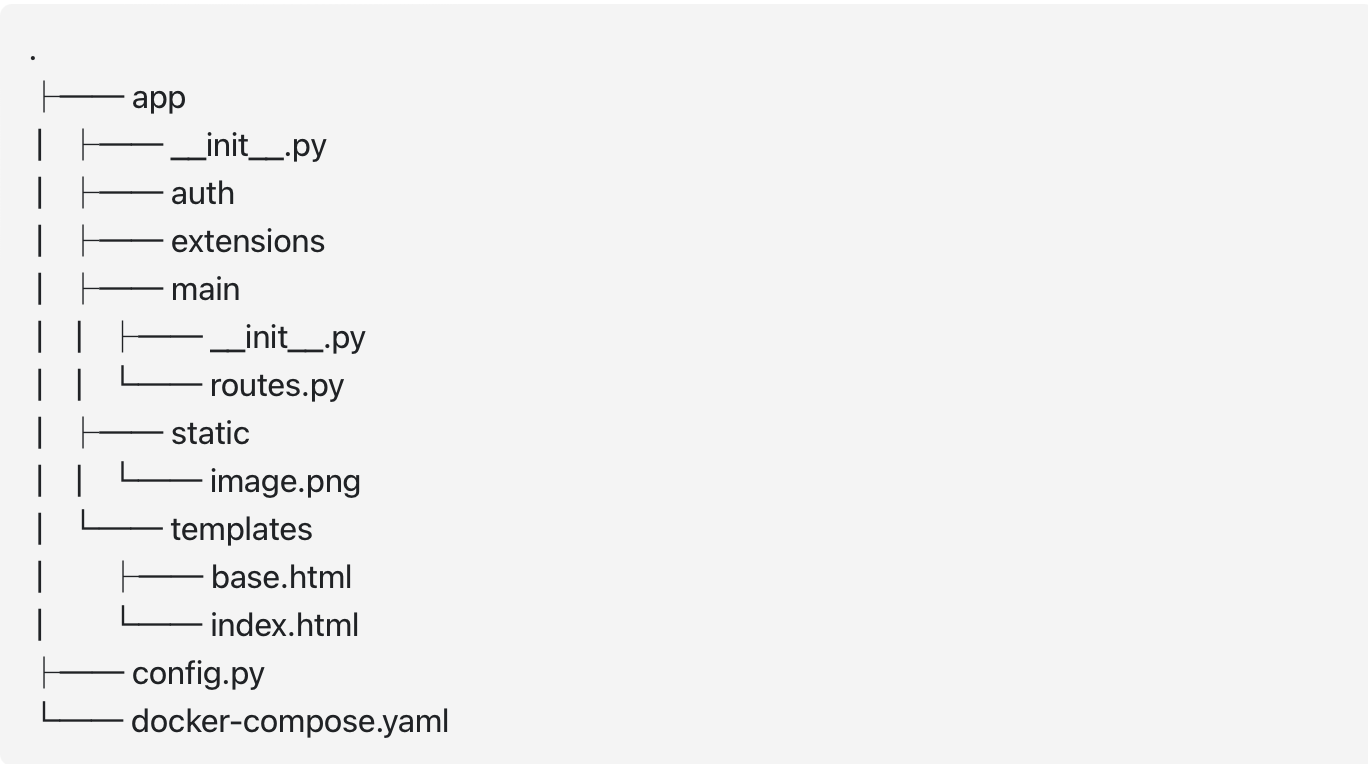
If you followed every steps, you should have something like this:
The recommended structure we will use for a Flask project is the following:
Description :
App : This folder is the root of your project. Everything related to Flask will be placed inside.
__init__.py : This file name convention from python allow us to use directory paths directly as path for the python file inside it like it would work with index.html on the web. The one at the root will contain the configuration of your Flask app.
routes.py : This file will contains every endpoint in the folder and implement the logic behind. In bigger project you could place the logic in a dedicated services.py file.
config.py : This file will contains the configuration of your Flask app and import your environment variables.
Extensions : This folder will contain all python script you need in your app that isn’t directly related to Flask like a database connexion for example.
Main : This folder contains all main endpoint of our app.
Templates : This folder contains all html files that will be used by Flask and need data injection.
Static : This folder contains all static data of our project, such as images, css, script, and more.
To execute our app we will now execute the following command:
flask –app app run –debug –port=8081
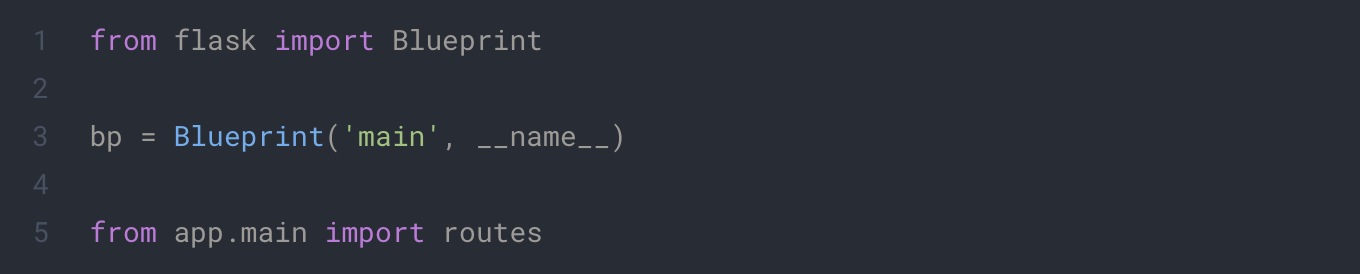
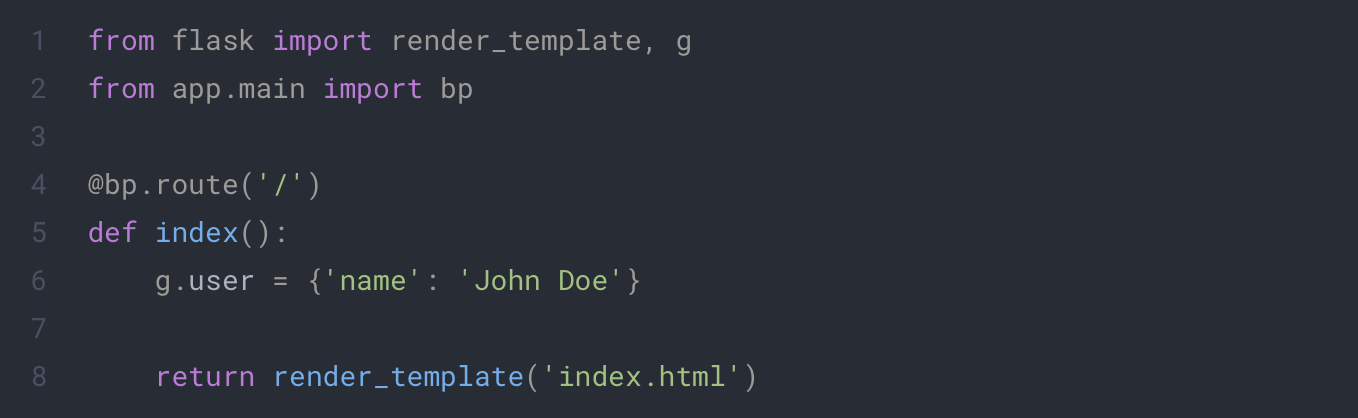
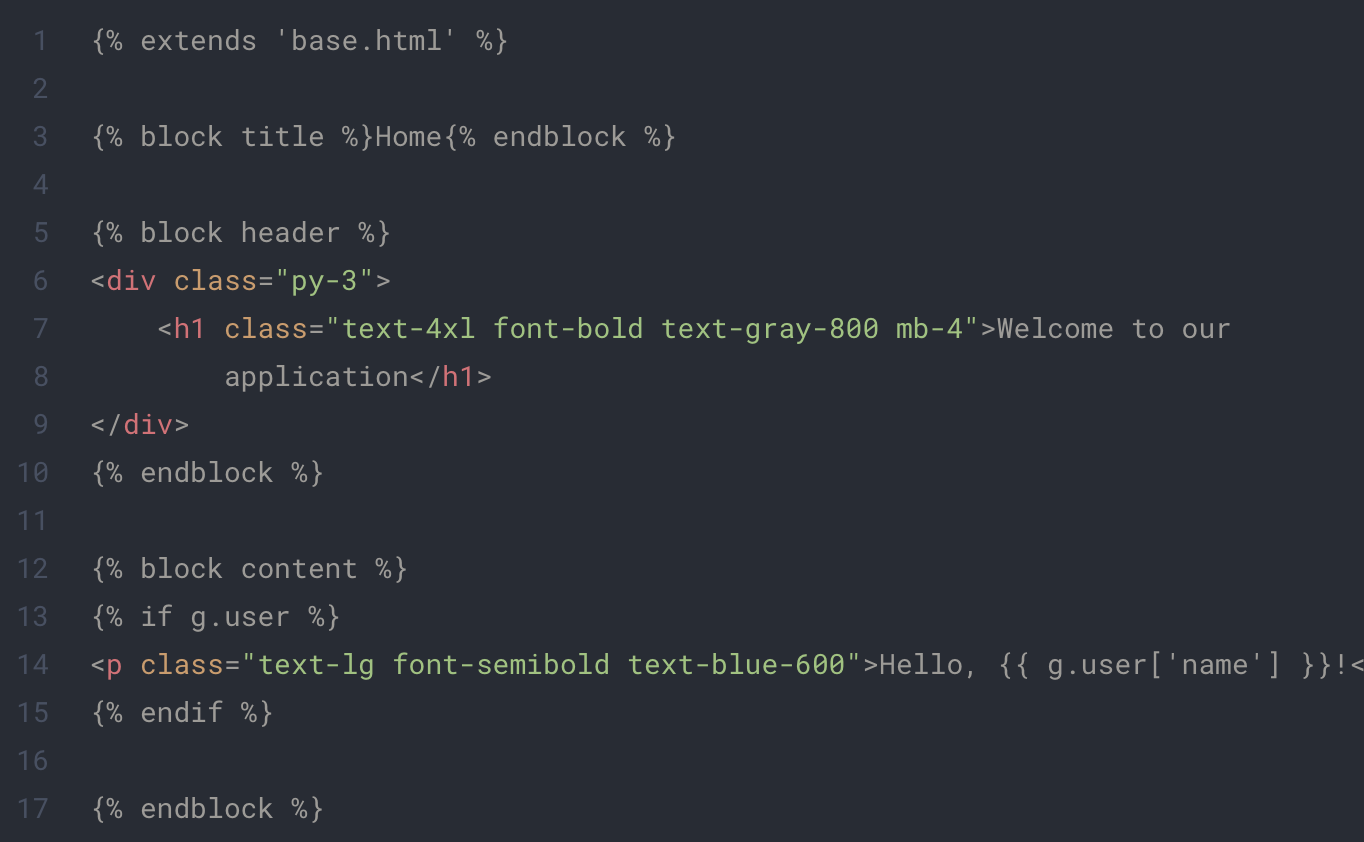
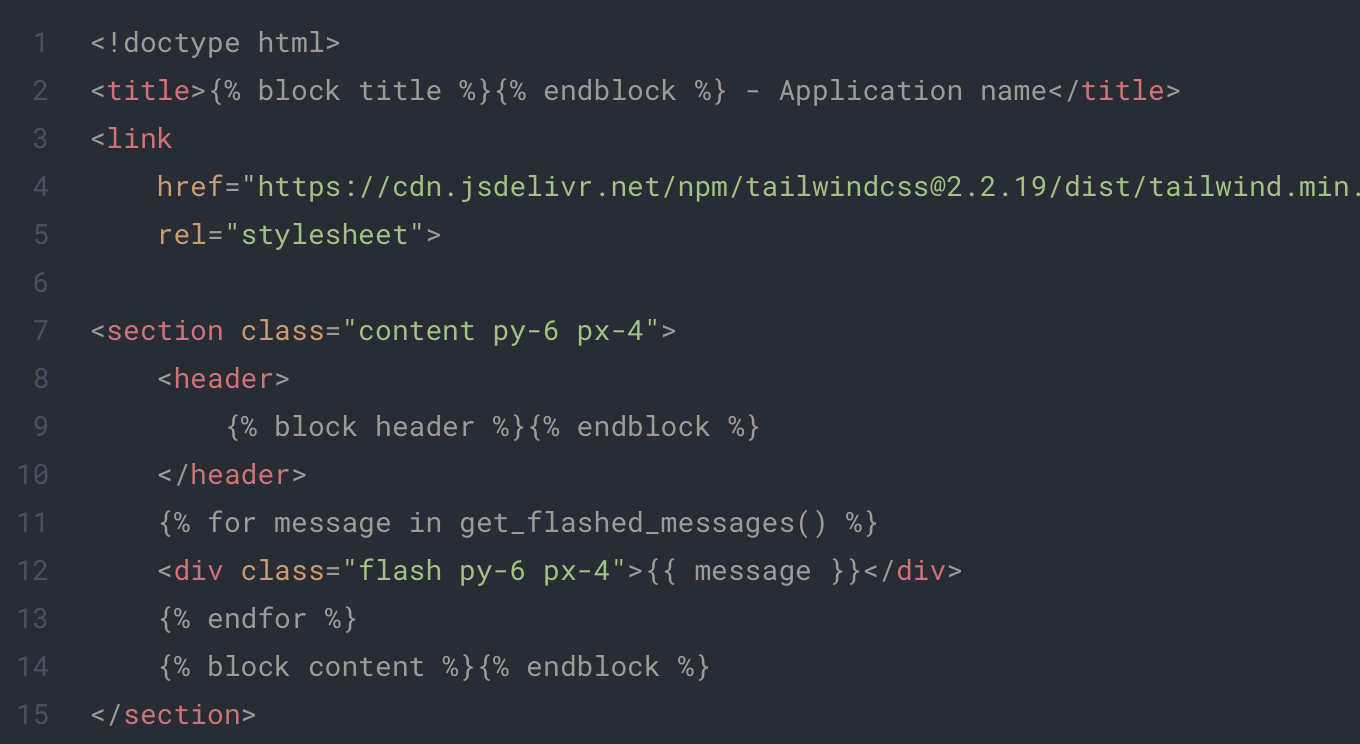
The content of each file will look like this:
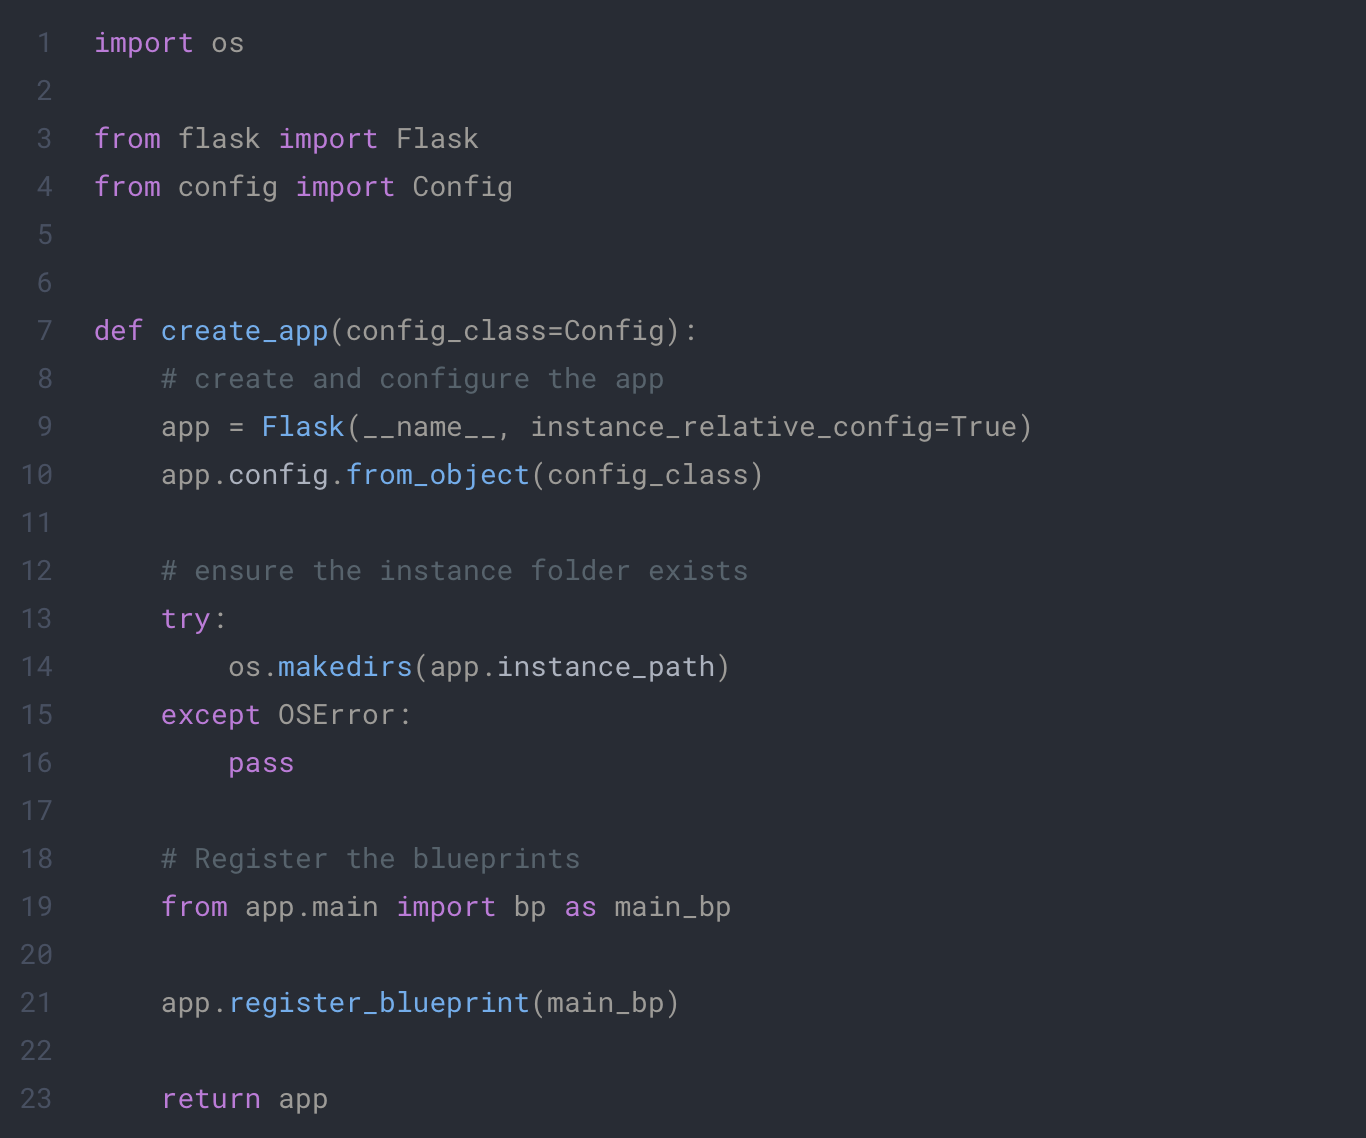
app/__init__.py
config.py
app/main/__init__.py
app/main/routes.py
app/template/index.html
app/base/base.html
There are a lot of new concept here:
First Blueprint. In Flask, you can create Blueprint to group your endpoints. Each folder with routes will represent a Blueprint in our project. For now we only need the main one.
Second Templates, as aboded before you can use template in Flask made from html and Jinja2. To learn more about it, you can check the Flask documentation. In this project we have two html file :
base.html : It will contain everything we want to share between our page such as tailwind import in our case.
index.html : This will contains the content of the home page of our app.
To launch your newly created app you can use the following command:
flask —app app run —debug
You can see the result of your application at http://localhost:8081/.
Know that you are familiar with Flask and project organization, we will start to develop the OIDC connector to Keycloak !
Implement OIDC with Flask
We will now implement Open ID Connect in our application. For this we will use the oic python library.
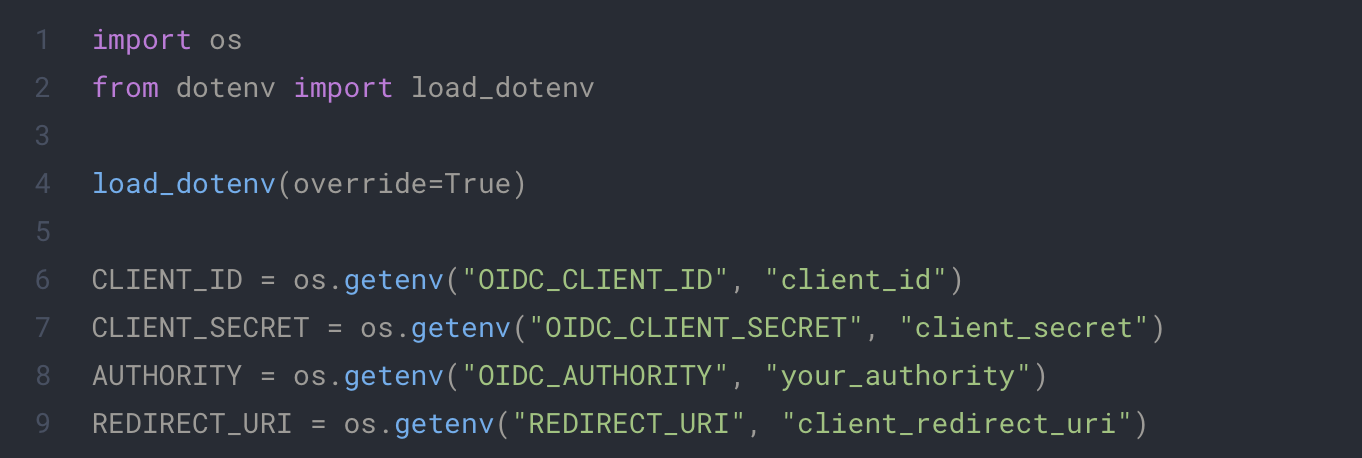
First we will put our environment variable in our config. For this you will need to add this to your config.py.
.env
Replace the appropriate variable with you own data. AUTHORITY represents the base url of your keycloak Open ID server. REDIRECT_URI represents the endpoint we will use in the future for our Open ID Connect flow.
The identity class
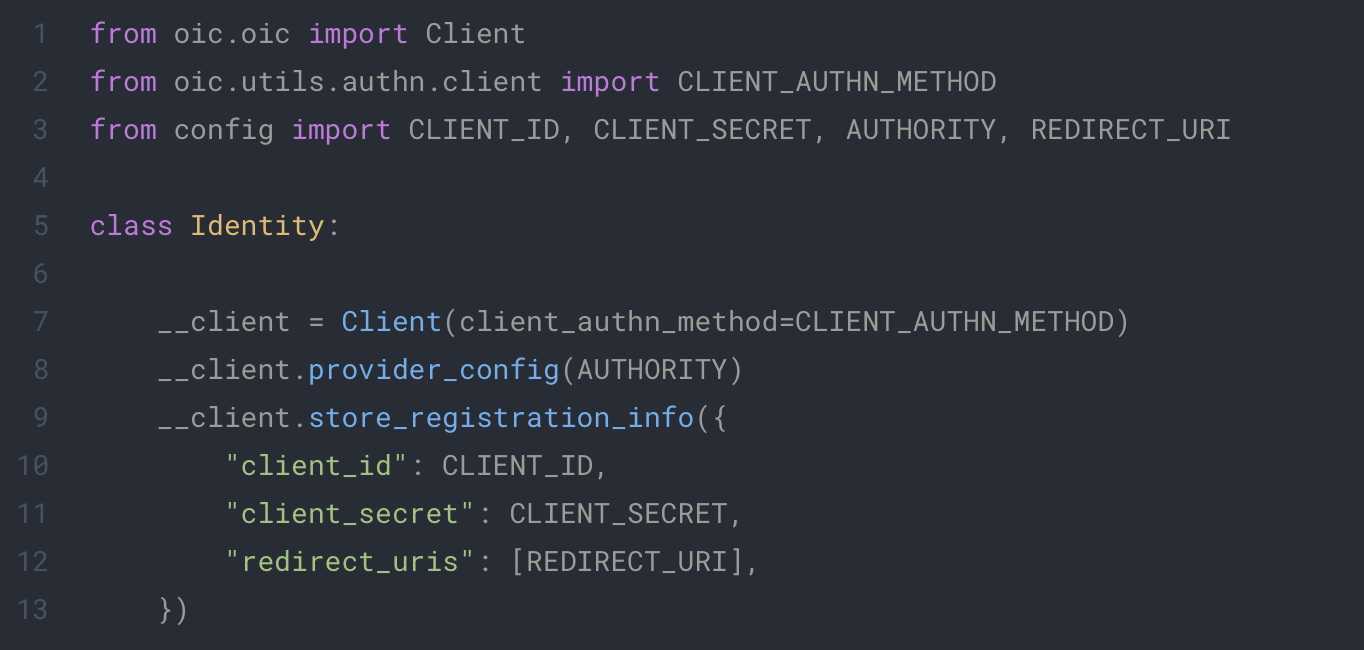
To easily reuse our identity script that will manage the Open ID logic, we will create a static class.
Here is the base of our class:
app/extentions/identity.py
This class define a OpenID client and configure it with our environment. provider_config and store_registration_info will give the necessary information to our client to fetch all data it need to learn the urls of our keycloak endpoint.
We will now implement each step of the OIDC flow:
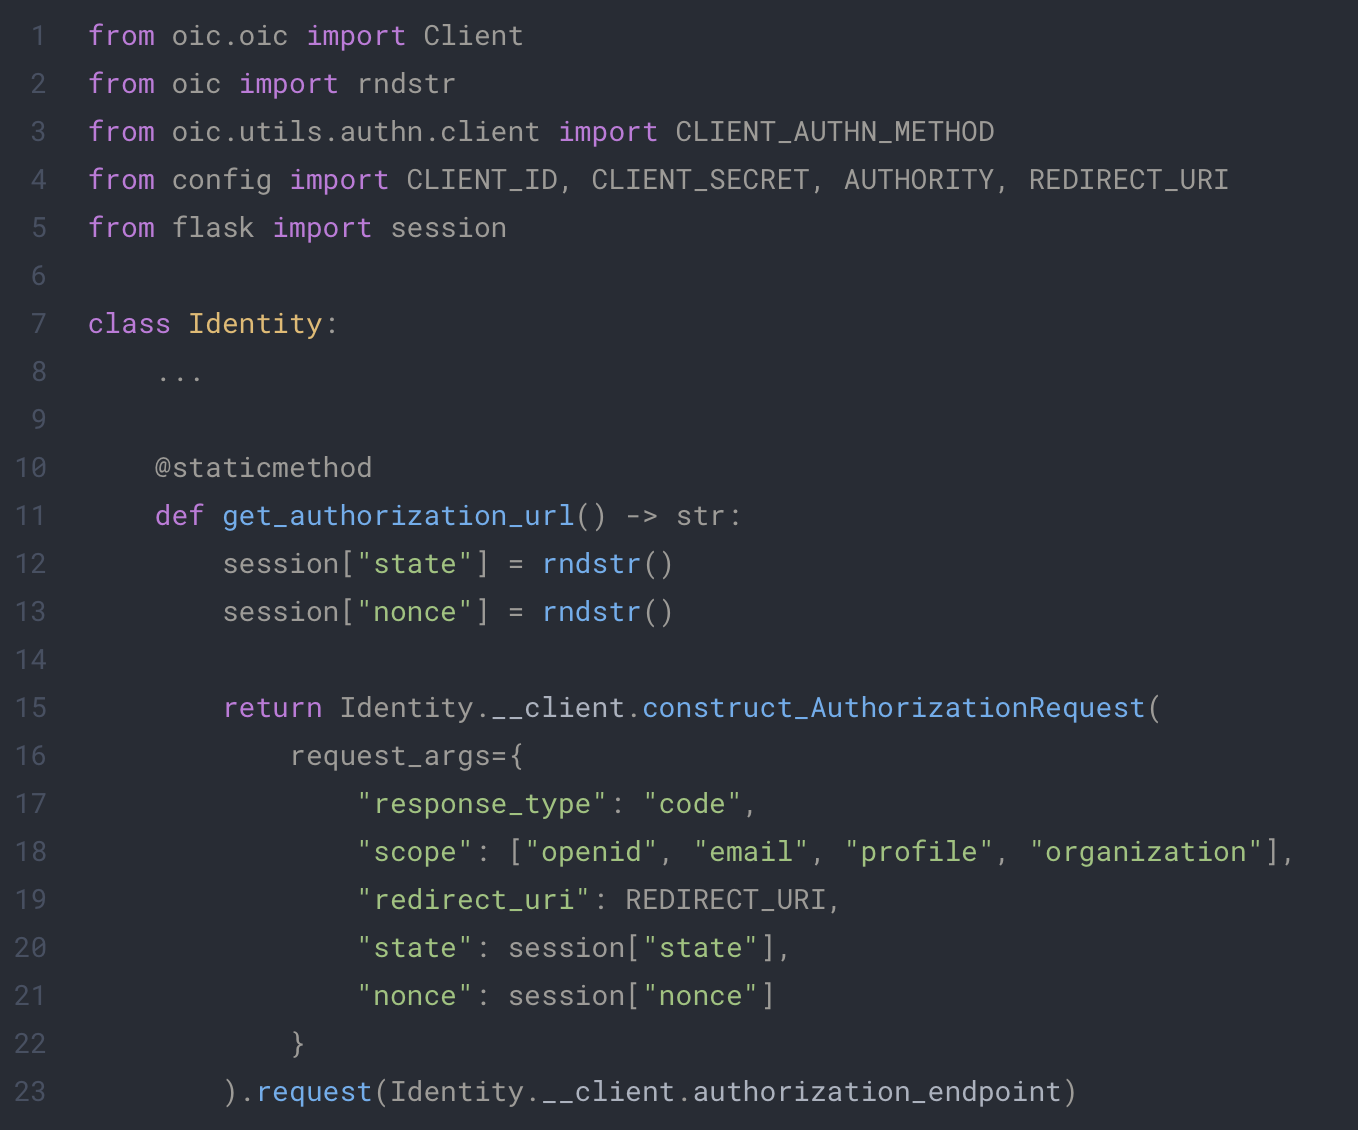
1. Get login url
To connect, the user will need to build an url with all informations about the connection request. This url is specific to each connexion and must give to keycloak:
The redirection url of the request
The authentication method and response type
The scopes the user want to access
State and Nonce, two random strings to identify the request
For this we will use the power of the oic that will make this much faster.
app/extensions/identity.py
2. Get the authentication token
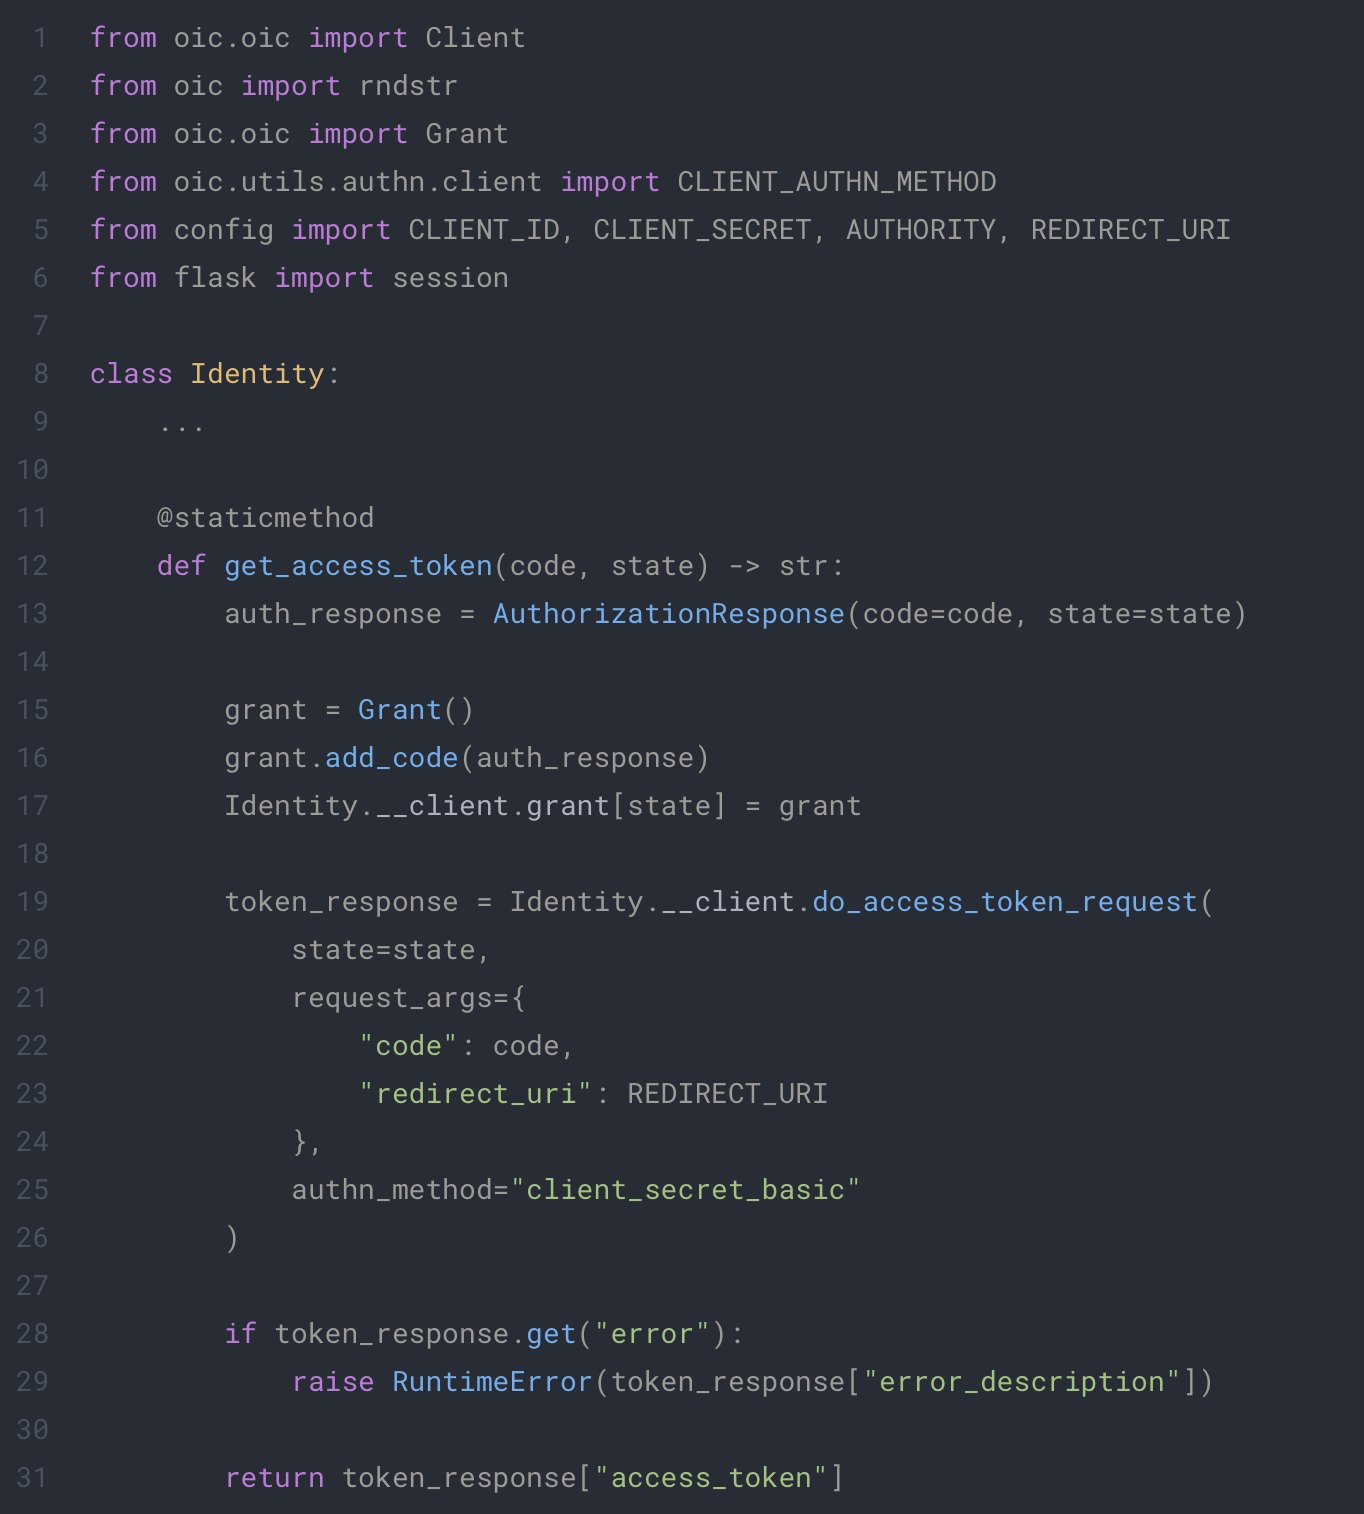
The next step of the Open ID Connect flow is to retrieve the token of the user from the provider. For this we will once again make use of the oic library. This time we only need to send the following information to the provider:
The code given by the user, proof of his authentication with the provider
The redirect_url from which the server retrieved the code
In this function, we will make a request to the provider with all information given from our client. We must create the Grant and add it ourself to the client for the request to be a successful. This retrieved token will be the proof of identity of our user.
We now have all we need to start implementing our endpoints and test out our OIDC.
3. Testing the authentication flow
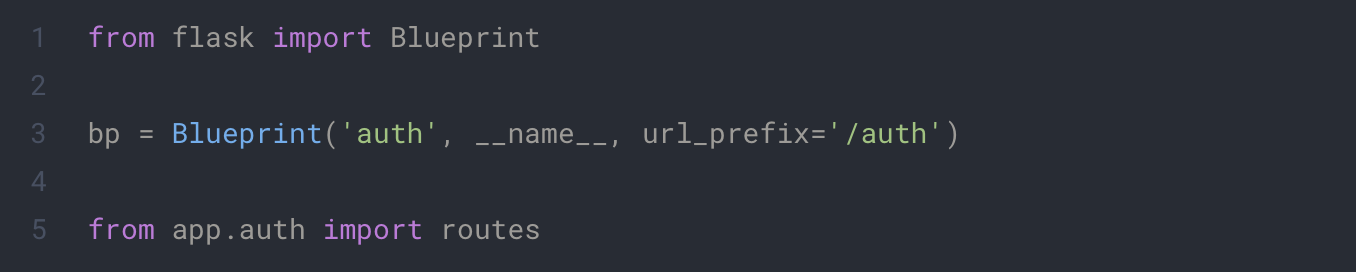
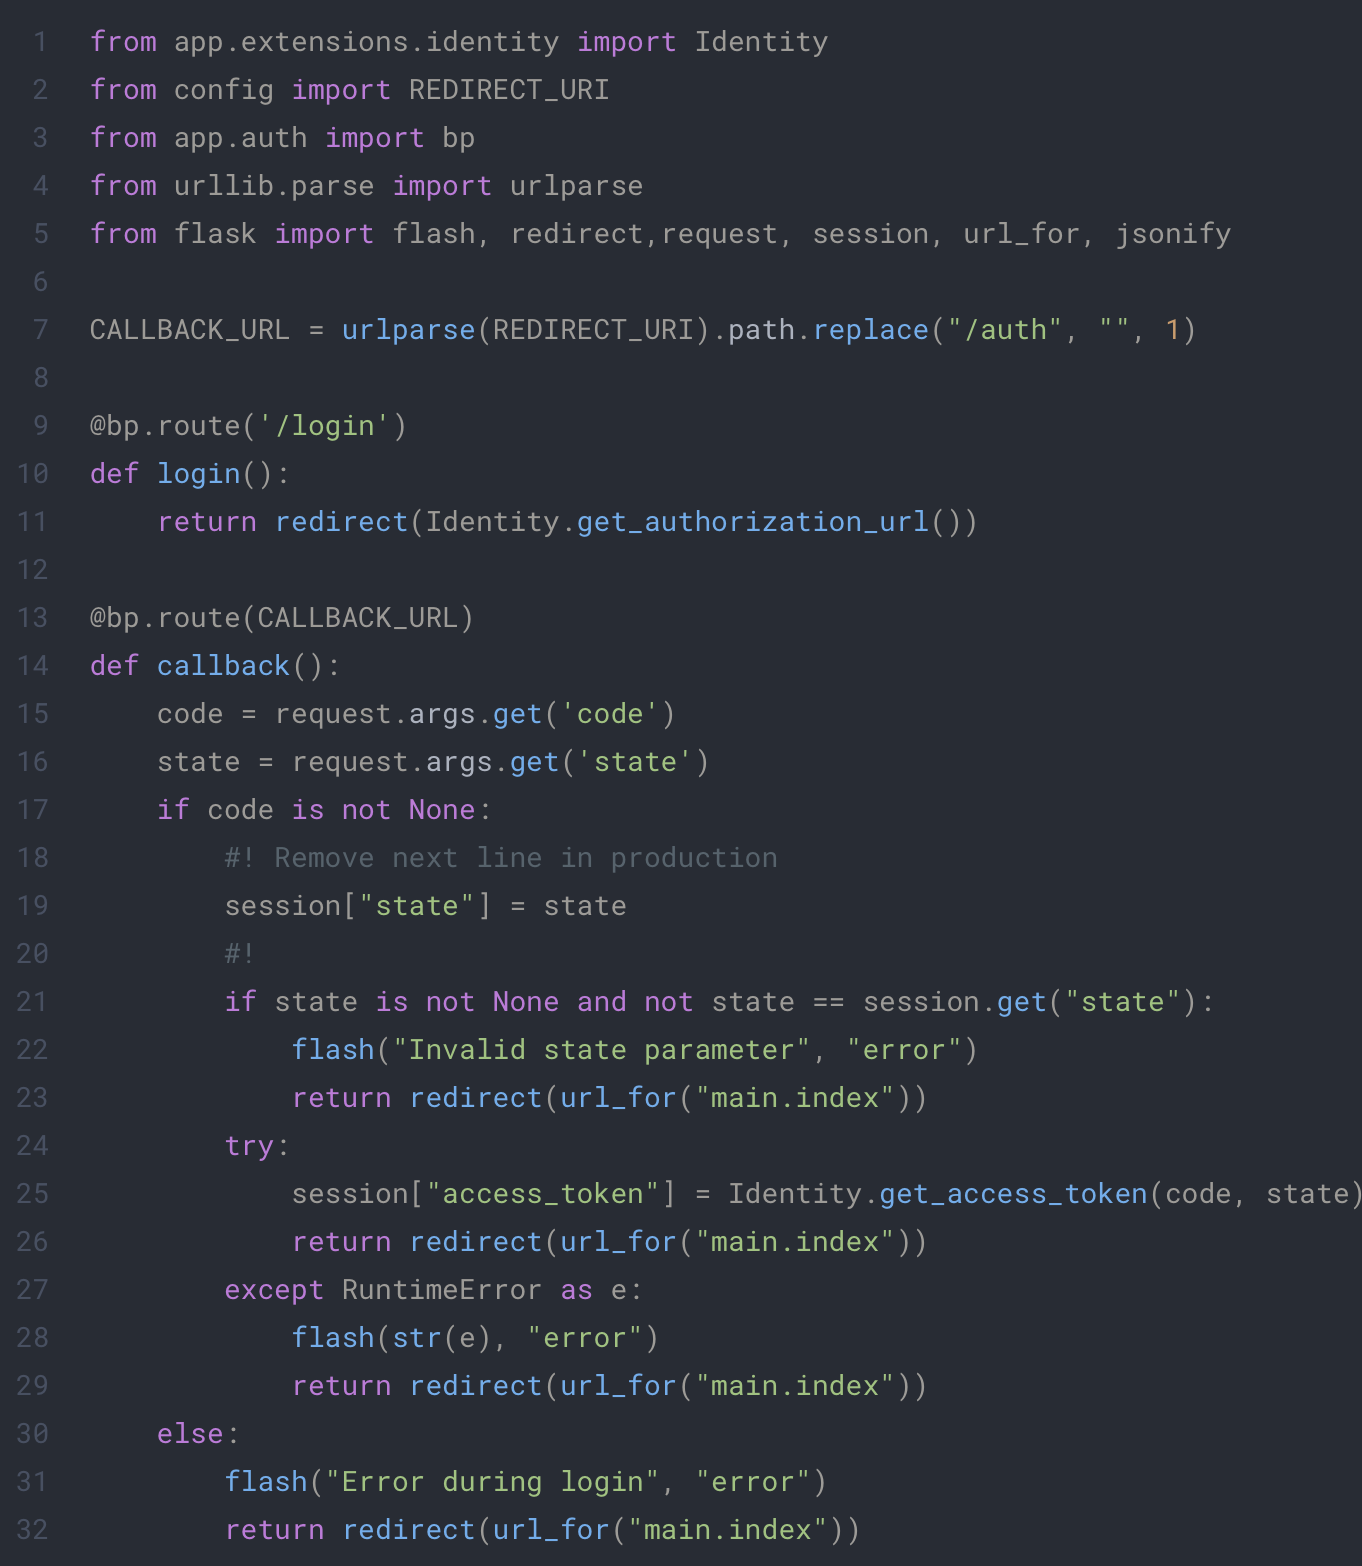
For this we will create dedicated routes in a new folder with the two following files
app/auth/__init__.py
app/auth/routes.py
In this code we define two endpoints which will be used by our clients to follow the identification flow. The first one will redirect our client to the provider with the appropriate information. The second one will retrieve the token from the callback of the provider.
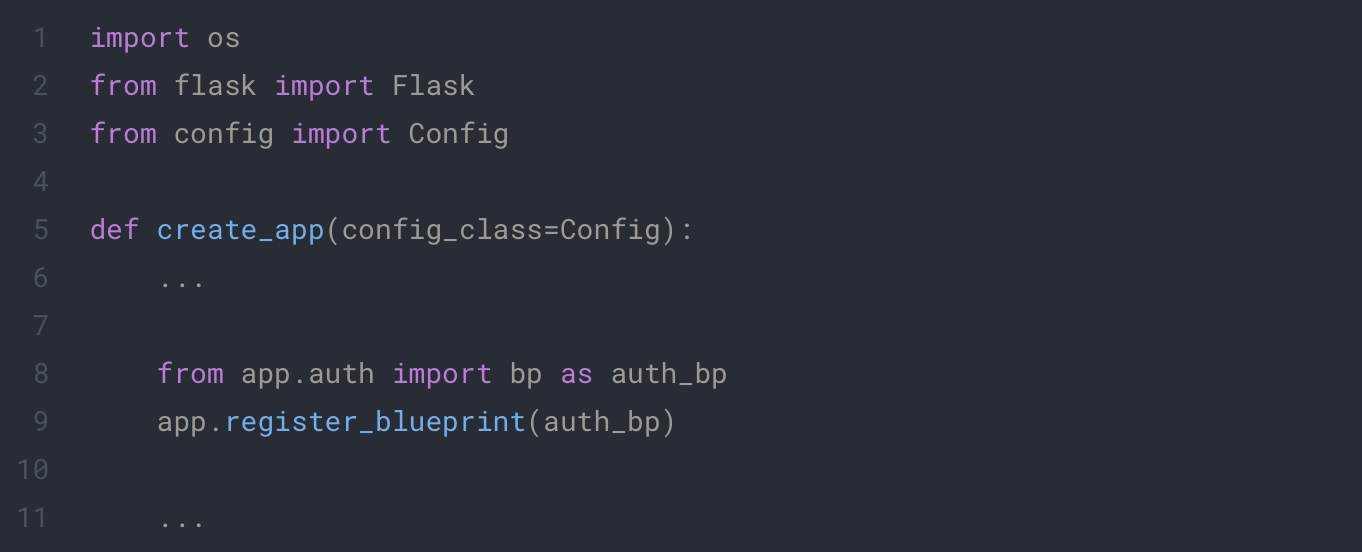
Just before testing our program we need two small update to our app:
First we need to add our new blueprint to our app
app/__init__.py
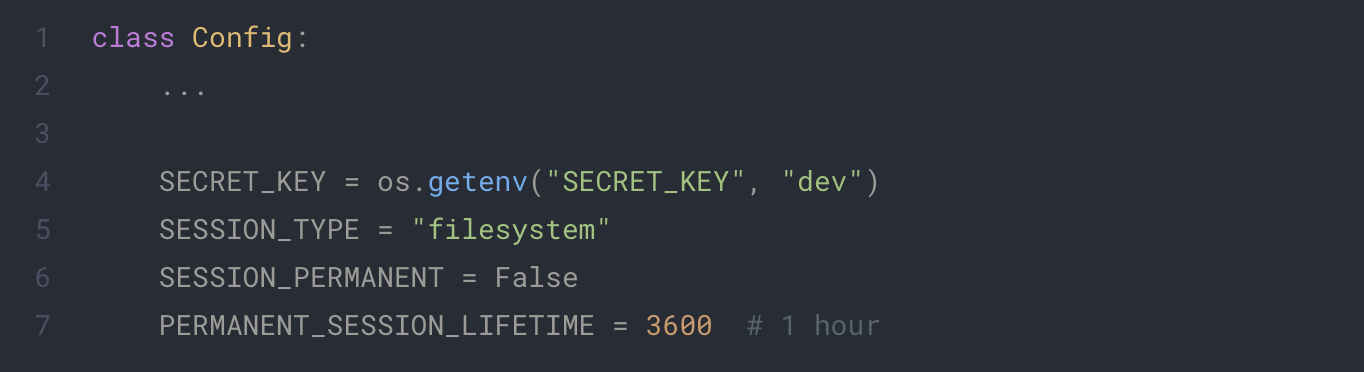
Next we need add parameters inside our configuration to use flask session
config.py
You will also need to install Flask-Session as dependency. You can use the following command:
pip install Flask-Session
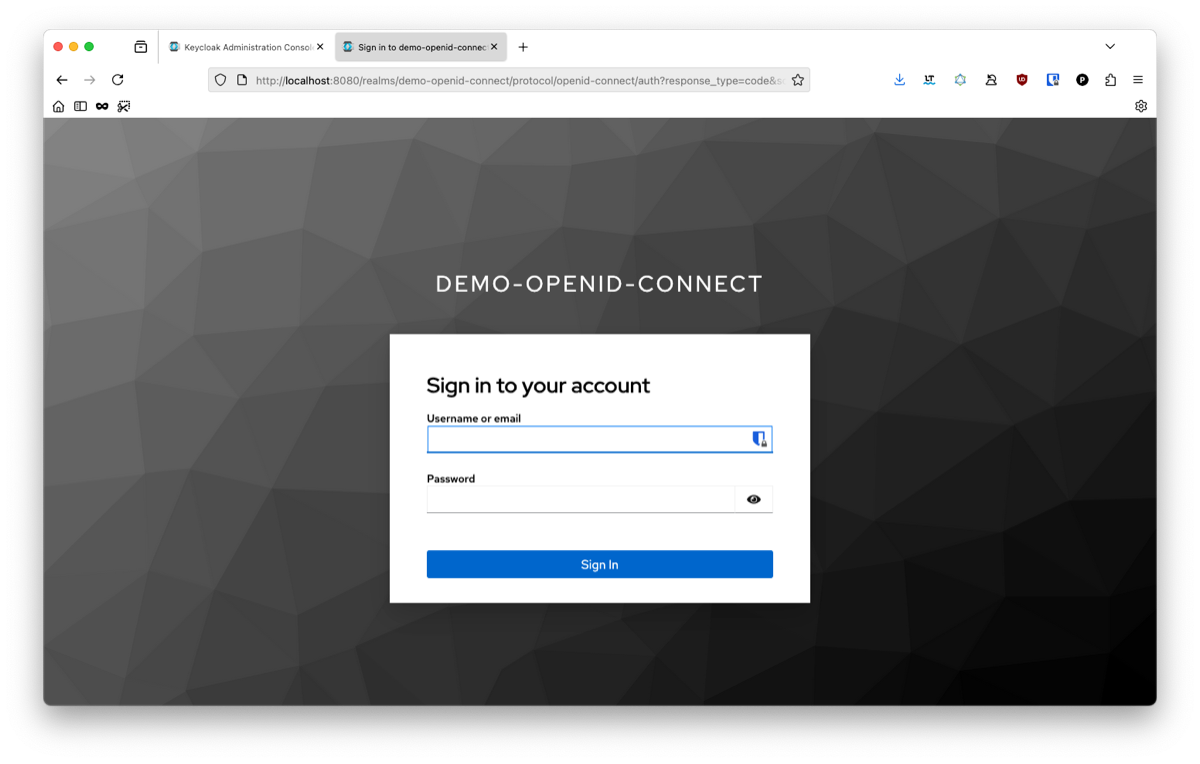
When going to http://localhost:8081/auth/login, you should be redirected to your keycloak and see the following:
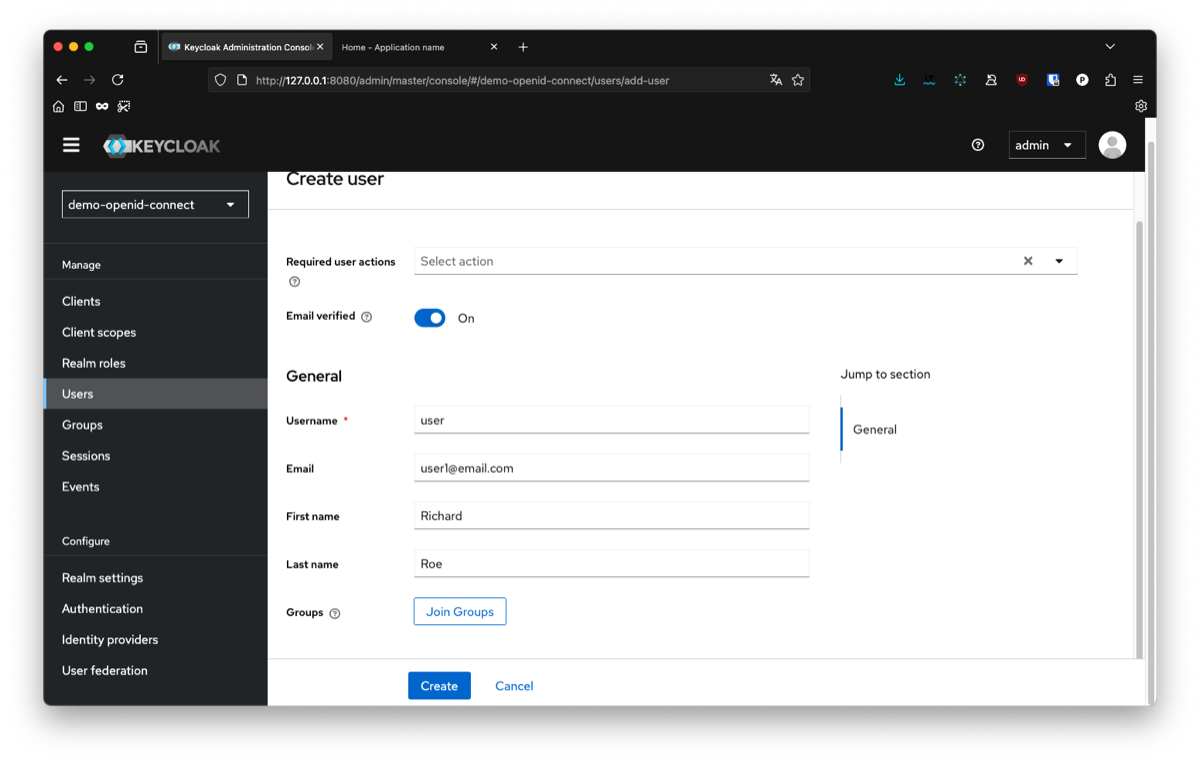
To finish our test we will need to add a user inside the keycloak console. Go to the user tab and add one:
You will also need to set a password from the interface. For this go inside the credentials tab. Return to your app and connect with your user. If everything went fine you should be redirect to your Home page.
If you try to input different information than the one previously used, you will notice that nothing change. The login flow worked, but we don’t access the user information yet. This will be the final step of our guide. If you are curious, you can open the dev console of your navigator and see that you have a cookie session which was created by our authentication flow. For security purpose, we choose to hide the real access token from the client and only give him a reference to the data. This helps avoiding attacks such as token hijacking with an XSS vulnerability in your app.
4. Get the user information
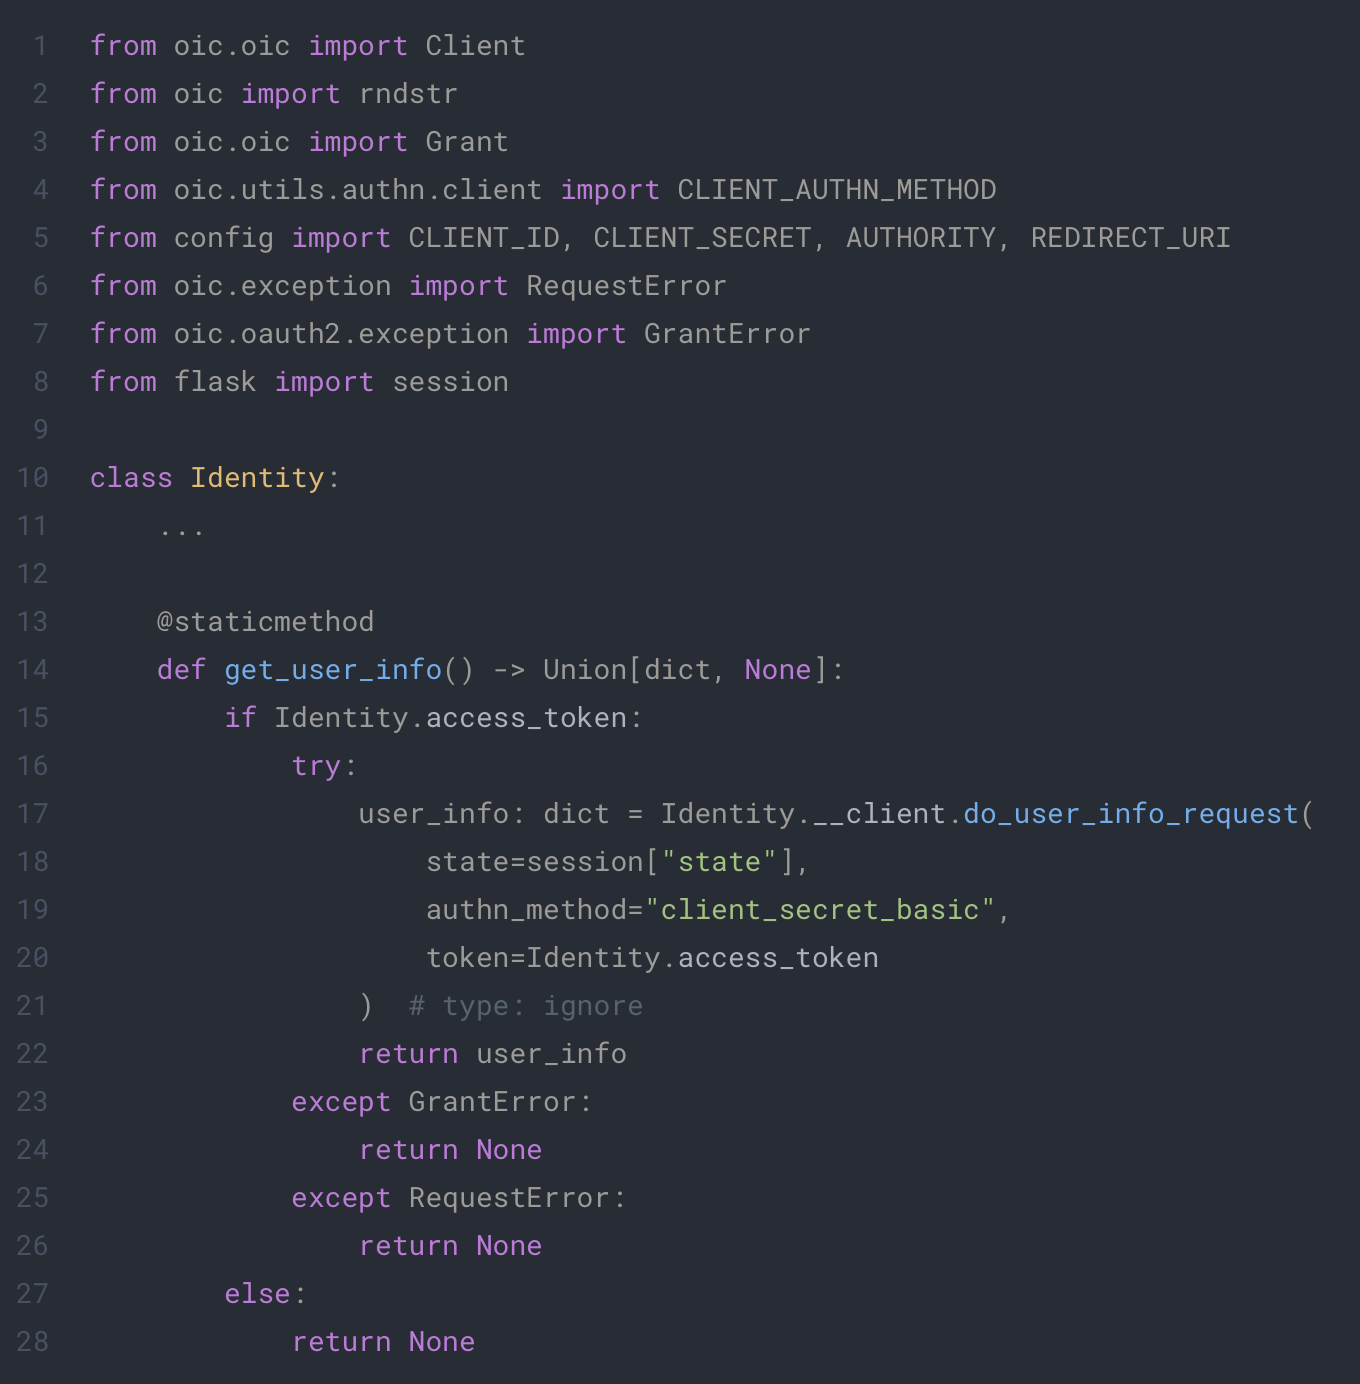
All we need now is to be able to retrieve information about our user when he his connected to our app. For this we can call the user information endpoint of our provider with the do_user_info_request method of our oic client. The code will look like this:
app/extensions/identity.py
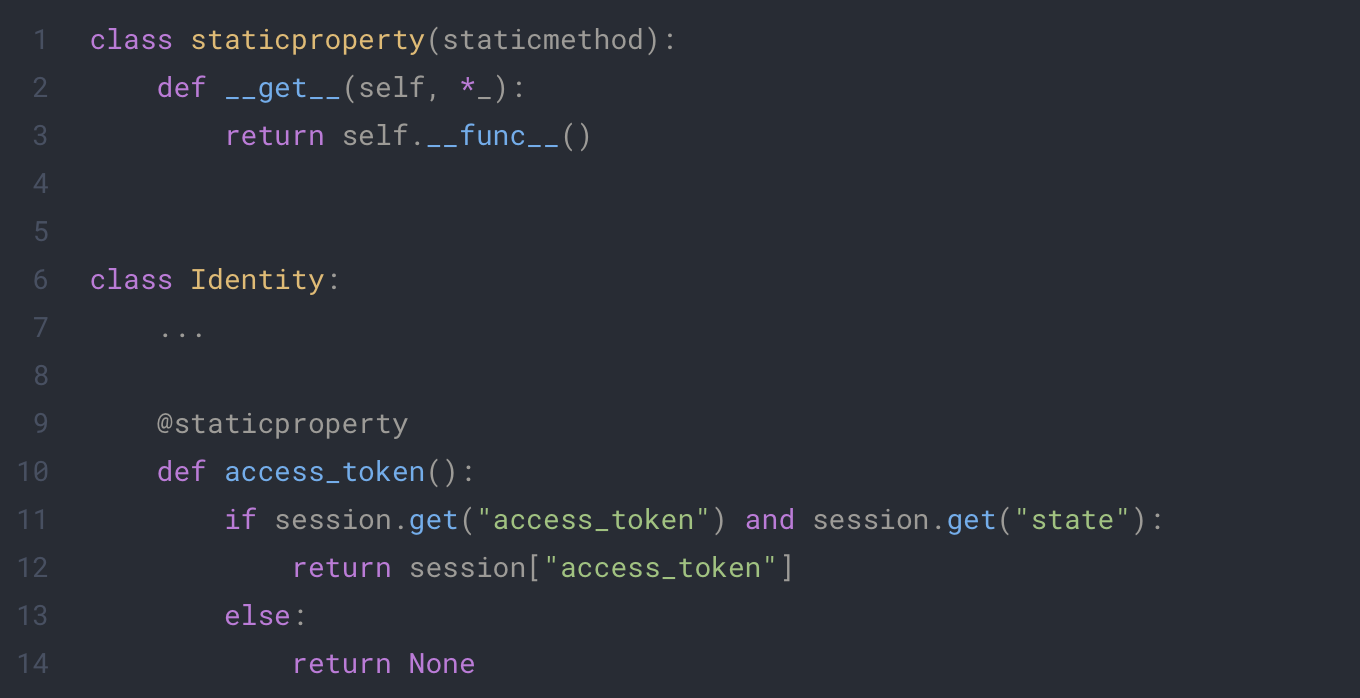
To use this method, we need to give the token to the request. For this we choose to use a property which will try to get the access_token from the session. Since we only use this class with static method we will need to define a static property.
app/extensions/identity.py
Each time we access our access_token, the script will try to get the token from the session or return nothing.
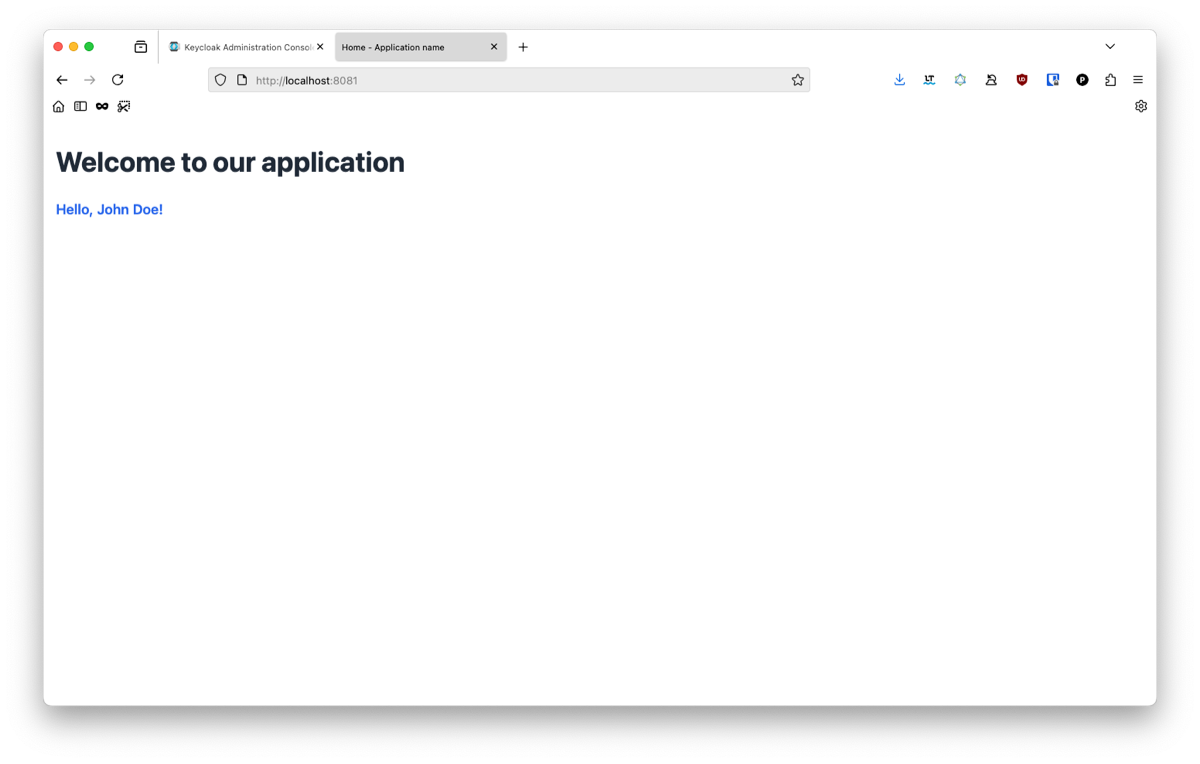
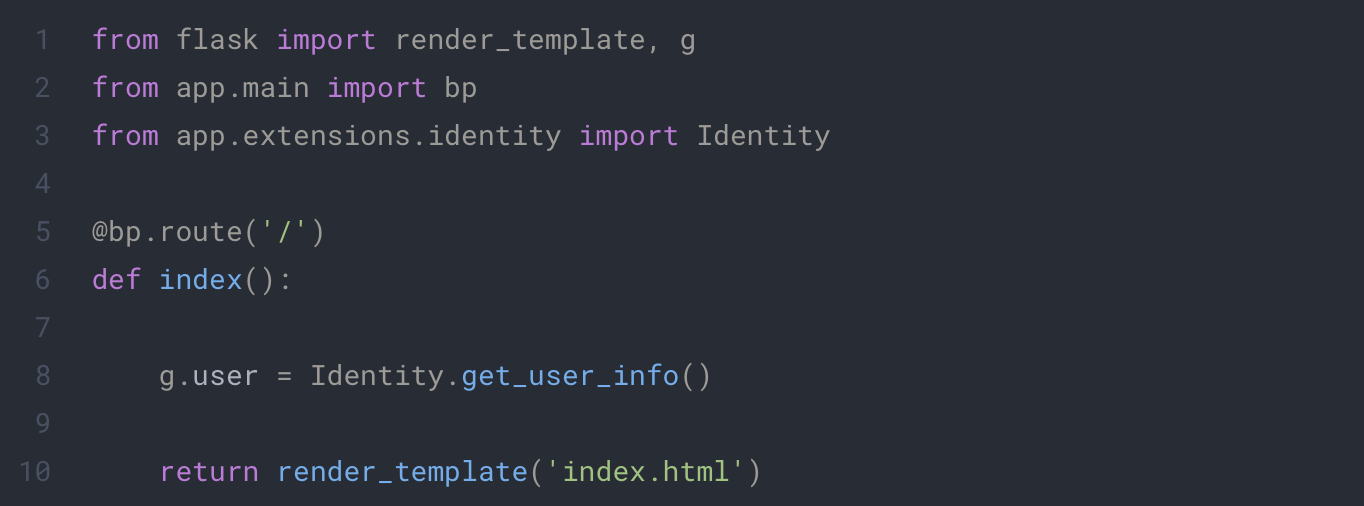
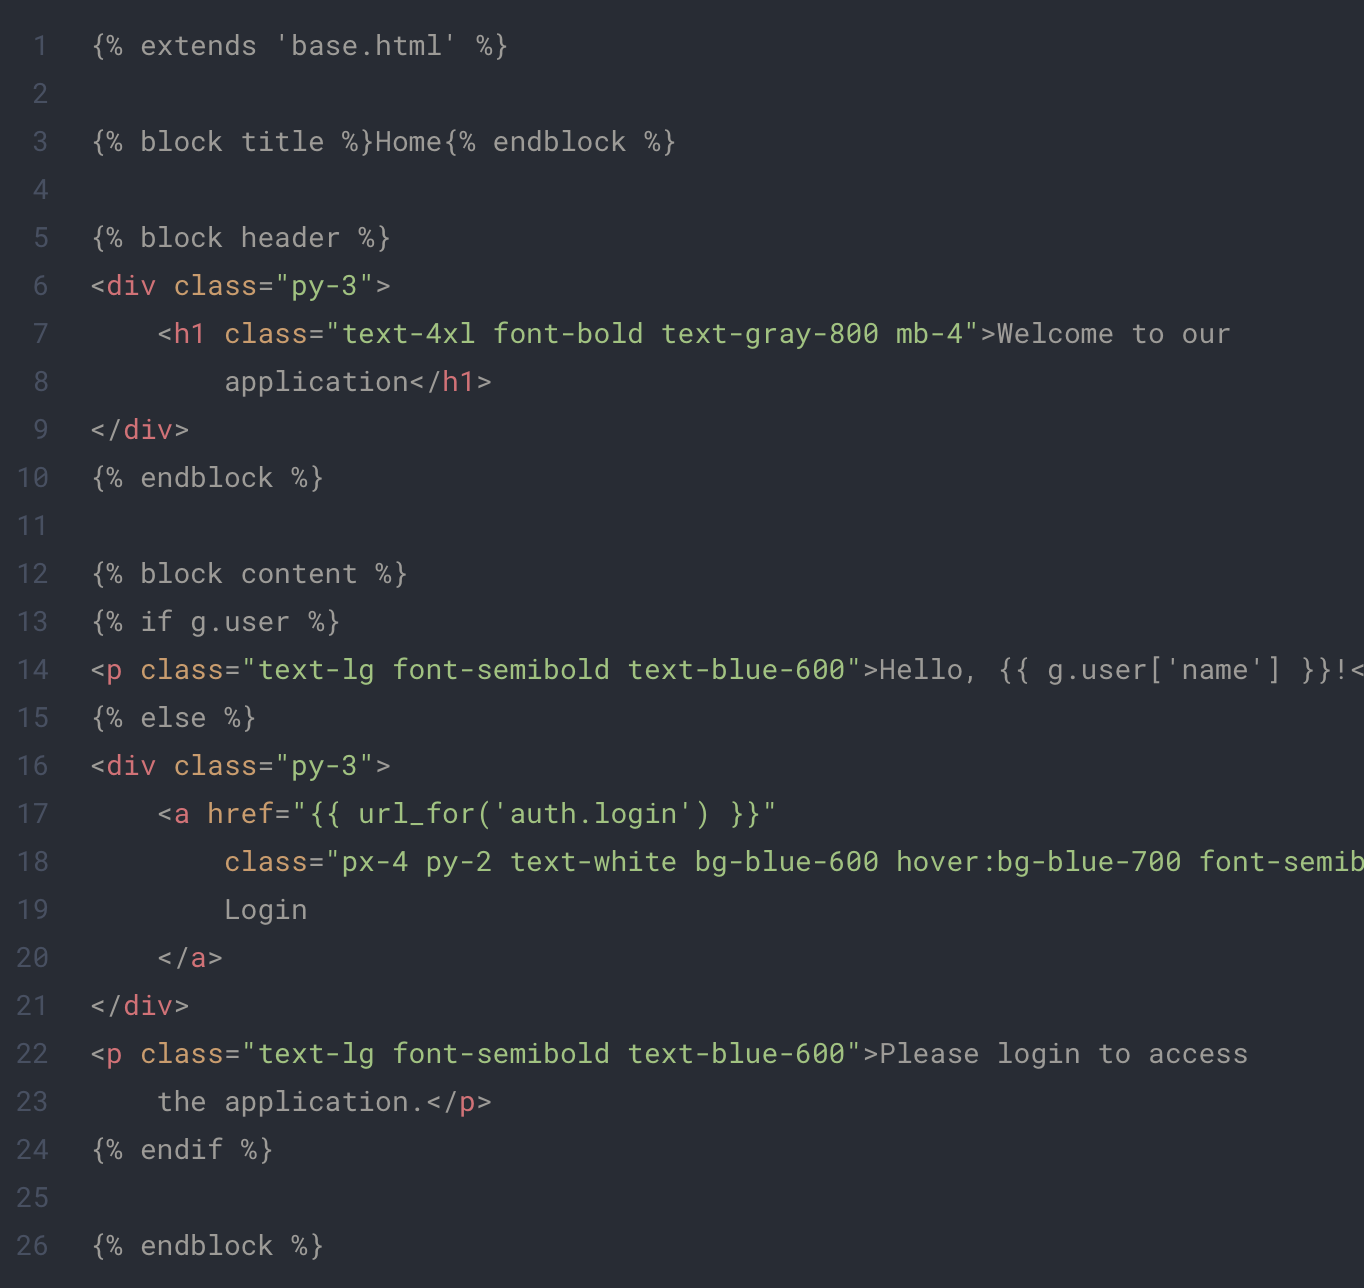
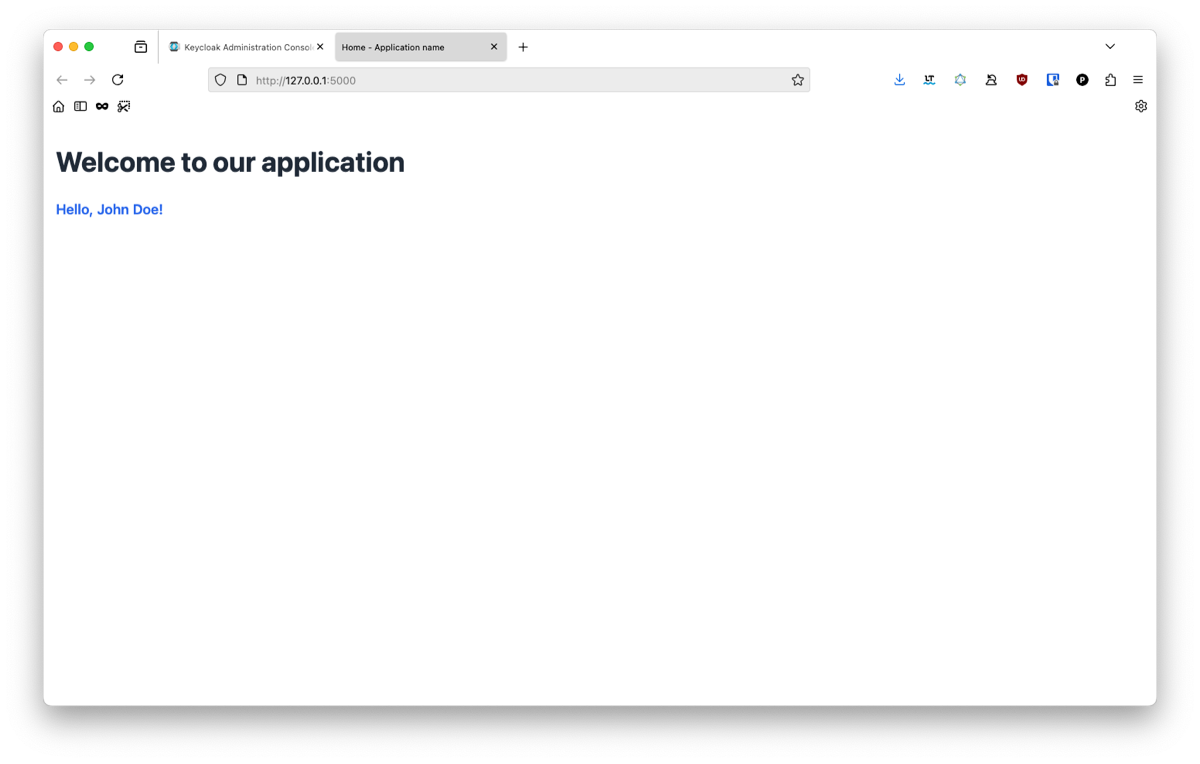
We can now update our home page to display our user information:
app/main/routes.py
app/templates/index.html
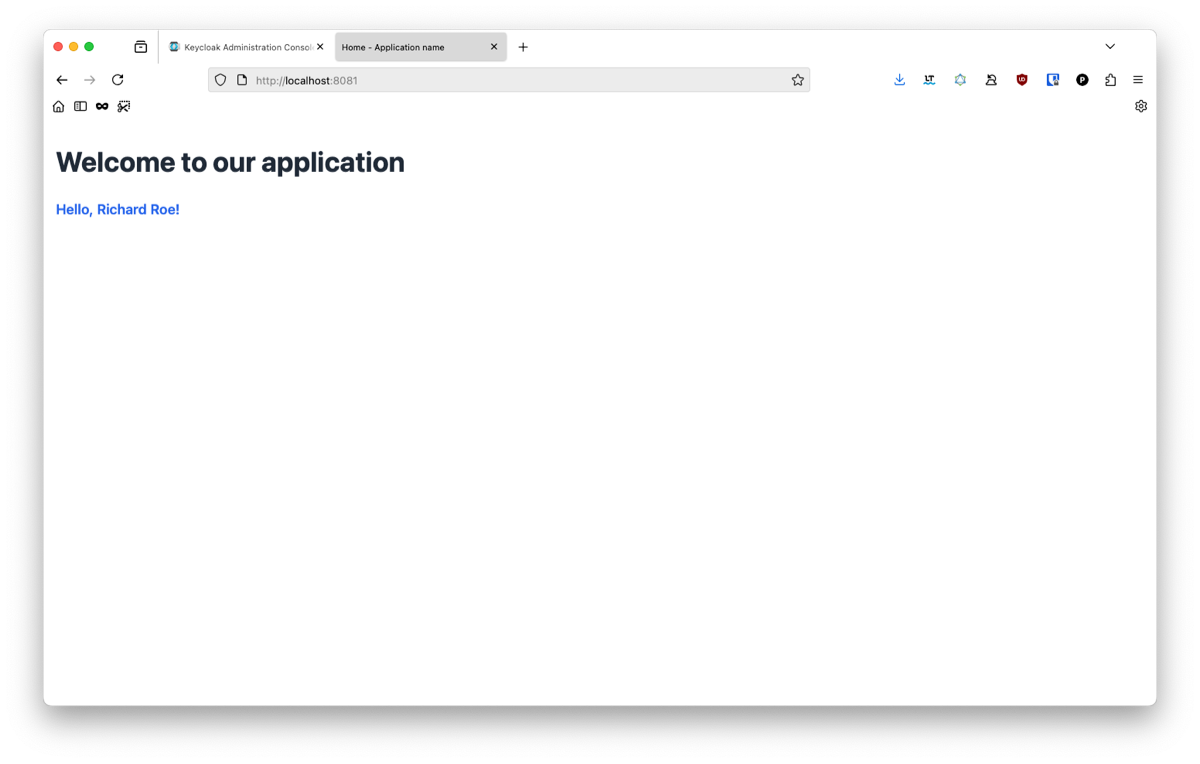
And that’s it! the application finally display our user’s informations correctly. 🥳
To go further
While we finished our authentication flow, you may want to add more functionality such as logging out or protecting endpoint with authentication.
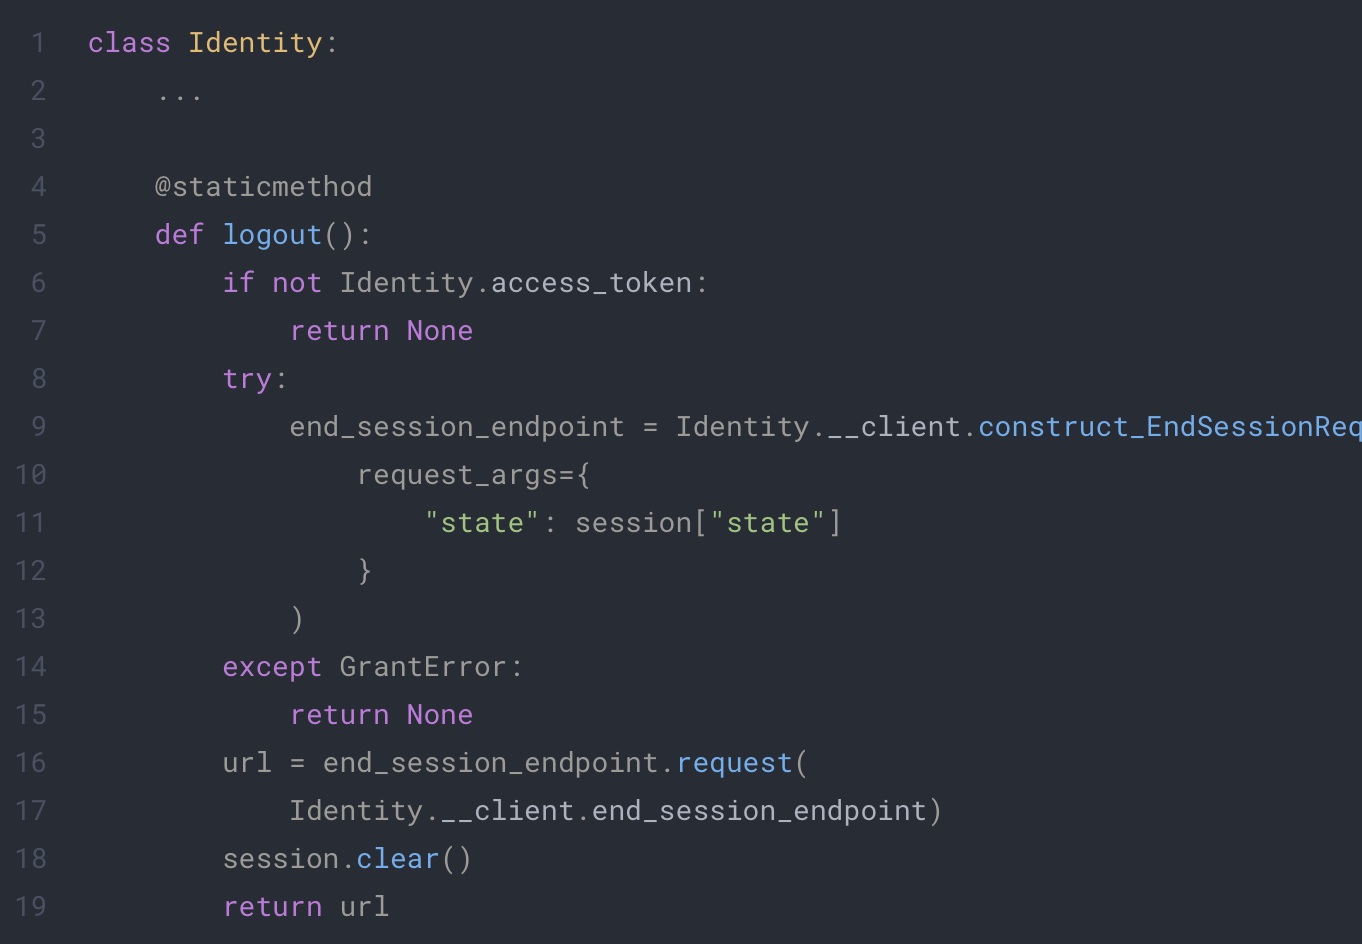
For this we will add the following to our Identity class:
app/extenstions/identity.py
This code will use the oic library to end the session on keycloak and will clear the session on the client side. You can now call this function in your code or create a dedicated endpoint like this:
app/auth/routes.py
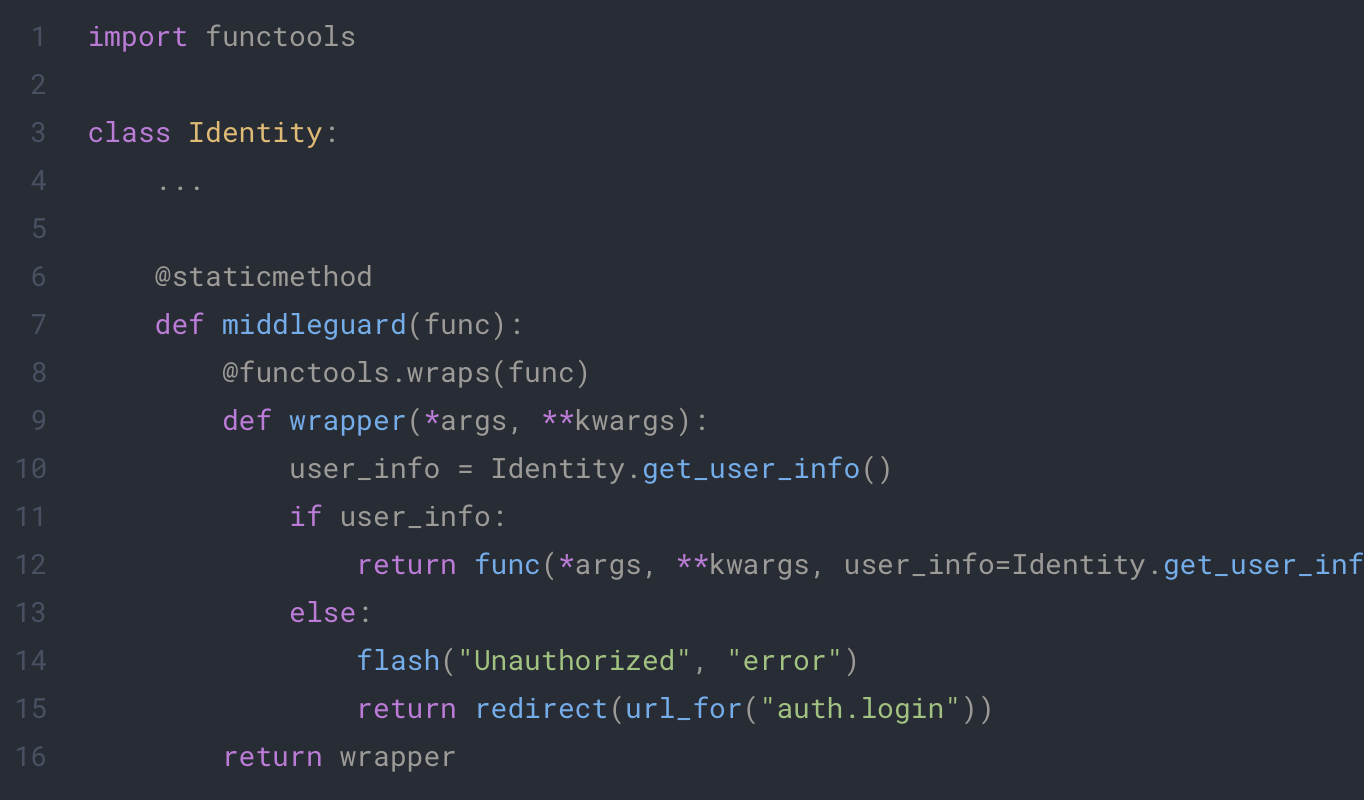
For the second part, the best way to secure any endpoint easily is to write a decorator that will do every check for you:
app/extensions/identity.py
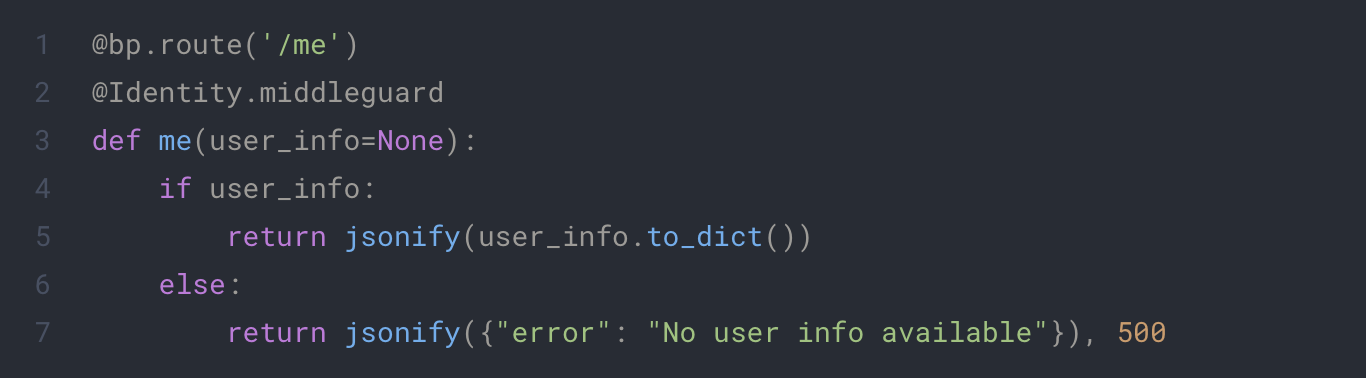
You will just need to put this decorator on any route you want to protect and it will be inaccessible to the client if he doesn’t login first. It will also add the user information as an optional parameter from you function on call. This way you will be able to directly retrieve the information of the user without calling the get_user_info function yourself. Example:
By following this tutorial, you’ve successfully configured Keycloak as an OpenID Connect provider and integrated it with a Python Flask application. You created a secure authentication flow, retrieved user information, and added logout functionality. You also learned how to structure a Flask application for scalability and maintainability.
For production environments, don’t forget to:
Secure secrets and sessions properly
Enable HTTPS
Use strict redirect URI validation
Implement token expiration and refresh handling
With these foundations in place, you’re ready to extend your app with protected APIs, role-based access control, and much more. 🚀
Bridging the Gap Between Security and Business Needs
In 2025, organizations continue to struggle with authorization management. Technical complexity and miscommunication between IT and business teams often create bottlenecks that slow down enterprise agility.
While access policies have always been fundamental to applications, today’s landscape is dramatically different. Generative AI is transforming this space by bridging the divide between business requirements and technical implementation.
Generative AI: Transforming IAM Teams
In 2025, generative AI has opened new possibilities across multiple industries. For IAM teams specifically, it serves as a powerful force multiplier that extends their capabilities and unlocks strategic opportunities.
IAM professionals can now escape the endless cycle of technical translations and implementations. Instead, they’re free to focus on what truly matters: crafting innovative security strategies, enhancing identity governance, and aligning security with business goals.
This shift creates a compelling opportunity for organizations to turn access management from a necessary burden into a strategic business advantage.
From Business Language to Secure Code: Finally Bridging the Gap
After more than a year of deploying AI solutions for authorization, we’ve identified their main strength: they create bridges between business needs expressed in common language and tailored technical implementation.
This advancement solves one of the historical challenges of cybersecurity: communication between different stakeholders. On one side, business teams express functional needs; on the other, IAM experts translate them into operational policies.
This augmented collaboration enhances IAM expertise in its strategic dimensions:
Designing access policies aligned with the overall security strategy
Compliance with regulatory and contractual requirements
Optimizing performance and security implementations
Unified governance of access policies
AI and Access Control: A Human-Machine Synergy
To understand the value of this combined approach, let’s take a concrete example:
Imagine that within a career management application, access rights must be adapted according to roles and hierarchical relationships. A manager should be able to supervise the objectives of their direct reports, while each employee should have limited rights to their own data.
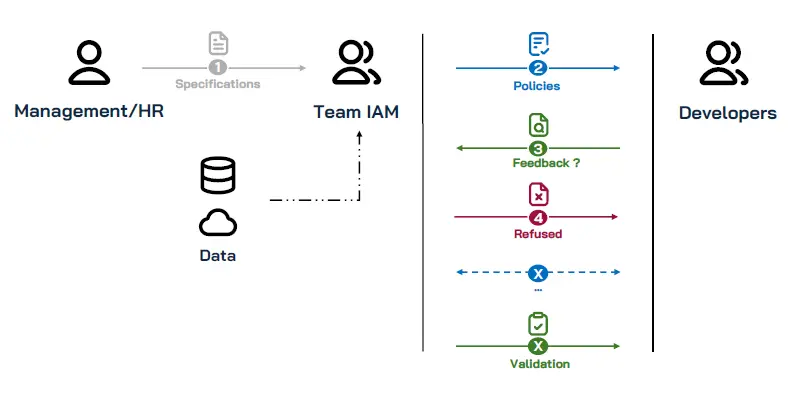
Without AI, this request would require:
Detailed interpretation by IAM teams
Numerous and complex technical data sources
Implementation by developers
Validation testing
Successive adjustments in case of misunderstanding
Implementing access policies without AI
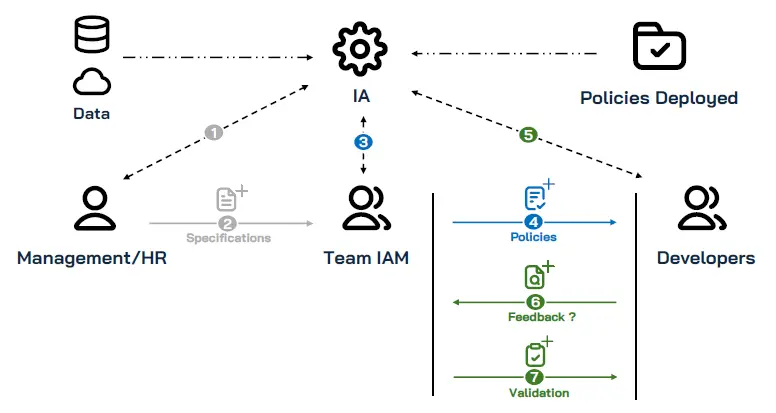
With AI tools assisted by IAM experts, this same rule is first automatically translated into a technical access policy, then verified and refined by specialists before deployment. AI accelerates the process and reduces the number of back-and-forth exchanges between teams, but human expertise ensures its relevance and security.
Implementing access policies with AI
Tangible Benefits of This Human-Machine Collaboration
Since we began supporting our clients through this transformation, we’ve observed tangible benefits for both IAM and business teams:
Enhancing IAM expertise: specialists can focus on high-value tasks rather than repetitive technical translations
Facilitated communication: reducing misunderstandings between business and technical teams
Improved policy quality: rules are more precise and better aligned with actual needs, while remaining secure
Enhanced documentation: security choices are naturally documented, facilitating audits and controls
Increased adaptability: policy modifications can be proposed, validated, and implemented more quickly
But the most important benefit is undoubtedly the reconciliation between security imperatives and business needs. AI, under the supervision of IAM experts, allows security to become a facilitator rather than a constraint, ultimately improving operational efficiency.
Policy Companion: A Workflow Redesigned in 5 Steps The market now offers several solutions that integrate generative AI to assist in access policy management. Players like Axiomatics with Policy Companion have adopted these technologies to complement—not replace—human expertise.
At Ariovis, we’ve developed a balanced approach to support our clients. We help them select and integrate these tools into their existing ecosystem and train their IAM teams to leverage these technologies effectively without losing control.
How does this synergy work in practice?
Needs expression phase: Business teams formulate their access requirements in natural language
Initial AI translation: The tool generates a technical version of these policies
Validation and optimization by IAM experts: Specialists verify, correct, and optimize the generated policies
Feedback to business for confirmation: AI translates the technical version back into accessible language
Secure deployment: After final validation, IAM experts deploy the policies in the environment
This approach combines the best of both worlds: the efficiency and speed of AI with the rigor and expertise of IAM professionals.
Addressing the « Hidden IAM » Challenge
This collaborative approach also addresses the growing problem of « Hidden IAM » that we explored in a previous article
When authorizations are hard-coded into applications, they escape centralized governance.
Using AI under the supervision of IAM experts enables:
Easier standardization of access policies across the organization
Facilitated adoption of centralized authorization solutions
Limited development of fragmented authorizations that are difficult to audit
Our Vision for the Future
At Ariovis, we’re convinced that generative AI, properly framed by IAM experts, will continue to positively transform identity and access management in the years to come. Our « Security Meets Business » approach finds an ideal balance in this human-machine collaboration.
We’re transforming how business and security teams interact. Cybersecurity is no longer just a technical hurdle that few understand—it’s becoming a business enabler that everyone can appreciate. While remaining firmly grounded in expert oversight, security becomes more accessible and valuable across all organizational levels.
Want to Learn More?
Find out how to integrate generative AI into your access management strategy with expert guidance from our IAM team, and stay ahead of the curve.
At Ariovis, we believe that security should be a value driver, not a constraint.
In the face of hardware vulnerabilities, traditional security models show clear limitations. In this article, we address a fundamental flaw that continues to threaten systems worldwide: Spectre. This critical hardware vulnerability affects processors at their core, requiring us to fundamentally rethink our security approaches. The Zero Trust model, which aligns perfectly with our « Security meets Business » philosophy, offers a compelling response to these emerging threats that too often remain in the background of security discussions.
While software security often takes center stage in cybersecurity strategies, hardware security frequently remains the overlooked component of our defenses. However, as we’ll explore, the Zero Trust approach can provide an effective shield, even against vulnerabilities embedded deep within our infrastructure.
What is the Spectre vulnerability?
In the cybersecurity landscape, certain vulnerabilities create distinct « before and after » moments. Discovered in 2018, Spectreis undoubtedly one of these watershed moments. Unlike conventional software flaws, Spectre exploits an architectural feature present in virtually all modern processors: speculative execution.
To understand Spectre, imagine your processor trying to save time by anticipating and executing instructions before knowing whether they’ll actually be needed. If this prediction proves incorrect, the processor discards the result but leaves traces of these operations in its caches. Spectre allows attackers to exploit these traces to extract sensitive information, such as passwords or cryptographic keys. It’s as if an intruder, rather than forcing your front door, could read your confidential documents by looking through the walls.
Why is this a serious concern?
The danger is very real: a simple malicious website can potentially read sensitive data stored in your browser or even the browser’s memory, which might contain passwords stored in plain text by your password manager extension—all without requiring any malware installation.
This reality fundamentally challenges the isolation principles we’ve long taken for granted in our information systems. In essence, the very foundations of computer security have been shaken.
What are the concrete risks for your organization?
The discovery of Spectre highlighted an uncomfortable truth: even the hardware architecture of our systems cannot be considered inherently secure.
This situation exposes your organization to three major risks :
Sensitive data leakage : Confidential information can be exfiltrated even through supposedly isolated environments
Ineffectiveness of traditional controls : Classic security mechanisms provide insufficient against this threat
Remediation challenges : The impossibility of completely eliminating this flaw increases the complexity of maintaining a robust security posture
Rather than viewing these challenges solely as threats, our approach transforms them into opportunities for optimization and value creation for your organization.
How should we address this challenge?
When a vulnerability as fundamental as Spectre tests our security systems, the Zero Trust model emerges as a particularly relevant architectural response. Its core principle— »Never trust, always verify »—aligns perfectly with the nature of this threat that exploits processors’ internal optimization mechanisms.
The Zero Trust model, recommended by authoritative organizations like NIST and ANSSIis built on several principles that create complementary layers of protection against Spectre:
Continuous authentication: Each access is verified, limiting potential exploitation windows
Micro-segmentation: Drastically limiting exposure zones reduces the impact of memory leaks
Principle of least privilege: Assigning minimal necessary rights limits what an attacker could obtain
Inspection and logging: Constant monitoring facilitates detection of suspicious activities
This interplay between Spectre and Zero Trust perfectly illustrates the necessary evolution of security approaches. At Ariovis, we observe that this evolution not only enhances protection but also creates value for organizations by optimizing their security processes.
How does this translate to practical defense?
When Spectre attempts to exploit hardware architecture flaws, the Zero Trust model provides robust resistance. This defense materializes through four key strategies that, together, significantly neutralize attack vectors:
1. Keep systems updated with a robust patching strategy
In response to Spectre, processor manufacturers, operating system vendors, and browser developers have all released patches that mitigate certain aspects of the vulnerability. While these patches are imperfect in isolation, they constitute an essential first line of defense.
Ariovis, in partnership with Dhala, now offers a comprehensive workstation security solution that includes:
Automation of critical updates
Monitoring of missing patches
Centralized management of update policies
When patches and Zero Trust principles work together, they create a barrier that, while not eliminating the vulnerability entirely, substantially complicates its exploitation.
2. Catalog and monitor your data against side-channel attacks
The nature of Spectre, which exploits side channels to exfiltrate data, directly conflicts with the continuous monitoring principle of the Zero Trust model.
For effective protection, three essential actions must be implemented :
Classify your data according to sensitivity
Catalog the location of your critical information
Monitor unusual access to this data
Solutions like Netwrix Auditor, recommended by Ariovis, enable precise tracking of who accesses what data and when. This vigilance creates a significant obstacle for Spectre-type attacks, which typically require multiple access attempts that such systems can detect.
3. Segment your infrastructure according to ANSSI recommendations
Micro-segmentation, a fundamental principle of Zero Trust, presents a formidable challenge for Spectre, which seeks to cross boundaries between isolated environments. Following ANSSI’s recommendations on network segmentation, this approach involves:
Creating distinct security zones based on data sensitivity
Establishing strict controls at boundaries between zones
Applying the principle of least privilege to each access request
Our specialized team helps you design and implement a segmented architecture that multiplies obstacles against Spectre and dramatically reduces the exploitable attack surface.
4. Plan strategic hardware renewal
Hardware evolution plays a crucial role in this defense strategy. Processors designed after 2019 incorporate hardware protections against Spectre and its variants, significantly reducing the attack surface at its source.
Our « Security Meets Business » approach helps you identify critical systems for priority renewal, gradually transforming your infrastructure to make it naturally more resistant to hardware vulnerabilities.
When Spectre challenges Zero Trust, we witness a fascinating contest between a fundamental vulnerability and a security model designed to trust nothing by default. This situation perfectly illustrates the necessary evolution of cybersecurity approaches when facing threats that question the very foundations of IT architecture.
We’ve seen how Zero Trust principles offer structured resistance to Spectre’s exploitation mechanisms:
Continuous authentication against unauthorized access
Micro-segmentation against lateral movement
Principle of least privilege against privilege escalation
Continuous monitoring against abnormal behaviors
At Ariovis, we believe this approach not only provides effective defense but also perfectly aligns with our « Security Meets Business » vision. Indeed, a well-implemented Zero Trust architecture delivers benefits beyond protection against vulnerabilities like Spectre:
Optimization of information flows within the organization
Clarification of responsibilities and access boundaries
Strengthened regulatory compliance
Facilitated infrastructure evolution
This is precisely why Ariovis is launching a new offering that integrates safety and cybersecurity with native hardware security features. Against Spectre and future hardware vulnerabilities that will inevitably emerge, Zero Trust represents not just an effective shield but also a catalyst for organizational transformation.
Against Spectre and future hardware vulnerabilities that will inevitably emerge, Zero Trust represents not just an effective shield but also a catalyst for organizational transformation.
Contact us to discover how the interaction between hardware threats and Zero Trust architecture can become an opportunity for your company.










 Know that you are familiar with Flask and project organization, we will start to develop the OIDC connector to Keycloak !