
Phishing is one of the most widespread cyberattacks. And also one of the most effective: every day, thousands of people click on a fake link, share their login credentials, or download malware… without even realizing it.
The good news is that it’s entirely possible to protect yourself effectively from phishing, without spending a penny. You just need to be aware of the best practices and apply them daily.
1. Learn to recognize phishing attempts
The first line of defense against phishing is you. And it starts with being a little observation.
Here are some typical signs of a fraudulent message:
A strange or misspelled email address
An urgent tone: « Your account will be suspended », « Immediate action required »
● A link to click that leads to a suspicious site
An unexpected attachment
● Spelling or formatting errors
Tip: hover your mouse over the link without clicking. You’ll see the real URL. If it doesn’t match the official site, run away.
2. Always verify the sender… and the context
Receiving an email from a service you don’t use? An invoice from a company you don’t know? A message from a « friend » with a strange tone?
In 90% of cases, it’s phishing.
Ask yourself these simple questions:
Was I expecting this message?
Is the sender’s address legitimate?
Is the message’s tone consistent with the company or the person?
When in doubt, don’t click on anything. Go directly to the official website concerned, or contact the sender through another channel.
3. Enable two-factor authentication (MFA)
Even if you fall into the trap of a fake site, it’s not too late. The best defense to prevent your accounts from being compromised is two-factor authentication.
For free, you can enable it on:
Gmail, Outlook, Yahoo
Social networks (Facebook, Instagram, TikTok, etc.)
E-commerce or online service sites
It adds an additional verification: a code by SMS or via an app like Google Authenticator.
. A hacker who only has your password won’t be able to go further.
4. Update your devices
An updated system = fewer exploitable vulnerabilities.
Whether it’s your computer, phone, or even your browser, remember to:
● Install updates as soon as they’re available
● Use antivirus software (even free)
● Delete applications you no longer use
Updates often include invisible but essential security patches.
5. Use filtering DNS against malicious sites
A lesser-known but very effective trick: change your internet box’s DNS to use a service that automatically blocks phishing sites.
For example, DNS4EU is a free European solution that you can easily configure at home.
Ariovis has written clear guides, adapted to each operator:
The traditional perimeter model is becoming increasingly obsolete. Once an attacker enters the IT system and gains access to the internal network, they can move laterally (meaning they can explore and access systems and services within the network) often without strong authentication or authorization controls at each step.
This lack of control allows the attacker to increase privileges, access sensitive data, or compromise other systems.
This is where Zero Trust comes into play. In Zero Trust, nothing and no one is trusted by default, even within the perimeter. Access attempts are dynamically verified by taking into account identity, context, and security posture.
IAM (Identity and Access Management) aims to:
Verify identity (human and non-human)
● Apply conditional access policies
● Manage rights with models (RBAC, ABAC, CBAC)
In this article, we will see that IAM is not just a component, but a pillar of a Zero Trust strategy.
Zero Trust in a nutshell According to the NIS
What is Zero Trust?
The NIST (National Institute of Standards and Technology) answers this question in a publication called Zero Trust Architecture.
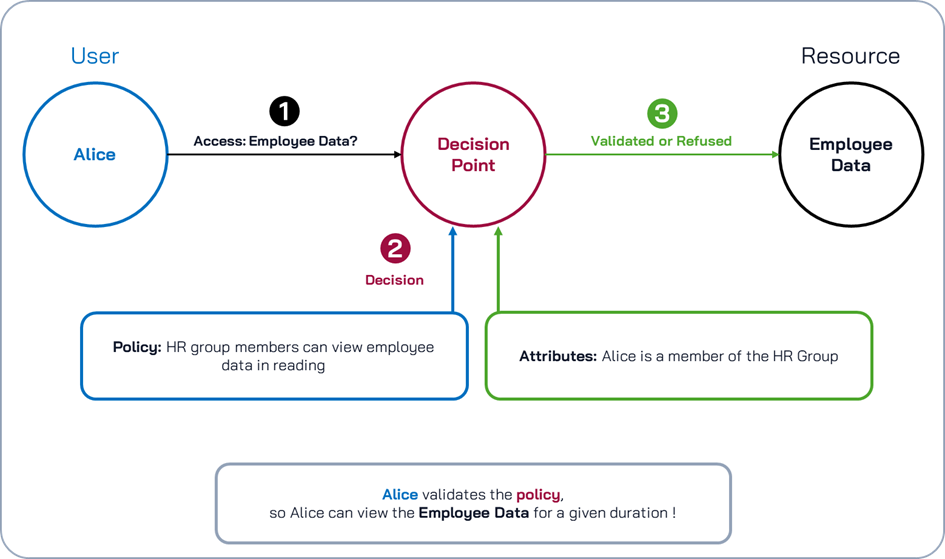
NIST defines Zero Trust as a paradigm that grants no implicit trust to a user, device, or network (whether internal or external). Access to a resource must be authenticated, authorized, and continuously validated.
The 7 pillars of Zero Trust
To implement a sound Zero Trust strategy, NIST identifies 7 foundational pillars:
Resources: All assets (data, devices, etc.) are considered resources.
Communication: Communications are no longer trusted, whether they are internal to company equipment or coming from outside. Consequently, the same security measures must be applied by default (they must be authenticated and authorized).
Session-based access: Access is granted per session with granular control.
Dynamic Policies: Access decisions are based on dynamic policies that include context and behavior analysis.
Monitoring: The integrity and security of company assets must be continuously monitored.
Authentication & Authorization: Access to resources is dynamically authenticated and authorized through continuous monitoring, re-evaluation, and policy enforcement to maintain a balance between security and efficiency.
Constant Improvement: The organization must collect as much information as possible about its assets, infrastructure, networks, and communications to strengthen its security policies.
Logical Components of a ZTA
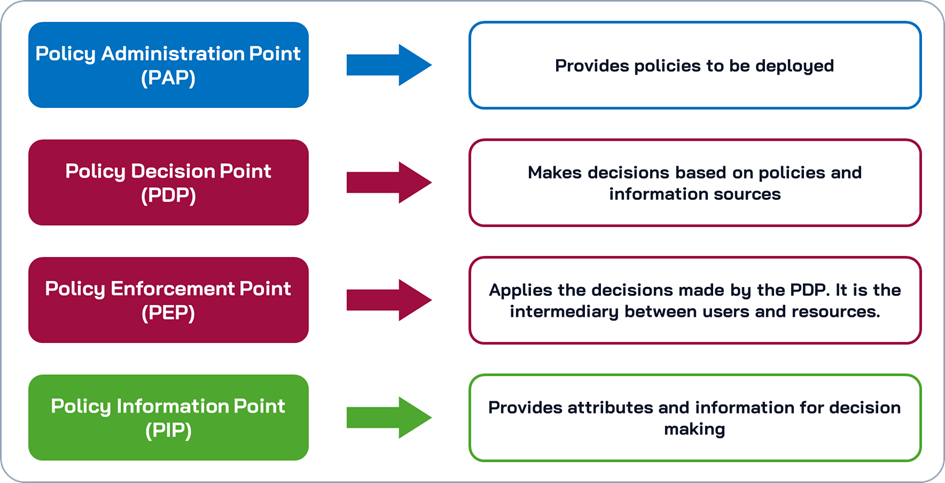
There are several necessary logical components for implementing a ZTA (Zero Trust Architecture). These components are services that can be On-Premises or even in the cloud.
Here is the description of the components:
Policy Engine (PE): Makes access decisions.
Policy Administrator (PA): Implements decisions through the network.
Policy Enforcement Point (PEP): Implements access policies at the resource level
Data sources: CDM, PKI, SIEM, IAM, etc.
IAM: The Foundation of a ZTA Policy
IAM is at the Heart of Zero Trust
IAM manages, verifies, and controls identities (human and non-human). It enables granular and dynamic access control based on attributes, context (location, time), and behavioral context.
In Zero Trust, every decision depends on precise identity verification and real-time context evaluation. These two points are managed by IAM.
Without IAM, a Zero Trust strategy could not be relevant.
Essential IAM components
Several IAM components are crucial for implementing a ZTA. Ariovis proposes here a list of essential components:
Identity Lifecycle Management: Onboarding, Offboarding, Joiner-Mover-Leaver (JML), temporary access, all processes that ensure the right access at the right time for the necessary duration.
Rights Models: Use of rights models such as RBAC (Role-Based Access Control) and/or ABAC (Attribute-Based Access Control) for the principle of least privilege and contextual access.
Privileged Access Management (PAM): Strict control and monitoring of administrator and sensitive accounts.
Non-Person Identity (NPE): Securing the management of service accounts, API keys, secrets, and certificates used by services, bots, and applications.
From traditional IAM to Zero Trust IAM
Static IAM vs Dynamic IAM
Traditionally, IAM relies on single authentication during login and a static RBAC model. Zero Trust IAM requires continuous validation of identity and context during a session. Access is dynamically re-evaluated based on context.
Integration with other Zero Trust components
IAM does not work in isolation in a ZTA. For IAM to be as effective as possible, it must be integrated with Zero Trust components:
UEBA (User and Entity Behavior Analytics): By analyzing behavior and detecting anomalies, UEBA enables IAM to trigger additional authentication or dynamically restrict access.
Policy Engine (PE) and Policy Administrator (PA): IAM directly uses these components to apply real-time decisions on access control. PE and PA will use IAM information to make granular decisions.
Standard Protocols: SAML, OIDC (OpenID Connect), and SCIM protocols are essential for streamlining identity federation, authentication, and managing identity lifecycles. Here, you can find a guide on how to connect an application with OIDC.
Migration to a ZTA
To migrate to a ZTA, there are two key points according to NIST:
Start with a hybrid approach: Most organizations use a hybrid model, which combines the perimeter model with a Zero Trust approach.
Progressive and based on Use Case: Migration should be incremental, focused on specific use cases rather than a complete transformation all at once.
Here are the key migration steps:
Identify the actors: To begin, list the users, services, and non-human identities that interact with resources. Don’t forget identities that come from shadow IT, which we call « Hidden IAM »
Asset inventory: Next, make an inventory of the hardware, software, data, and cloud services that the organization manages or owns.
Identify key processes: Then, identify critical workflows, and perform risk analysis to define access requirements.
Define access policies: Next, develop dynamic policies based on identities, asset status, and context (e.g., location, time, etc.)
Technology selection: Before deployment, research and choose solutions for Zero Trust components: IAM, PDP, PEP, etc.
Initial deployment and monitoring: Now begin deploying the ZTA. Start with low-risk use cases. Monitor the new architecture and make configuration adjustments if needed.
Extend the ZTA: Finally, continue deployment on increasingly critical systems.
Conclusion
IAM is much more than a cybersecurity component; it’s a pillar of a sound Zero Trust strategy. In a world where identity is a major target for attackers, IAM is the control tower for continuously verifying, authorizing, and monitoring every access request.
At Ariovis we apply these principles with our clients. In all our integrations, we use a Zero Trust approach. This means that every solution we implement has no implicit trust, requires authentication at every step, and applies dynamic rules based on context. For us, Zero Trust is not just a « buzzword, » but a concrete model anchored at the heart of our IAM projects.
After years of watching the power struggle between American and Asian tech giants, the EU is now trying to regain control over its data, infrastructure, and cybersecurity. This awakening, still fragile, is taking shape through new regulations, sovereign tech initiatives… and a clear ambition: no longer be subject to the rules of Silicon Valley.
But is this “resistance” credible? Where is it being deployed? And can it truly reverse decades of technological dependence?
Let’s take a closer look at this ongoing reconquest.
A deeply rooted American dominance
Since the early days of the web, the United States has shaped the global internet.
Google, Apple, Meta, Amazon, Microsoft, the main platforms, everyday tools, cloud services, and even submarine cables are mostly controlled by American firms, often closely tied to intelligence and surveillance interests.
The consequences?
Massive dependency for European businesses and public services
Systematic exposure to U.S. extraterritorial laws (like the Cloud Act)
A continuous flow of our personal data to servers often located outside the EU
This imbalance is no longer just economic it’s strategic.
Europe fights back: a multi-pronged approach
Faced with this reality, the European Union has chosen not to stand by. In recent years, it has launched a series of concrete initiatives to reclaim digital sovereignty:
Strong regulations: GDPR, DSA, DMA
The GDPR (General Data Protection Regulation), adopted in 2016, laid the foundation for the right to digital privacy.
The DSA (Digital Services Act) and DMA (Digital Markets Act) aim to regulate large platforms and rebalance the digital playing field.
Sovereign technology initiatives
GAIA-X: a European cloud designed to host strategic data
Chips Act: to bring some semiconductor manufacturing back to Europe
EU Digital Identity Wallet: a secure European digital ID
European-built alternatives: like DNS4EU
Less publicized but just as strategic, DNS4EU (DNS for Europe) is an initiative to build a sovereign DNS service that aligns with European standards — and remains independent from major U.S. players.
DNS4EU: A quiet yet powerful symbol
DNS is the internet’s invisible directory. It’s what enables your device to turn a domain name (like ariovis.fr) into an IP address your browser can understand.
Today, this process mostly runs through DNS servers owned by Google or Cloudflare.
DNS4EU offers a European alternative:
Hosted within the EU
Compliant with GDPR
Not commercially exploited
Equipped with security filters to block digital threats
It’s a small technical change but a big political statement: Europe still has the capacity to build its own infrastructure.
And this change can start right at home, by reconfiguring your router’s DNS settings.
Taking back control starts at home
Digital sovereignty isn’t just an institutional issue, it’s also about individual choices.
Changing your DNS, protecting your data, understanding who collects what and where it’s sent these simple actions are modern-day digital citizenship.
At Ariovis, we help you make informed choices with step-by-step guides to install DNS4EU based on your internet provider:
Europe doesn’t (yet) have its own Google, Amazon, or mass-market operating systems. But it’s laying the groundwork for an alternative digital model — one that’s more ethical, more controlled, and more transparent.
DNS4EU, GAIA-X, GDPR… these are building blocks of a new digital sovereignty.
And for this resistance to become a viable alternative, it must translate into everyday practice. Individuals, businesses, institutions, everyone has a role to play in restoring meaning to the word “independence” in the digital world.
The internet is a space of freedom, but also a space of threats.
In this context, the European Union launched DNS4EU: a European DNS service promoted as safer, more transparent, and more privacy-friendly. But since its announcement, opinions have been divided:
Is DNS4EU a response to cybersecurity and digital sovereignty challenges, or a step toward greater state control of the internet?
Let’s break down this sensitive topic and offer a practical guide for those who want to take back control.
DNS: A small acronym, a big issue
Before diving into DNS4EU, let’s clarify what DNS (Domain Name System) actually is.
When you type a web address (like ariovis.fr), your device uses a DNS server to translate that domain name into an IP address, so you’re directed to the right website. Think of it as the invisible phone book of the internet.
Here’s the problem: these DNS servers often belong to your internet provider or a major American tech company. They can:
log your queries,
exploit your data for commercial purposes,
or censor content, depending on the country and its policies.
That’s where DNS4EU comes in.
DNS4EU: An ambitious European project
DNS4EU is a public DNS service supported by the European Commission, with clear goals:
provide local, secure DNS resolution,
offer a European alternative to Google, Cloudflare, OpenDNS, etc.,
protect citizens against digital threats (phishing, malware…),
comply with GDPR and reduce data exploitation for commercial use.
In concrete terms, DNS4EU promises:
more privacy,
more transparency,
more technological sovereignty for Europeans.
But some also see… a risk of misuse.
Digital freedoms: A line that must not be crossed
A fair question many people are asking: if Europe provides a centralized DNS, what’s to stop it from eventually blocking content or creating a blacklist of forbidden sites like in more authoritarian regimes?
For now, DNS4EU is optional, and its setup is entirely voluntary.
But this skepticism raises a broader question: who controls the internet’s critical infrastructure, and under what conditions?
Using DNS4EU means choosing European transparency over the commercial opacity of some foreign services.
But like any tool, it all comes down to how it’s governed and how it’s used.
Using DNS4EU at home: Why (and how) to set it up?
Despite the debates, DNS4EU can be a powerful cybersecurity tool for individuals.
Switching your DNS to DNS4EU enables you to:
better protect your privacy,
automatically block malicious websites,
improve stability and speed, thanks to local infrastructure,
and filter sensitive content (useful for children, for instance).
The good news: it only takes a few minutes to set up, directly on your internet router.
At Ariovis, we’ve created simple, step-by-step guides tailored to each ISP:
In just a few clicks, you can regain control of your browsing, without installing any software or configuring each device individually.
In conclusion: Get informed to make better choices
DNS4EU is neither a magic bullet nor a looming threat. It’s a tool, and it’s up to each person to make an informed decision about how to use it.
The real challenge isn’t choosing between “freedom” or “security,” but finding a smart balance that respects your rights and meets your digital needs.
By configuring your own DNS, you’re already taking a step toward more responsible and sovereign browsing.
And if you want to go further — protect your home network, help your children navigate online, or just stay informed — check out our practical, easy-to-understand content on Instagram: @ariovis_officiel
Simple tips, no jargon, for a safer, more conscious web.
DNS4EU is a free European DNS service supported by the EU, designed to ensure greater safety, privacy, and performance.
Changing your DNS is like setting up a global parental control filter for your Wi-Fi — without installing anything.
4. Really talk with your kids
Let’s be honest: no tool can replace communication.
You don’t need to be a cybersecurity expert to pass on the right habits, just start the conversation.
Simple rules to repeat often:
Never share your real name, school, or home address
Don’t reply to strangers online
Tell your parents right away if something shocking appears on screen
You can also watch a short video together, or ask an open-ended question like:
“So… do you know what an online scam looks like?”
5. Teach good habits… in a fun, simple way
Cybersecurity doesn’t have to be scary or complicated.
With the right words and tools, you can start teaching kids how to stay safe online, and make it a shared moment.
Instead of scolding or silently watching over their shoulder, try:
asking questions about real-life situations (“What would you do if someone messaged you in a game?”)
discussing safe behaviors together
or watching a short illustrated video with them to spark the conversation
At Ariovis, we believe that awareness comes through education and repetition, not fear.
That’s why we regularly share practical, age-appropriate tips on Instagram, designed for both kids and parents!
A smart move: follow @ariovis_officielto get weekly insights on how to make the internet safer for the whole family.
In summary
Protecting your children online doesn’t require a big budget or technical skills.
With a bit of common sense, a few simple settings, and open conversation at home, you can already provide a much safer digital environment.
Are you an SFR customer looking to enhance the security and privacy of your internet connection? Configuring your SFR box to use DNS4EU servers is an effective solution. At Ariovis, experts in cybersecurity and access management, we’re here to guide you through a simple tutorial to install DNS4EU on your SFR box.
Why Use DNS4EU on Your SFR Box ?
DNS servers play a crucial role by translating domain names into IP addresses. By default, your SFR box uses the operator’s DNS servers, which do not always offer optimal personal data protection.
DNS4EU, supported by the European Commission, provides a secure and privacy-focused DNS infrastructure across Europe. Switching to DNS4EU allows you to :
Protect your personal data
Enjoy safer browsing
Benefit from a reliable and high-performance DNS service
Steps to Configure DNS4EU on Your SFR Box
Follow this step-by-step Ariovis guide to change your DNS settings on an SFR box in just a few minutes.
1. Log in to Your SFR Box Interface
Make sure you’re connected to the SFR network (Wi-Fi or Ethernet).
Open your browser and go to:
http://192.168.1.1
Log in using your credentials. By default, the username is usually admin, and the password is written on your box’s label.
2. Access the DNS Settings
In the interface, go to Local Network or Advanced Settings.
Look for DNS Servers or DNS Configuration.
3. Configure DNS4EU servers on your box SFR
Here are the 5 official DNS4EU addresses you can set on your SFR box for enhanced privacy and network security:
In your SFR box interface, go to Advanced Settings > Network.
Find the DNS Servers section, and replace the existing values with the five DNS4EU addresses above.
Save your changes and restart your box SFR and connected devices to apply the new DNS settings.
These five servers (two IPv4 and three IPv6) offer a more secure, reliable, and privacy-respecting browsing experience, fully aligned with European standards.
Need more help? Check out our full tutorial to guide you through the setup based on your SFR box model (4, 5, or 6).
4. Save and Restart the Box
Save your changes.
To apply the new configuration, restart your SFR box as well as all connected devices.
How to Verify DNS4EU is Active ?
To confirm your SFR box is using DNS4EU, perform a simple test:
If the DNS server shown is one of the DNS4EU addresses (51.81.216.60 or 51.81.216.70), the configuration is successful.
Ariovis: Your Cybersecurity Partner for a Safer Network
Changing your DNS is an important first step toward protecting your home network. At Ariovis, we help individuals and businesses with cybersecurity projects, access management (IAM), and network infrastructure security.
Need personalized guidance? Reach out to us or visit our website at ariovis.fr
Conclusion
Installing DNS4EU on an SFR box is a simple and effective way to improve the privacy and security of your internet connection. Follow this Ariovis guide for a quick and reliable setup, and browse with peace of mind using a European DNS service designed to protect your data.
Important information This article is currently being updated. Some steps may no longer match your device’s current interface. We invite you to consult Bouygues Telecom‘s official support page.
Additional articles on configuring DNS4EU on Windows, Android, macOS and iPhone will be published soon.
Are you a Bouygues Telecom subscriber looking to better secure your internet connection? Installing DNS4EU on your Bbox is a simple and effective solution to strengthen both the privacy and security of your online activity. At Ariovis, experts in cybersecurity and access management (IAM), we’ll show you how to easily configure DNS4EU on your Bbox.
Why configure DNS4EU on your Bbox ?
DNS servers translate domain names (like ariovis.fr) into IP addresses. By default, the Bbox uses Bouygues Telecom’s DNS servers, which may not provide optimal privacy.
DNS4EU is a European DNS service supported by the European Commission, designed to ensure :
Better protection of personal data
Secure internet browsing
A reliable and high-performance European infrastructure
By configuring DNS4EU on your Bbox, you gain stronger daily cybersecurity.
How to install DNS4EU on your Bbox
Here are the simple steps recommended by Ariovis experts to configure DNS4EU on your Bbox :
1. Log in to your Bbox interface
Make sure you’re connected to your Bouygues Telecom network (Wi-Fi or Ethernet).
Open a browser and go to:
http://192.168.1.254
Log in with your credentials. By default, the username is often admin, and the password is located on a label underneath your Bbox.
Access the DNS settings
In the menu, click Advanced Settings or Local Network.
Then find the DNS Servers or DNS Configuration section.
3. Configure DNS4EU servers on your Bbox
Here are the 5 official DNS4EU addresses you can set on your Bbox for enhanced privacy and network security:
In your Bbox interface, go to Advanced Settings > Network.
Find the DNS Servers section, and replace the existing values with the five DNS4EU addresses above.
Save your changes and restart your Bbox and connected devices to apply the new DNS settings.
These five servers (two IPv4 and three IPv6) offer a more secure, reliable, and privacy-respecting browsing experience, fully aligned with European standards.
Need more help? Check out our full tutorial to guide you through the setup based on your Bbox model (4, 5, or 6).
4. Save your changes and restart the Bbox
Save the configuration changes.
Restart your Bbox and all connected devices to apply the new DNS settings.
Verify that DNS4EU is active
To make sure your Bbox is now using DNS4EU, perform a quick test :
The response should show a DNS server address matching DNS4EU (51.81.216.60 or 51.81.216.70).
Ariovis – Your Partner for Stronger Cybersecurity
Changing your DNS servers is a first step toward better protecting your home network. At Ariovis, we help both individuals and businesses secure their infrastructure and manage identity and access (IAM).
For any questions or personalized support, contact us or visit our website : ariovis.fr.
Conclusion
Installing DNS4EU on your Bbox is a simple and effective way to improve the privacy and security of your internet browsing. Follow this Ariovis guide for a successful setup and browse with confidence thanks to a European DNS service focused on protecting your data.
Important information This article is currently being updated. Some steps may no longer match your device’s current interface. We invite you to consult Free’s official support page.
Additional articles on configuring DNS4EU on Windows, Android, macOS and iPhone will be published soon.
Are you a Freebox user looking to enhance your online privacy and security? Installing DNS4EU on your Freebox is a smart choice. At Ariovis, experts in cybersecurity and identity access management (IAM), we’ll walk you through how to configure your Freebox to use DNS4EU—a secure, privacy-respecting European DNS alternative.
Why Choose DNS4EU for Your Freebox?
DNS servers play a critical role in your browsing experience: they translate domain names (e.g., ariovis.fr) into IP addresses your devices can understand. By default, your Freebox uses Free’s DNS servers, but these don’t always offer optimal privacy.
DNS4EU is a European DNS service backed by the European Commission, designed to :
Protect your personal data,
Secure your online browsing,
Deliver reliable performance through a robust European infrastructure.
Switching your Freebox’s DNS to DNS4EU is a simple yet powerful way to boost your everyday cybersecurity.
How to Set Up DNS4EU on Your Freebox: Step-by-Step
Here’s the method recommended by Ariovis experts to configure DNS4EU on your Freebox in just a few minutes.
1. Log In to the Freebox Management Interface
First, ensure you’re connected to your Freebox network. Open a web browser and go to:
http://mafreebox.freebox.fr
Log in using your Freebox password. If you’ve never changed it, it’s displayed on your Freebox Révolution (touchscreen) or written in your contract.
2. Go to Network and DNS Settings
Once logged in :
Click on Freebox Settings,
Then open Port Management and Local Network, or directly DHCP, depending on your Freebox version,
Locate the DNS server configuration fields.
3. Configure DNS4EU servers on your Freebox
Here are the 5 official DNS4EU addresses you can set on your Freebox for enhanced privacy and network security:
In your Freebox interface, go to Advanced Settings > Network.
Find the DNS Servers section, and replace the existing values with the five DNS4EU addresses above.
Save your changes and restart your Freebox and connected devices to apply the new DNS settings.
These five servers (two IPv4 and three IPv6) offer a more secure, reliable, and privacy-respecting browsing experience, fully aligned with European standards.
Need more help? Check out our full tutorial to guide you through the setup based on your Freebox model (4, 5, or 6).
4. Save and Restart
Save your changes. To apply the new settings, restart your Freebox and all connected devices (computers, smartphones, etc.).
Verify Your DNS4EU Configuration
To check whether your Freebox is using DNS4EU, you can run a quick test:
If the DNS server shown matches 51.81.216.60 or 51.81.216.70, you’re all set.
Ariovis: Your Cybersecurity Partner for Safer Browsing
Switching your DNS servers is a crucial first step toward improving your home network’s security. At Ariovis, we support individuals and businesses in their cybersecurity efforts, from access management (IAM) to securing IT infrastructure.
To further protect your digital environment, feel free to contact us or visit ariovis.fr to discover our services and expert advice.
Conclusion
Installing DNS4EU on your Freebox is a simple and effective way to boost your online privacy and security. Follow Ariovis’ guide for a smooth setup and enjoy a safer internet experience thanks to a trusted European DNS provider.
Want to learn more about cybersecurity or get personalized guidance ? Ariovis is here to help.
Important information This article is currently being updated. Some steps may no longer match your device’s current interface. We invite you to consult Orange’s official support page.
Additional articles on configuring DNS4EU on Windows, Android, macOS and iPhone will be published soon.
Are you an Orange customer looking to enhance the security and privacy of your internet connection? Installing DNS4EU on your Livebox is a simple and effective way to protect your browsing. At Ariovis, experts in cybersecurity and access management (IAM), we’ll walk you through how to configure DNS4EU on your Livebox.
Why configure DNS4EU on your Livebox ?
The DNS server is a core component that translates domain names into IP addresses. By default, the Livebox uses Orange’s DNS servers, which don’t always offer optimal privacy guarantees.
DNS4EU, a European DNS service supported by the European Commission, provides:
Better protection of personal data
Secure browsing
A reliable and high-performing European DNS infrastructure
By setting up DNS4EU on your Livebox, you can browse the web more securely with a DNS service that respects your privacy.
How to install DNS4EU on your Livebox?
Here are the steps recommended by Ariovis experts to configure DNS4EU on your Livebox :
1. Access the Livebox management interface
Connect to your Livebox network (Wi-Fi or Ethernet)
Open a browser and go to:
http://192.168.1.1
Log in with your credentials (the default password is printed on your Livebox label)
2. Access DNS settings
In the main menu, click Advanced Settings
Then go to the Network or DNS Configuration section
Configure DNS4EU servers on your Livebox
Here are the 5 official DNS4EU addresses you can set on your Livebox for enhanced privacy and network security:
In your Livebox interface, go to Advanced Settings > Network.
Find the DNS Servers section, and replace the existing values with the five DNS4EU addresses above.
Save your changes and restart your Livebox and connected devices to apply the new DNS settings.
These five servers (two IPv4 and three IPv6) offer a more secure, reliable, and privacy-respecting browsing experience, fully aligned with European standards.
Need more help? Check out our full tutorial to guide you through the setup based on your Livebox model (4, 5, or 6).
4. Save and restart
Save the changes
Restart your Livebox and connected devices to apply the new DNS settings
The response should show a DNS server address matching DNS4EU (51.81.216.60 or 51.81.216.70)
Ariovis, your expert in cybersecurity and access management
Configuring DNS4EU is a first step toward securing your home network. At Ariovis, we help both individuals and businesses with their cybersecurity and Identity & Access Management (IAM) strategies.
For personalized support, contact us or visit our website : ariovis.fr.
Conclusion
Installing DNS4EU on your Livebox is a simple and effective way to strengthen your online privacy and browsing security. Follow this Ariovis guide for a quick setup and enjoy a European DNS service that protects your data.
OpenID Connect is an identity layer built on top of the OAuth 2.0 protocol. It allows applications to verify the identity of users based on the authentication performed by an external provider. This is especially useful when you want to secure applications without managing your own user credentials. Keycloak is an open-source Identity and Access Management (IAM) solution that makes it easy to set up a robust OpenID Connect provider.
In this article, we’ll discuss how to connect your own python flask application to any OpenID Connect provider and how to configure your own with Keycloak. You’ll configure a Keycloak server, register an OIDC client, and build a simple Flask application that authenticates users through Keycloak using industry-standard protocols.
By the end of this guide, you will have:
A working Keycloak instance running in Docker
A Flask application secured with OpenID Connect
A complete login and logout flow
A structured and scalable Flask project architecture
This setup is ideal for developers looking to add authentication to their Python web apps using modern identity standards.
Prerequisites
Before you begin, here are the basic prerequisites to use this guide:
With both tools in hand, we can safely start our project.
Understanding what is Open ID Connect ?
If you are already familiar with OpenID Connect, you can pass this section. If you aren’t or want a refresher on the concept, this section will give you a quick overview of how OpenID Connect works, why it’s useful, and what role it plays in securing your application.
So OpenID Connect is built on the open Oauth2 protocol. It is a globally adopted web standard used by major tech players like Google, Microsoft, and Apple. It enables user identity verification by relying on the identity and authentication services of an external provider.
This approach eliminates the need for a dedicated user database, simplifying the way you implement authentication and authorization in your apps.
Fully interoperable, OpenID Connect operates through a RESTful HTTP interface with JSON formatting. Chances are, you already use this standard daily—any time you click a “Sign in with Google” button instead of entering separate credentials, you’re leveraging OpenID Connect.
Now, if you aren’t familiar with Oauth2 protocol either, here is the detailed flow of information that happens when you use OpenID Connect.
When you log into the service, you are first redirected to the provider to authenticate with your account. A code or proof of authentication will be given to you in exchange, which you will give to your service. This service can then exchange the code for a token with the provider, which will represent your identity.
Each time the service will need to get information about your profile, it will ask the provider for the information and give you access to resources accordingly to your identity.
This is called the authorization code flow of OpenID Connect. By this design, the token is never exposed to the frontend, reducing the possible angle of attacks and identity thefts.
What is Keycloak ?
Keycloak is a fully open-source identity and access management solution that provides all-in-one support for authentication and authorization. Designed for flexibility, it enables developers to secure applications with minimal effort, offering features like single sign-on (SSO), social login, and user management out of the box.
We will use Keycloak to play the role of the Identity Provider in our project. With it, you will be able to create and manage your users, fully customize the authentication flow and link your users to all your projects faster. This solution is also lightweight and scalable thanks to its clustering ability if you plan to implement it on bigger projects.
All configurations will be done through this admin console, so no specialized skills are required to use it.
Configure Keycloak
The first step of this guide is the configuration of Keycloak. For this we will use Docker as this facilitate the installation step.
To work, Keycloak need to store its data in a database. For this article, we will use Postgres, but you can use any database in the following list:
To orchestrate all configuration, we will use the following docker-compose.yaml:
This file is the configuration of your Keycloak and Postgres environment, be sure to change the user and password parameters accordingly to your preferences.
Run the following command to launch a basic instance of Keycloak on your machine.
docker-compose up
Once the container is fully started, you can access the admin console at the following address: http://localhost:8080. You can connect to the administration console and should get to this page:
From this console, you can administrate all your connexion, users, clients, and more…
First we will create a realm for our app, for this you can click on the list of realms on the top left. We don’t have a current configuration so we will just create an empty one. For this article I will name it demo-openid-connect.
In Keycloak, a realm is like a container that holds all the users, applications, and settings for a specific project or environment.
The next step is to configure an OpenID client that Python will use to connect with Keycloak. In you newly created realm, go to client and create a new one.
You will need to configure the following parameters:
client type : OpenID Connect
You can choose between SAML or OpenID Connect, in this article we will focus on OpenID Connect.
client id : 7f3c2e10-8c1a-4c71-89f2-f0bb72e536f4.
The id of your client, it will be needed later to connect to it. You can choose anything, for this example I chose a random uuid.
ame : open-id-client
The name of your client. This is only use to identify your client on keycloak, you can choose anything.
client authentication : toggle to true
Enable to authorize opined flow on this client.
root url : http://localhost:8081
The root url of you application. For this example we will use a local instance on port 8081.
home url : /
The home of the application, since our application will be at the root url, we will just put ‘/’. If you want to run it under a specific path, you can update this
alid redirect urls : *
For this example, we will allow any url from our domain to act as a redirection from our client. In production, you should change this to a more specific url to restrict your client to your own application only.
Finally you will need to configure a secret for your client. For this you can go in the credential tab and copy it. It should look like something like this: 961jZtg26dDrLcUacShPyYRvUEAhQEA4.
This secret is the proof your app will use to authenticate to keycloak. You have to be careful not to share it and save it in an unaccessible place like a secret manager or an environment file.
You can also configure custom roles for your application if you need to:
Switch to python
Our keycloak is now ready for our Python application to use. We will now build our python application. For this we will use Flask, be aware you can use any other http server for this.
What is Flask ?
Flask is a minimalist web framework written in Python. It allows you to quickly spin up a web server and expose endpoints for your application. It’s lightweight, simple to use, and well-suited for building REST APIs or small web services.
Here’s a basic example of a Flask application:
In this example we launch a web server and create an endpoint at the path /. To run this application, simply save it in a file (for example app.py) and execute it with Python:
python -m pip install Flask
python app.py
You can now go on your chosen web navigator to http://localhost/. You should see the text Hello, world!.
The power of Flask is to render html template and inject your own data. We will update our script a little bit to make a basic example, but first we will need to organize our project a little bit.
If you followed every steps, you should have something like this:
The recommended structure we will use for a Flask project is the following:
Description :
App : This folder is the root of your project. Everything related to Flask will be placed inside.
__init__.py : This file name convention from python allow us to use directory paths directly as path for the python file inside it like it would work with index.html on the web. The one at the root will contain the configuration of your Flask app.
routes.py : This file will contains every endpoint in the folder and implement the logic behind. In bigger project you could place the logic in a dedicated services.py file.
config.py : This file will contains the configuration of your Flask app and import your environment variables.
Extensions : This folder will contain all python script you need in your app that isn’t directly related to Flask like a database connexion for example.
Main : This folder contains all main endpoint of our app.
Templates : This folder contains all html files that will be used by Flask and need data injection.
Static : This folder contains all static data of our project, such as images, css, script, and more.
To execute our app we will now execute the following command:
flask –app app run –debug –port=8081
The content of each file will look like this:
app/__init__.py
config.py
app/main/__init__.py
app/main/routes.py
app/template/index.html
app/base/base.html
There are a lot of new concept here:
First Blueprint. In Flask, you can create Blueprint to group your endpoints. Each folder with routes will represent a Blueprint in our project. For now we only need the main one.
Second Templates, as aboded before you can use template in Flask made from html and Jinja2. To learn more about it, you can check the Flask documentation. In this project we have two html file :
base.html : It will contain everything we want to share between our page such as tailwind import in our case.
index.html : This will contains the content of the home page of our app.
To launch your newly created app you can use the following command:
flask —app app run —debug
You can see the result of your application at http://localhost:8081/.
Know that you are familiar with Flask and project organization, we will start to develop the OIDC connector to Keycloak !
Implement OIDC with Flask
We will now implement Open ID Connect in our application. For this we will use the oic python library.
First we will put our environment variable in our config. For this you will need to add this to your config.py.
.env
Replace the appropriate variable with you own data. AUTHORITY represents the base url of your keycloak Open ID server. REDIRECT_URI represents the endpoint we will use in the future for our Open ID Connect flow.
The identity class
To easily reuse our identity script that will manage the Open ID logic, we will create a static class.
Here is the base of our class:
app/extentions/identity.py
This class define a OpenID client and configure it with our environment. provider_config and store_registration_info will give the necessary information to our client to fetch all data it need to learn the urls of our keycloak endpoint.
We will now implement each step of the OIDC flow:
1. Get login url
To connect, the user will need to build an url with all informations about the connection request. This url is specific to each connexion and must give to keycloak:
The redirection url of the request
The authentication method and response type
The scopes the user want to access
State and Nonce, two random strings to identify the request
For this we will use the power of the oic that will make this much faster.
app/extensions/identity.py
2. Get the authentication token
The next step of the Open ID Connect flow is to retrieve the token of the user from the provider. For this we will once again make use of the oic library. This time we only need to send the following information to the provider:
The code given by the user, proof of his authentication with the provider
The redirect_url from which the server retrieved the code
In this function, we will make a request to the provider with all information given from our client. We must create the Grant and add it ourself to the client for the request to be a successful. This retrieved token will be the proof of identity of our user.
We now have all we need to start implementing our endpoints and test out our OIDC.
3. Testing the authentication flow
For this we will create dedicated routes in a new folder with the two following files
app/auth/__init__.py
app/auth/routes.py
In this code we define two endpoints which will be used by our clients to follow the identification flow. The first one will redirect our client to the provider with the appropriate information. The second one will retrieve the token from the callback of the provider.
Just before testing our program we need two small update to our app:
First we need to add our new blueprint to our app
app/__init__.py
Next we need add parameters inside our configuration to use flask session
config.py
You will also need to install Flask-Session as dependency. You can use the following command:
pip install Flask-Session
When going to http://localhost:8081/auth/login, you should be redirected to your keycloak and see the following:
To finish our test we will need to add a user inside the keycloak console. Go to the user tab and add one:
You will also need to set a password from the interface. For this go inside the credentials tab. Return to your app and connect with your user. If everything went fine you should be redirect to your Home page.
If you try to input different information than the one previously used, you will notice that nothing change. The login flow worked, but we don’t access the user information yet. This will be the final step of our guide. If you are curious, you can open the dev console of your navigator and see that you have a cookie session which was created by our authentication flow. For security purpose, we choose to hide the real access token from the client and only give him a reference to the data. This helps avoiding attacks such as token hijacking with an XSS vulnerability in your app.
4. Get the user information
All we need now is to be able to retrieve information about our user when he his connected to our app. For this we can call the user information endpoint of our provider with the do_user_info_request method of our oic client. The code will look like this:
app/extensions/identity.py
To use this method, we need to give the token to the request. For this we choose to use a property which will try to get the access_token from the session. Since we only use this class with static method we will need to define a static property.
app/extensions/identity.py
Each time we access our access_token, the script will try to get the token from the session or return nothing.
We can now update our home page to display our user information:
app/main/routes.py
app/templates/index.html
And that’s it! the application finally display our user’s informations correctly. 🥳
To go further
While we finished our authentication flow, you may want to add more functionality such as logging out or protecting endpoint with authentication.
For this we will add the following to our Identity class:
app/extenstions/identity.py
This code will use the oic library to end the session on keycloak and will clear the session on the client side. You can now call this function in your code or create a dedicated endpoint like this:
app/auth/routes.py
For the second part, the best way to secure any endpoint easily is to write a decorator that will do every check for you:
app/extensions/identity.py
You will just need to put this decorator on any route you want to protect and it will be inaccessible to the client if he doesn’t login first. It will also add the user information as an optional parameter from you function on call. This way you will be able to directly retrieve the information of the user without calling the get_user_info function yourself. Example:
By following this tutorial, you’ve successfully configured Keycloak as an OpenID Connect provider and integrated it with a Python Flask application. You created a secure authentication flow, retrieved user information, and added logout functionality. You also learned how to structure a Flask application for scalability and maintainability.
For production environments, don’t forget to:
Secure secrets and sessions properly
Enable HTTPS
Use strict redirect URI validation
Implement token expiration and refresh handling
With these foundations in place, you’re ready to extend your app with protected APIs, role-based access control, and much more. 🚀